Basic Rider Skills Practice Exercises
Feb 14, 2010 15:44:33 GMT -5
Hilo Rider, Scootrific, and 1 more like this
Post by 90GTVert on Feb 14, 2010 15:44:33 GMT -5
Skills Practice
Skills practice can be a great way to learn to control your scooter better and possible avoid accidents and injuries in the future. It is also very helpful if you plan on taking a skills test to obtain a motorcycle license. This page contains exercises that I feel are useful for anyone wishing to improve their riding ability or just brush the dust off after long periods without riding a two-wheeler.
**Please wear all the proper safety gear when you ride and practice. A helmet, gloves, armored jacket, riding pants, and proper footwear can all help you avoid injury in the event of a fall or crash. Use these exercises at your own risk.**
Many of these practice layouts require the use of cones or other objects to use as markers or to navigate around. You can pick up practice cones from sporting goods stores for reasonable prices. I paid $0.50 each (on sale) for my cones from SoccerSupplies.Com. Sidewalk chalk is a great way to mark lines on the ground. Be courteous and always clean up your mess. Never mark the parking lot or whatever you are practicing on with anything permanent or semi-permanent.
Slow Speed Control
This exercise is good for learning to control your scooter or motorcycle at low speeds. You will appreciate this skill in stop and go traffic and parking lots.
Lay out a box about 2ft wide by 60ft long. Bring the scooter to a stop a few feet in front of the box, lengthwise. Start off slowly and enter the box. Travel as slowly as you can toward the other end of the box without putting a foot down or touching the lines or markers on either side. This exercise is best with a friend around to time you. Begin timing when the front tire crosses the line to enter the box and stop timing when the rear tire exits the box at the other end. You should be able to take at least 12 seconds. The higher the time, the better.

The Cone Weave
This is a very basic exercise that is on a lot of motorcycle skills tests and practiced in most motorcycle safety courses. The cone weave helps you learn slow speed turning and balance.
Set up 5 or more cones in a straight line. For beginners, the cones should be about 12ft apart at first. Navigate your scooter through the cones as shown below. You should be able to do this without falling, hitting any cones, or putting a foot down. Asyour skill improves, move the cones closer together to challenge yourself. You can try increasing speed as well. You should be able to move the cones to 10ft apart or less eventually.

Obstacle Avoidance
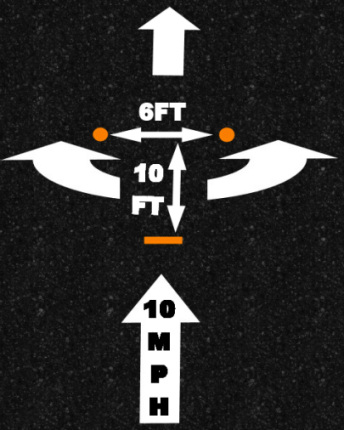
This practice exercise is great for learning to maneuver your scooter at slightly higher speeds than some of the other exrecises. It simulates avoiding an object with a limited reaction area.
Place a marker line on the ground. Measure 10ft from the line you just marked and set up 2 cones, 6ft apart from each other. Approach the line on the ground and do not swerve to avoid the obstacles until your front tire has crossed the line. You can swerve to the left or right, and I would suggest practicing both. Start off slow, and you should be able to work your way up to 10MPH or better approaching the marker line.

Obstacle Avoidance #2
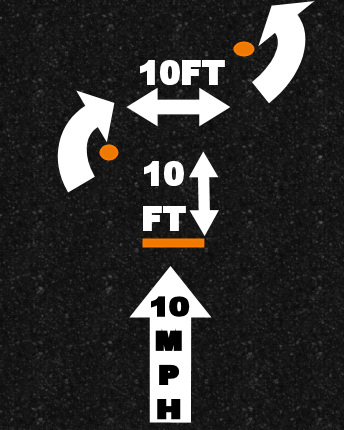
This exercise is a slightly more difficult version of the obstacle avoidance exercise above. Try this one once you have the first one down.
Setup the course much like you did in the previous exercise, but stagger the 2 cones so that one cone is about 12ft behind the other and they are still 6ft side to side as shown in the diagram. Once again, approach the line and do not begin to swerve until your front tire crosses the line. Swerve around both cones. As your skills improve you can move the cones farther apart side to side or closer together lengthwise to make the exercise more difficult. You should be able to have the cones 10ft apart each way once your skills improve.

Tight Turn
This exercise is great for learning how to control your turns. Some people pick this one up very easily and others find it difficult at first.
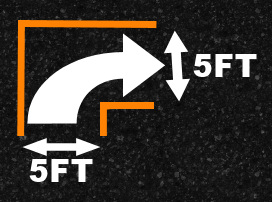
Use cones or mark out a 90 degree turn that is 5ft wide as shown. You may increase or decrease this width as necessary. Approach the box at roughly 5MPH and negotiate the turn without hitting the markers, falling, or putting a foot down. You should be able to work your way to 5ft or less in width and increase speed as you progress.

Controlled Stop
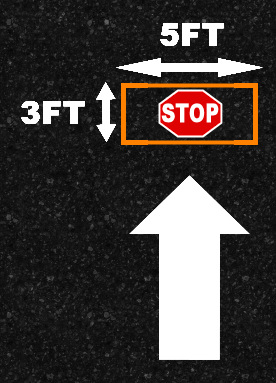
This exercise helps new riders learn control when braking. Mark a 3ft by 5ft box on the ground. Approach the box and apply your brakes so the front wheel stops inside the box, without touching any of the lines. Start out at 5-10MPH. You can decrease the size of the box or increase the speed as your skill improves.

Circles
This exercise needs no diagram. Most sites and courses suggest setting up a U-turn box to practice tight turning. I prefer to simply ride in circles. It does a good job of teaching slow speed balance. Start out riding slowly in a large circle. As skill improves, make the circle smaller and smaller. Eventually you should be making a tiny circle. If you wish to practice a U-turn, once you have learned to ride in very small circles, just ride straight and make a half circle. Make sure you maintain control at all times. Practice until circles and U-turn come naturally.
Here are some clips from when I was practicing for my motorcycle skills test that may give you more ideas :
Skills practice can be a great way to learn to control your scooter better and possible avoid accidents and injuries in the future. It is also very helpful if you plan on taking a skills test to obtain a motorcycle license. This page contains exercises that I feel are useful for anyone wishing to improve their riding ability or just brush the dust off after long periods without riding a two-wheeler.
**Please wear all the proper safety gear when you ride and practice. A helmet, gloves, armored jacket, riding pants, and proper footwear can all help you avoid injury in the event of a fall or crash. Use these exercises at your own risk.**
Many of these practice layouts require the use of cones or other objects to use as markers or to navigate around. You can pick up practice cones from sporting goods stores for reasonable prices. I paid $0.50 each (on sale) for my cones from SoccerSupplies.Com. Sidewalk chalk is a great way to mark lines on the ground. Be courteous and always clean up your mess. Never mark the parking lot or whatever you are practicing on with anything permanent or semi-permanent.
Slow Speed Control
This exercise is good for learning to control your scooter or motorcycle at low speeds. You will appreciate this skill in stop and go traffic and parking lots.
Lay out a box about 2ft wide by 60ft long. Bring the scooter to a stop a few feet in front of the box, lengthwise. Start off slowly and enter the box. Travel as slowly as you can toward the other end of the box without putting a foot down or touching the lines or markers on either side. This exercise is best with a friend around to time you. Begin timing when the front tire crosses the line to enter the box and stop timing when the rear tire exits the box at the other end. You should be able to take at least 12 seconds. The higher the time, the better.

The Cone Weave
This is a very basic exercise that is on a lot of motorcycle skills tests and practiced in most motorcycle safety courses. The cone weave helps you learn slow speed turning and balance.
Set up 5 or more cones in a straight line. For beginners, the cones should be about 12ft apart at first. Navigate your scooter through the cones as shown below. You should be able to do this without falling, hitting any cones, or putting a foot down. Asyour skill improves, move the cones closer together to challenge yourself. You can try increasing speed as well. You should be able to move the cones to 10ft apart or less eventually.

Obstacle Avoidance
This practice exercise is great for learning to maneuver your scooter at slightly higher speeds than some of the other exrecises. It simulates avoiding an object with a limited reaction area.
Place a marker line on the ground. Measure 10ft from the line you just marked and set up 2 cones, 6ft apart from each other. Approach the line on the ground and do not swerve to avoid the obstacles until your front tire has crossed the line. You can swerve to the left or right, and I would suggest practicing both. Start off slow, and you should be able to work your way up to 10MPH or better approaching the marker line.

Obstacle Avoidance #2
This exercise is a slightly more difficult version of the obstacle avoidance exercise above. Try this one once you have the first one down.
Setup the course much like you did in the previous exercise, but stagger the 2 cones so that one cone is about 12ft behind the other and they are still 6ft side to side as shown in the diagram. Once again, approach the line and do not begin to swerve until your front tire crosses the line. Swerve around both cones. As your skills improve you can move the cones farther apart side to side or closer together lengthwise to make the exercise more difficult. You should be able to have the cones 10ft apart each way once your skills improve.

Tight Turn
This exercise is great for learning how to control your turns. Some people pick this one up very easily and others find it difficult at first.
Use cones or mark out a 90 degree turn that is 5ft wide as shown. You may increase or decrease this width as necessary. Approach the box at roughly 5MPH and negotiate the turn without hitting the markers, falling, or putting a foot down. You should be able to work your way to 5ft or less in width and increase speed as you progress.

Controlled Stop
This exercise helps new riders learn control when braking. Mark a 3ft by 5ft box on the ground. Approach the box and apply your brakes so the front wheel stops inside the box, without touching any of the lines. Start out at 5-10MPH. You can decrease the size of the box or increase the speed as your skill improves.

Circles
This exercise needs no diagram. Most sites and courses suggest setting up a U-turn box to practice tight turning. I prefer to simply ride in circles. It does a good job of teaching slow speed balance. Start out riding slowly in a large circle. As skill improves, make the circle smaller and smaller. Eventually you should be making a tiny circle. If you wish to practice a U-turn, once you have learned to ride in very small circles, just ride straight and make a half circle. Make sure you maintain control at all times. Practice until circles and U-turn come naturally.
Here are some clips from when I was practicing for my motorcycle skills test that may give you more ideas :

