|
|
Post by sai on Jul 11, 2015 18:15:04 GMT -5
"my pilot is too rich which leans out the main he said." I don't really understand how that makes any sense sorry lol 10,000 miles is really good for a 70cc kit. I'd just replace the whole thing Yea, he said that it's a dellorto carb thing and he found out about it the hard way. So even though there's no scoring on the cylinder wall ( I added the X-hatch just now) it could be the cylinder and piston themselves are pretty much worn but can't be seen to the naked eye? |
|
|
|
Post by niz76 on Jul 11, 2015 18:15:17 GMT -5
Boy o' boy- sounds like it's time to get serious! If it were me I'd drop the engine and get meticulous about checking out your cylinder. This is how I build 99% of engines- I've rebuilt a ton and they all seem to run great (I learned everything here BTW) . #1 Pull the cylinder off and check your ring end gaps #2 Hand hone the cylinder #3 Set the cylinder up correctly- by this I mean check your ring gaps and squish clearance! I typically re-install cylinders with NO base gasket- just Permatex Ultra Grey MotoSeal1. (notice that it's different than the typical Permatex Ultra Grey). 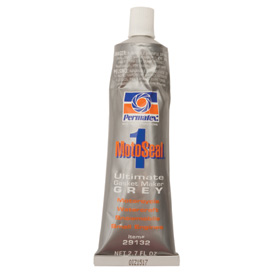 You may want to do a dry run- or dry setup before sealing everything up. Your main goal is to get your squish clearance as tight as possible- but not too tight of course. You're looking to get as close to .6mm as possible but not much tighter than that. In my experience most cylinder/head combo's are designed pretty loose but I have come across a very few that are not. Time to step it up to the next notch of engine building and use your calipers on everything here! Put the cylinder on with no base gasket. Now rotate the piston up to TDC- is it sticking out of the cylinder noticably?? Probably not- in my experience anyway. OK, now put your Cylinder head on with NO gaskets and NO sealant at this point. You should have NO gaskets installed anywhere at this point... Now, tighten the cylinder head nuts down- don't worry about installing your exhaust right now. Now, turn the crank slowly by hand- with the spark plug installed- does it turn all the way through with the piston going up and down up and down without hitting anything?  Hopefully it is. Now you'll need to check your squish clearance! Do this; mentally picture your piston at Top Dead Center with no base gaskets installed on your cylinder- ok, now imagine you put a base gasket in- that would move the cylinder "up" while the piston remains in the same place... now imagine adding 10 base gaskets! Now your cylinder has moved significantly "up" but the piston of course stays in the same place. Result: There's more space between the top of the piston and the bottom of the cylinder head. This is your squish clearance. Now mentally take the 10 base gaskets out- cylinder goes back down, there's significantly less room between the top of the piston and the bottom of the cylinder head. Use the method Brent shows in the vid to measure your squish clearance with a piece of thick solder. I have taken an engine that had low compression- 90 psi just like yours- and by hand honing and manipulating the squish clearance from a (very wide) 1.4mm down to .7mm and brought the compression up to 140 psi! Your squish clearance is VERY important! If you can set your engine up this way- with no base gasket and no head gasket and get your squish clearance as close to .6mm as possible- you'll have greatly improved compression and a much stronger running engine! Welcome to the world of performance scooter tuning! lol. Seal the cylinder head with copper spray instead of a head gasket.  RECAP: I don't recall if you've ever told us what your squish clearance is?? Can you start out by measuring your current squish clearance and let us know what it is? (Very easy0 just take out your spark plug and insert a piece of solder like Brent shows in the video and use either e-start or the kickstart to squish the solder and then measure it with calipers. In my experience, if it's real easy to squish the solder and it's barely squished- your squish clearance is too wide. If it takes more effort to squish the solder (I always use the kickstarter with my hand) and the solder is squished pretty flat, then you're getting closer! Squish clearance is VERY important in our performance 2t's and can make a HUGE difference in your compression and power! |
|
|
|
Post by sai on Jul 11, 2015 18:19:44 GMT -5
 this is how the cylinder wall looks like and I notice there's around 1-2mm of black ring that feels like carbon on the edge of the cylinder |
|
|
|
Post by niz76 on Jul 11, 2015 18:40:44 GMT -5
That cylinder is still very useable! Trust me I have run MUCH worse! Can you put it together "dry" - with no gaskets- and tell us what the squish clearance is?
|
|
|
|
Post by sai on Jul 11, 2015 19:04:26 GMT -5
I'll try that tomorrow. I don't have anything to check the squish with right now.
Btw, the gasket that is on the cylinder head that looks like a big o-ring is very FLAT and feels like there's no gasket at all.
In the mean time, what can I do about the cylinder and why am I losing this much compression and power?
|
|
|
|
Post by niz76 on Jul 11, 2015 19:08:55 GMT -5
You'll need to check the ring end gaps- that'll tell you a lot of the story. I bought a set of feeler gauges at Auto Zone for $8...
|
|
|
|
Post by sai on Jul 11, 2015 19:11:22 GMT -5
feeler gauge, check. I'll buy that.
What else do I need?
|
|
|
|
Post by 190mech on Jul 11, 2015 19:32:03 GMT -5
Niz said it well!You'll need a piece of solder(the fatter stuff,around 1/8") for squish checking.Might can find somebody to give you a bit that does plumbing,etc..A vernier caliper(Harbor Freight has them super cheap),the sealants Niz posted,along with the feeler gauge..That oughta complete your mini 2T tuners kit for now..
|
|
|
|
Post by niz76 on Jul 11, 2015 19:42:29 GMT -5
That's all you'll need to check the ring end gaps. If the rings are too tight (doubt it) it might be nice to have a set of tiny files that they sell at Harbor Freight. For other tuning purposes calipers are a must! I prefer digital- sooooo much easier to use! Also about $20 at HF if you don't already own one. A good compression tester is pretty much a must-have also. Another subject you've touched on is crankcase leaks. You'll need a leak-down tester for this, and AFAIK it's not something that's even sold- you hafta build one! I recently built one while I gave my engine a complete overhaul and wow- it'd probably be seized right now if I didn't find those crankcase leaks! If you have a Crankcase leak it can throw a total monkey wrench into your carb tuning and make you pull your hair out! Soon you'll be able to (confidently!) completely re-build your engine strong as ever! Check your ring end gaps, give your cylinder a nice "hand hone", set the cylinder up with good tight squish, and spank those race buddies of yours! RECAP: Digital Calipers Compression Tester Feeler Gauges Leak Down Tester ( 49ccscoot.proboards.com/thread/506/make-2t-leak-tester-ways) Eventually you'll want a Degree Wheel also, but that's advanced stuff that comes later- for now, I'd just focus on knowing how to build a strong running engine) 49ccscoot.proboards.com/thread/353/port-durations-degree-wheel-methodsThis can all seem a bit overwhelming, but keep in mind a year ago I was in to electric scooters and didn't know about any of this stuff! A year later and a bunch of 2t engines and I can build a pretty strong running engine out of scarred up cylinders and some chemical sealants. Here's my tool set:  |
|
|
|
Post by Elektrey on Jul 11, 2015 19:48:10 GMT -5
I've used feeler gauges to compare with the solder for squish on my first kit
idk how accurate it was though
|
|
|
|
Post by sai on Jul 11, 2015 19:54:31 GMT -5
Let me go to advanced autoparts and buy the solder and the feeler gauge.
I'll post back in here within 2 hours when I get home.
(thank you btw)
PS: so you are saying I don't need a new cylinder kit and I can just rebuild this kit I have?
|
|
|
|
Post by Elektrey on Jul 11, 2015 20:11:32 GMT -5
or at least try to rebuild it first before you go spending hundreds of dollars on a new kit
|
|
|
|
Post by sai on Jul 11, 2015 21:06:12 GMT -5
I just bought a feeler gauge, 3 stone cylinder hone.
The hone is expensive...
Ps:if you guys look at my photo, you'll see there's a black ring of carbon deposit that's dark on the mouth of the cylinder. Can I measure that for the squish?
|
|
|
|
Post by niz76 on Jul 11, 2015 21:18:31 GMT -5
I just bought a feeler gauge, 3 stone cylinder hone. The hone is expensive... Ps:if you guys look at my photo, you'll see there's a black ring of carbon deposit that's dark on the mouth of the cylinder. Can I measure that for the squish? No- You'll need to do it just like Brent shows to get an accurate reading. |
|
|
|
Post by sai on Jul 11, 2015 21:45:21 GMT -5
Looking for solder now. Is it too late to use the 3 stone hone for the cylinder?  |
|


 Hopefully it is. Now you'll need to check your squish clearance!


