|
|
Post by lobarrett on Aug 16, 2016 5:07:39 GMT -5
My 50cc ET2 Build Project - Exhaust
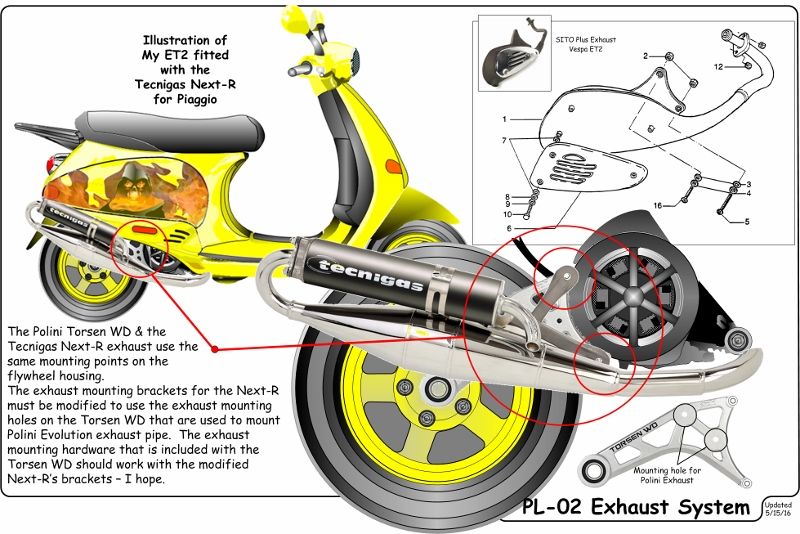
No parts/order list for my exhaust - just one dollar amount for the aftermarket Tecnigas Next R.
Link > to Exhaust Parts List & Cost Link > back to the main build thread
Status:
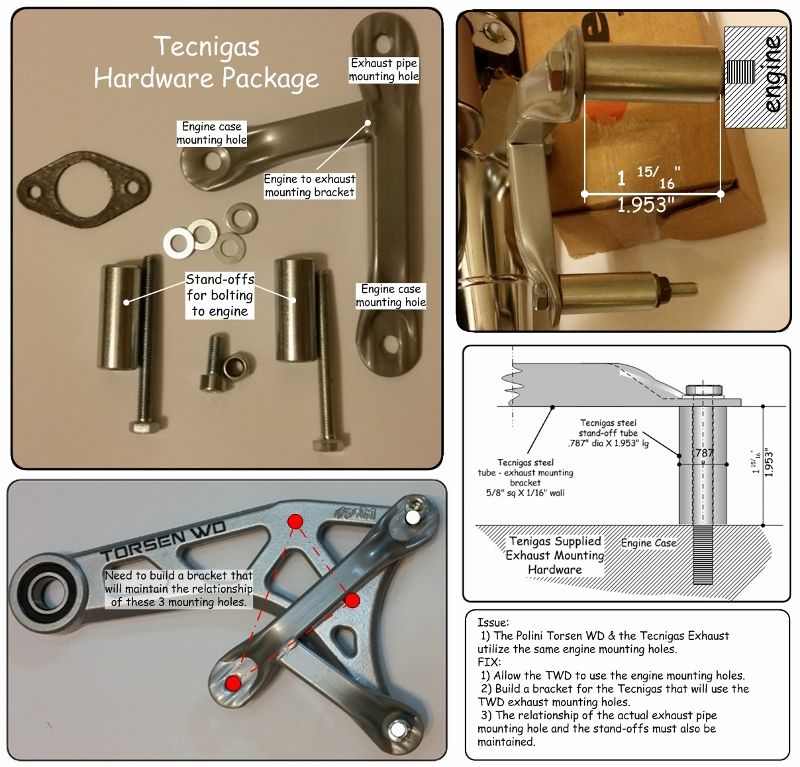
The first issue that I need to over come is the mounting of the Next R when using a Polini WDT. The WDT uses the same mounting holes in the right half of the engine as the Next R does.
Polini designed the WDT with exhaust mounting hole to mount their Polini Evolution exhaust. Of course the standard exhaust mounting bracket that comes with your aftermarket exhaust will not fit. So you will need to modify the WDT or the standard bracket or build some thing different. I went with the - build some thing different.
The WDT has a good set of instructions to go by - the exhaust has "zero". Both have a packet of mounting hardware. Overall, I don't think it's going to be much of a problem after all. With a little cutting and drilling - maybe some welding - I should have a workable solution for mounting the exhaust.
More to come.
Thanks for viewing, larry
--------------------------------------------------------------------------------
|
|
|
|
Post by spaz12 on Aug 16, 2016 22:14:11 GMT -5
Why did you pick that pipe?
|
|
|
|
Post by lobarrett on Sept 30, 2016 17:40:56 GMT -5
Why did you pick that pipe? Way back it had a good performance curve with the Malossi 70cc kit that I bought for my scooter. Now that I changed to a Stage6 MKII Cylinder Kit not sure where it stands. I will hunt down the curves - if memory serves me it has the Malossi and the Stage6 Kits.
I will be interesting to see where it stands how the NextR works out.
Thanks larry
|
|
|
|
Post by 'O'Verse on Sept 30, 2016 17:56:40 GMT -5
|
|
|
|
Post by lobarrett on Oct 9, 2016 19:33:41 GMT -5
My 50cc ET2 Build Project - Exhaust Restrictions
Where to looking for restrictions - ask those that have looked and removed them before.
90GTVert Link > How To : Remove Restrictions In Aftermarket Pipes - A good thread on performing this task.
Got the pipe wrapped up in bubble-wrap so I will put this down as something I need to do.
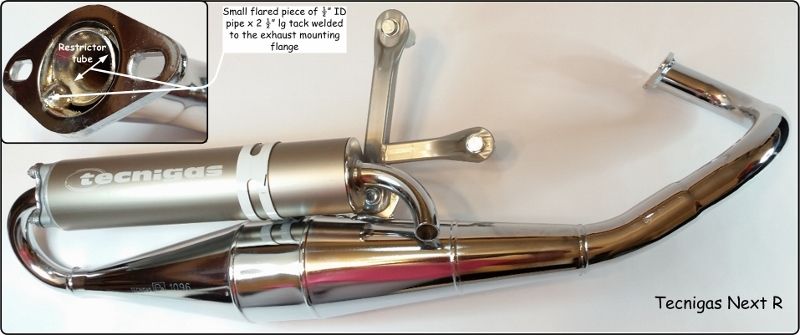
- A small diameter tube in the engine side flange.
- A baffle in the main part of the expansion chamber that can cause a restriction. The baffle also reduces exhaust noise.
For now, I am not going to do anything with this - I want the performance that removing this baffle "might" have to offer, but I do not want a un-necessarily loud pipe.
- A conveyance ring in the pipe at the same location as the restrictor - you might need to check 90GTVert's thread on what this is and if you want to cut this out.
Ronan Alves Link > Alternate way of getting the expansion chamber baffle out with his post to the above thread.
Good way of doing it, but something I am not going with for now.
Lucass2T Link > Yet another restrictor (Yasuni exhaust) that could be in the muffler portion of your pipe.
An article posted back in May of 2012 on Tuning Matters website picked the Yasuni - C16 Kevlar (racing version) as the top performance pipe - power wise. They indicated a city version (homologated) was available but different in performance. I wonder if this difference was the Lucass2T restrictor in the muffler.
The Tecnigas Next R Check - The Next R had the small restrictor tube welded into the engine side exhaust flange.
- Did not have a flange ring.
- Did not check for any baffle in the expansion chamber.
- The muffler restrictor was not an issue with the Next R.
Looks like I will only be dealing with the restriction in the exhaust mounting flange. My Dremel should take care of it.
More to come
Thanks for viewing, larry
|
|
|
|
Post by lobarrett on Dec 9, 2016 6:20:10 GMT -5
My 50cc ET2 Build Project - Removing the Restrictor
Armed with all the above knowledge it was time to undertake the task.
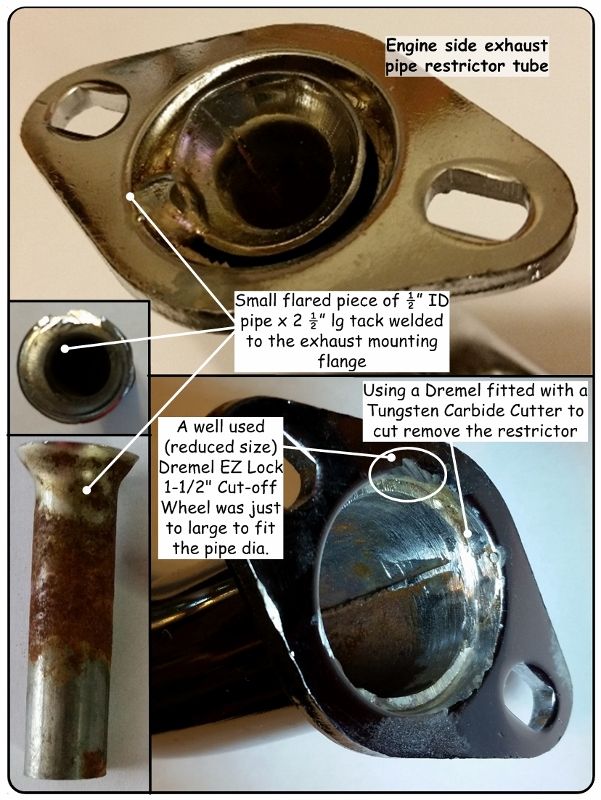
The only restrictor I had to worry about was the one welded into the engine side of the exhaust flange. And, as I stated earlier, I thought this would be a good task for my Dremel. So when I had sometime, I grabbed the Dremel, my favorite attachment the EZ 1 1/2" cut-off wheel, the next R pipe and headed out to the back of my truck (tailgate workbench). That's when I realized that a new 1 1/2" cut-off wheel was just to big to fit the small diameter pipe - so I got a well used one and started to make my first cut which ran into the flange. So the EZ type cut-off wheel wasn't the right attachment.
"This little restrictor is made to stay in the pipe - one extremely hard weld to grind out"
I had other mandrel type cut-off wheels and the Dremel 409 15/16" Cutting Wheel looked like the perfect wheel - only problem - I could not get the screw out of the mandrel. I needed something else. It was going to be a good time to check out some of their other attachments. So I grabbed what I had and headed back out to the truck.
Here's what I tried:
Dremel Attachment List
1-100 High Speed Cutter - for use on wood, plastic and soft metals.
2-84922 Silicon Carbide Grinding Stone - sharpening, deburring and general purpose grinding on harder materials.
3-7105 Diamond Point - wood, jade, ceramic, glass, hardened steel, semi-precious stones and other hard materials.
4-545 Diamond Wheel - cutting, sawing and carving of hard materials, such as marble, concrete, brick, porcelain, ceramics, hard epoxy and soft and hard wood.
5-953 Aluminum Oxide Grinding Stone - general-purpose grinding on metals, castings, welded joints, rivets and rust.
6-9901 Tungsten Carbide Cutter - shapes, smooths or grinds especially hard materials including: hardened steel, stainless steel,
cast iron, nonferrous metals, fired ceramics, plastics and hard woods.
7-EZ406 EZ Lock™ 1-1/2" Cut-off Wheels - Metal cut-off wheel
8-426 1-1/4" Fiberglass Reinforced Cut-off Wheel - cut bolts or screws or make slots in rusted or stripped bolts -
9-409 15/16" Cutting Wheels - cutting metal with limited use on wood and plastic.
And, Here's what worked and what didn't.
Dremel Usability Chart
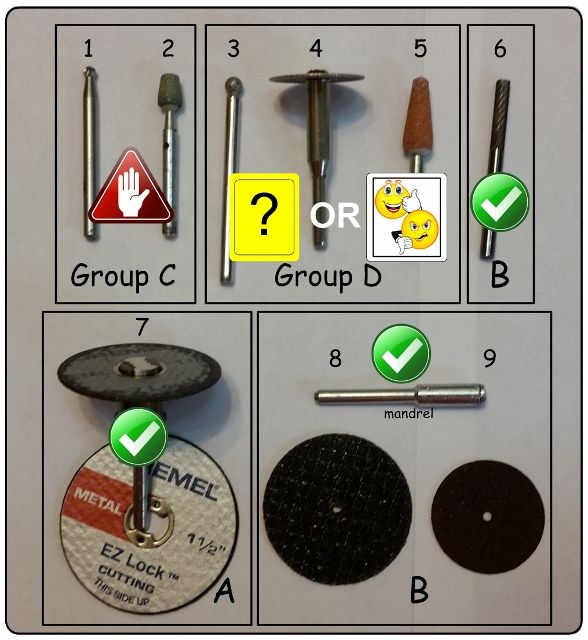
Attachments 3, 4 and 5 might have worked but it would have been slow going - too slow for me.
I ended up using the "Tungsten Carbide Cutter" - It's load and will scare the crap out of you, but it did a fast and reasonable nice job. Used a Dremel drum sander attachment to clean up the pipe and flange.
More to come
Thanks for viewing, larry
|
|
|
|
Post by drc174 on Dec 9, 2016 23:55:12 GMT -5
Certain pipes have issues because of those reasons of space.
Look into the following pipes:
Metrakit SP
Barikit Racing.
They have the silencer the other way around
Therefore, I suggest cutting the silencer off and turning it around, under the body. You will lose some angle possibilities when taking corners, but angle doesnt mean speed.
|
|
|
|
Post by lobarrett on Dec 10, 2016 10:09:21 GMT -5
My 50cc ET2 Build Project - Exhaust Bracket Design
The next photo shows the Tecnigas hardware package. The package includes the engine to exhaust mounting bracket and the 2" long stand-off tubes.
Polini hardware package.
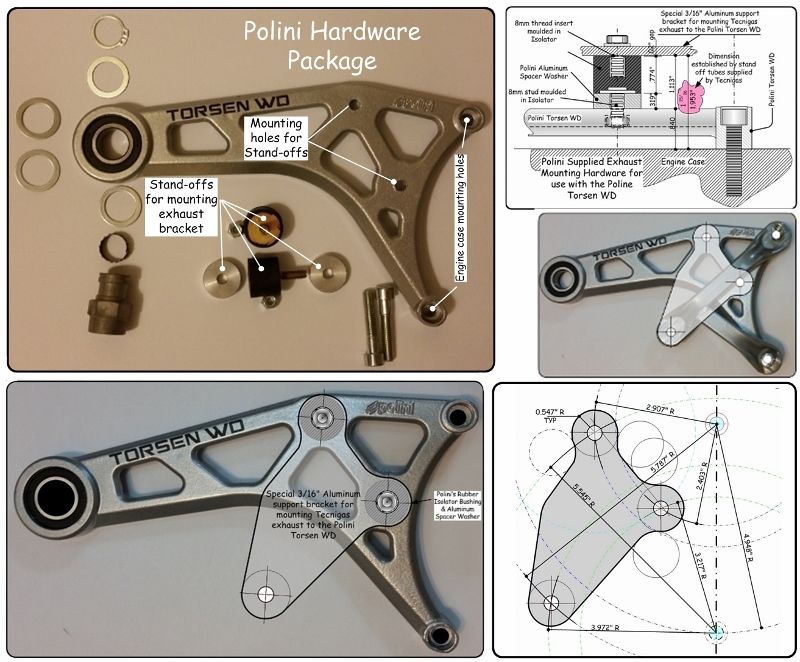
It looks like the Polini hardware will supply just about everything needed to mount my custom made aluminum exhaust support bracket - dropped the idea of modifying the existing exhaust bracket. Based on the above drawing (upper right) - Once the TWD is mount to the engine and rear axle - the Polini spacer washer and rubber isolator can be installed. This combination will bring me to within .02" of the targeted 1.953" (exhaust stand-offs length). Close enough tolerance for exhaust work - I think.
Without access to all my shop power equipment this will be difficult, but not imposable. I should still be able to put this together using my truck's tailgate as a workbench and some basic hand tools - a hand saw, dremel, drill, and file.
The distance (4.948" 4 15/16") between the light blue circles (holes) in the above illustration (lower right) of the DIY aluminum bracket is the distance between the mounting holes on the engine case. I currently don't have my case, so I used the dimensions between the holes in the standard exhaust mounting bracket.
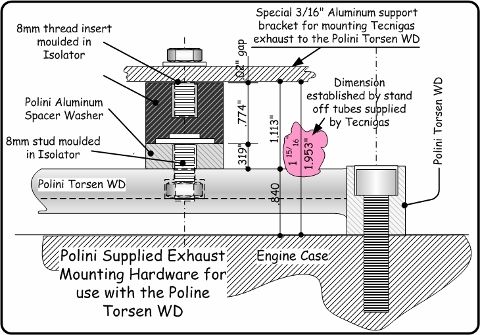
A piece of 3/16" thick piece of aluminum should work as the bracket and will not require any special tools. Just a lot of cutting, grinding, and drilling.
Hope it works.
More to come
Thanks for viewing, larry
|
|
|
|
Post by lobarrett on Jan 9, 2017 17:56:57 GMT -5
My 50cc ET2 Build Project - YET another alternative........................
Just when I get everything worked out exhaust wise for My ET2 Build, I buy another exhaust system and change my whole ride direction. It was a birthday gift to myself.
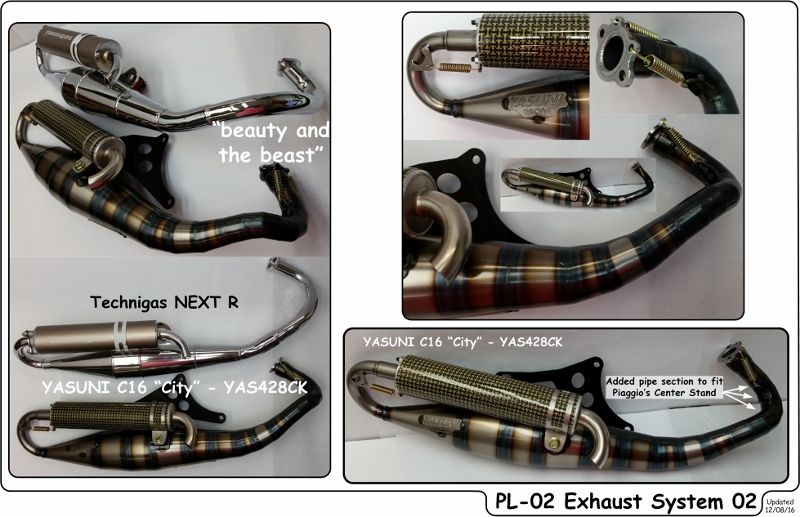
The quality of construction seems to be much higher than the Tecnigas Next R but so was the price.
Got via SIP-Germany. YASUNI Carrera City 16, for Gilera/Piaggio AC/LC w/carbon/polyamide silencer with e-pass - Part # YA428CK
According to PedParts.co.uk, "The Yasuni C16-City exhaust system is the road legal version of the C16-Carrera race pipe. It can be used in conjunction with the centre stand and if derestricted the performance is absolutely identical to the C16-Carrera version."................................." It is shaped very slightly differently to accommodate the centre stand but this doesn't affect performance."
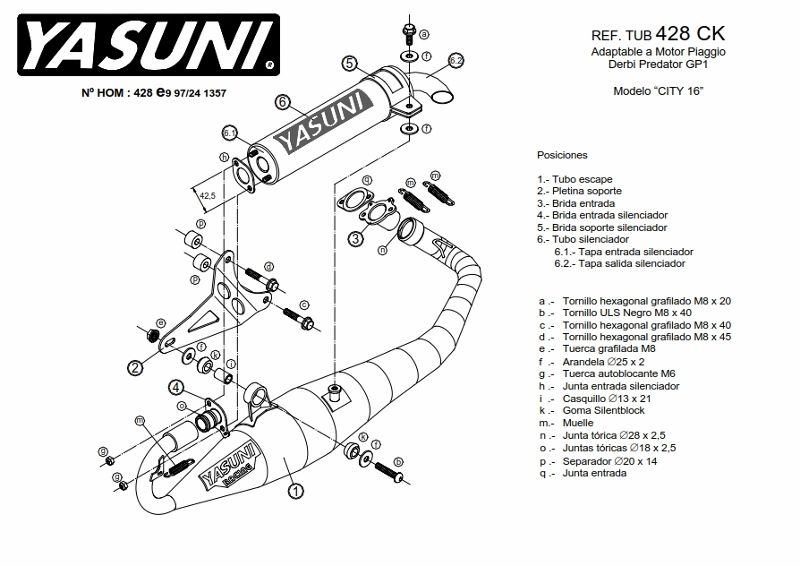
Not sure which way I am going to go -- at least during the first tuning sessions. Guess it would be - whichever would be the easiest to work through the tuning curve that I will be facing. I will have a lot stuff to get working together on this build - none of which I have any experience doing.
But, I think my original riding desires are moving away from the conservative side - to just short of the aggressive side. I will get both pipes ready and just need to see how things roll-out for me over the next few months. If all goes as well as I think it is going to go - I will be able to hit the ground running. In the meantime, my ET-2 Project will AGAIN be on hold.
More to come
Thanks for viewing, larry
|
|
|
|
Post by 190mech on Jan 9, 2017 19:08:03 GMT -5
The Yasuni City 16 is a WAAAAY better pipe than all the TechniGas pipes combined!!  |
|
|
|
Post by spaz12 on Jan 9, 2017 20:03:39 GMT -5
The C16 is also a much better match to the MkII cylinder as well. You made a wise decision!
|
|
|
|
Post by niz76 on Jan 9, 2017 21:32:13 GMT -5
Yeppers! You may have perceived the collective frown from us scoot geeks when you were planning to pair that lowly Technigas exhaust with the MKII. The C16 is pretty much legendary and will operate in the RPM range to let your MKII shine!
Great choice!
|
|