|
|
Post by 90GTVert on Apr 14, 2020 22:23:46 GMT -5
Why not run a filler on each tank and put a vent hose on the top and a crossover hose on the bottom with one petcock? Tubing is cheap. Filler necks are expensive and/or hard to make (for me). Wouldn't really need the vent hose with 2 vented fillers. |
|
|
|
Post by 90GTVert on Apr 14, 2020 22:34:54 GMT -5
I like #4. You could create a reserve system by putting a cutoff valve between each tank and the T fitting. Along with the bottom crossover tube being a couple inches higher on the right tank than the left tank. The valve on the left tank would be left open as the main fuel and the valve on the right tank is closed normally, then opened when reserve is needed which would be the last couple of inches of fuel left in the right tank. Of course, you are not one to ever run out of gas.  I've never liked reserve settings (and generally find fuel gauges unnecessary). If I've had petcocks with reserve, it stays there. I have ran out of fuel when a filter cracked on the 150 and when the tank cracked on T2 long ago and once on the 150 when I didn't realize it only had a 1.0 gallon tank. I think that's it. I'd find a gear oil reserve or gauge more useful. lol |
|
|
|
Post by 190mech on Apr 15, 2020 3:41:48 GMT -5
Maybe a variation here,bias your crossover lines to suit their purpose and tie the petcock into the lower one kind of like in this crappy drawing;  Heck,the vent line could be tee'd into the upper cross over too... |
|
|
|
Post by 90GTVert on Apr 15, 2020 11:25:16 GMT -5
My timing sux. I am looking at using a 2 part clear coat on the tank for the first time, because everything else that I've used on/near scooter tanks is quickly crap from spills. They say not to screw around with this stuff and use a respirator. I'm normally an idiot and do all sorts of dumb stuff with chemicals, but reviews of these 2 parts paints are all basically "seriously, don't try it". Looked up respirators and everything is out of stock unless it's a $150 mask because of COVID. Didn't even cross my mind about paint respirators being sold out and then prioritized for healthcare. Now I'm debating if I should order the expensive ($20/can) 2 part stuff and wait till maybe I can get a respirator in June/July or just annoy myself with another tank that is junk after the first few fill ups. I don't ever make anything pretty, but I don't enjoy watching paint disappear.
|
|
|
|
Post by Kenho21 on Apr 15, 2020 11:34:50 GMT -5
I have an N95 I can send you if you need. Not sure if that will be incredibly helpful for paint fumes or not.
|
|
|
|
Post by Kenho21 on Apr 15, 2020 11:35:50 GMT -5
Better than nothing. That’s what I’ve always used when I painted. New and unused btw.
|
|
|
|
Post by aeroxbud on Apr 15, 2020 11:58:22 GMT -5
I like this project a lot. But it's not easy trying to build something in lockdown.
The nitrous bottle idea would be cool. Especially on a moped.
Enjoyed the videos so far.
|
|
|
|
Post by 90GTVert on Apr 15, 2020 12:56:25 GMT -5
I like this project a lot. But it's not easy trying to build something in lockdown. The nitrous bottle idea would be cool. Especially on a moped. Enjoyed the videos so far. I gave up on painting it like anything. I don't think it's worth the potential hassle. |
|
|
|
Post by 90GTVert on Apr 16, 2020 17:57:48 GMT -5
The other end caps came in this afternoon so I got those welded on. Next time I guess I'll work on a bracket or brackets to mount them (hopefully less crooked than the pic). 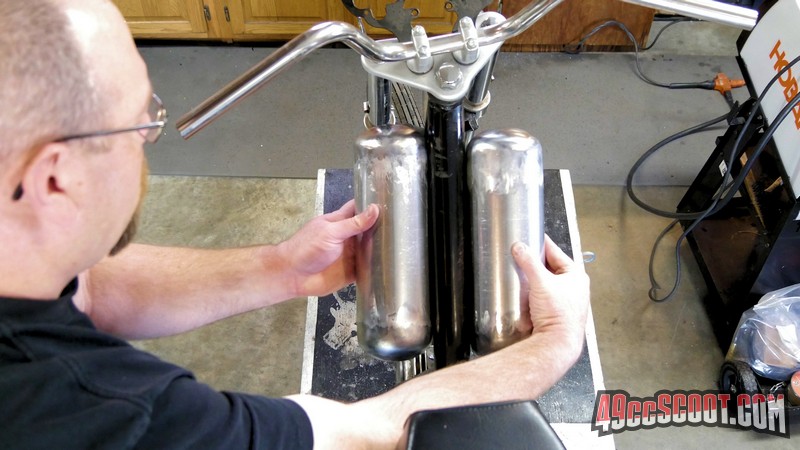 |
|
|
|
Post by 90GTVert on Apr 17, 2020 20:01:17 GMT -5
The bracket is pretty simple. 2" x 8" x 0.125" thick steel. Would have been way faster if I had 2" flat bar, but I ain't going anywhere to get it. I only tacked the bracket onto 1 tank, because I need them separated if I'm going to do a pickup/crossover tube like this. 7/8 OD / 3/4" ID steel tubing, going near center of the tanks where the bottom is when installed. I should be able to put a bung in the center for a pipe fitting so I've only got 1 outlet.  I gotta admit, I'm a bit scared. Trying to drill cylinders (round edges) for a 7/8" hole is not cool and could ruin what I've got done so far. I built a sort of jig to help me drill and get both cylinders aligned as they need to be to match up. I don't have much faith in this. I'm not terribly worried till past 1/2". I have a 3/4" drill bit, but I hate it. That thing grabs like hell every time. Hand drilling, drill press... always grabs hard for me. I don't really want to use it. 1/2" to 7/8" is a lot to rely on a carbide burr when you're trying to make things align and not leave big gaps to fill. I called it a night at that point. Tired and sore. No patience left. Not a good time to get into such a thing. Just getting it aligned took a while. Level here. Level there. Now I moved it forward. In position this way. Level again. Level again. Tighten down. Moved it. Did that about 50 times. It's sitting there all level and aligned now though.    Challenges and being different can be cool to me, but right now I'm even wondering WTF I'm doing. |
|
|
|
Post by 190mech on Apr 18, 2020 4:39:24 GMT -5
A hole saw would make short work of it,would still need a guide though..
Are you planning on rubber hose inter connects for some flexibility?
|
|
|
|
Post by 90GTVert on Apr 18, 2020 8:19:19 GMT -5
A hole saw would make short work of it,would still need a guide though.. Are you planning on rubber hose inter connects for some flexibility? I was initially, but that created a couple of issues. The main one is that they're only ~2" apart. By the time I add barbs of some sort that are long enough to secure a hose, I'll probably have a heck of a time squeezing a 7/8" hose into a tiny gap and getting it started. Then there's also no room for a barb for a fuel outlet left. If I put them on the bottom centers, then I'd have room for that stuff... but by then they'd be running into the carb or intake because I'm already just barely above them. Never thought of a hole saw. I was thinking and end mill would be nice and considering making one kinda like I did with an old valve to cut valve reliefs in a GY6 piston, but that makes sense. Now if only I had a 7/8" saw. Not expensive... just a pain when you try to obey stay at home stuff and 1hr to go grab one turns into days. |
|
|
|
Post by harleyracer59 on Apr 18, 2020 15:55:13 GMT -5
look at a set of Harley fat bob tanks. the only have a petcock on one tank with a equalizer tube at bottom for fluis and one at top for fumes. might help with your design some only have one filler, but the crossover tubes need to be bigger for that
|
|
|
|
Post by 90GTVert on Apr 18, 2020 19:41:04 GMT -5
I picked a good time to need tools, if there is such a thing now. My father had to have some prescriptions today so I did a curbside pickup at Lowe's and got a couple of hole saws and more 1" bar just in case. This would have been ordered from McMaster-Carr, but I figured since I had to go by there anyway, it's not much different than having it shipped. I was thoroughly disappointed when I got there. The place was packed. I was the only person in the pickup area. Hell, I felt bad for even doing this, but I waited about 15 minutes and watched people carrying out potted plants, decorative shelves, mulch, fertilizer, and so on. I'm out here running out of stuff and waiting 3 weeks between grocery pickups because I won't leave the house if I don't actually have to. Lowe's employee showed up with pen and paper to sign (expected contactless) then shoved a 4ft long steel bar in the window of a Mustang with the trunk open. Remanufactured the rig. I had 1" tubing with a 7/8" ID here because I got it from McMaster thinking it would be used for crossovers initially. It worked well as a guide after welding flat bar to the sides since I was drilling a 1" hole through 1" tube.  I drilled both holes and it was surprisingly easy. Thanks again for the hole saw suggestion John. I would have had a long road with drill bits and such. Plus, they may come in handy for occasional tubing notching.  Then I go to put the tube and tanks together and they fit crooked. The tube fit well in each tank, but they were kinda lopsided when assembled. I could flip one tank over so they were more like end to end instead of side by side and the tube went together great. Then I realized my folly. I should have took the top piece from the jig and flipped it around so 1 was drilled from the left and the other from the right side. I drilled as I suspected would work and then it all would go together fine and the angle of the crossover tube matched that of the bracket as I intended... I just had an extra egg shaped hole.  The gap from the cutout was wider than the material itself, but I figured the tank is junk if I don't try to fix so I might as well.  It's not pretty, but it is welded back in. I'd have to use body filler or something if I wanted it to look nice (not just in this spot).   Some of my subscribers are gonna love this video whenever I'm done. 2 big fails so far (this and the filler neck). Surely more to come. All sorts of opportunities to look like a dummy... but I'd rather look dumb than never try and I'm not cool/smart enough to leave out all of my fails. |
|
|
|
Post by Kenho21 on Apr 19, 2020 0:33:02 GMT -5
I picked a good time to need tools, if there is such a thing now. My father had to have some prescriptions today so I did a curbside pickup at Lowe's and got a couple of hole saws and more 1" bar just in case. This would have been ordered from McMaster-Carr, but I figured since I had to go by there anyway, it's not much different than having it shipped. I was thoroughly disappointed when I got there. The place was packed. I was the only person in the pickup area. Hell, I felt bad for even doing this, but I waited about 15 minutes and watched people carrying out potted plants, decorative shelves, mulch, fertilizer, and so on. I'm out here running out of stuff and waiting 3 weeks between grocery pickups because I won't leave the house if I don't actually have to. Lowe's employee showed up with pen and paper to sign (expected contactless) then shoved a 4ft long steel bar in the window of a Mustang with the trunk open. Remanufactured the rig. I had 1" tubing with a 7/8" ID here because I got it from McMaster thinking it would be used for crossovers initially. It worked well as a guide after welding flat bar to the sides since I was drilling a 1" hole through 1" tube. I drilled both holes and it was surprisingly easy. Thanks again for the hole saw suggestion John. I would have had a long road with drill bits and such. Plus, they may come in handy for occasional tubing notching. Then I go to put the tube and tanks together and they fit crooked. The tube fit well in each tank, but they were kinda lopsided when assembled. I could flip one tank over so they were more like end to end instead of side by side and the tube went together great. Then I realized my folly. I should have took the top piece from the jig and flipped it around so 1 was drilled from the left and the other from the right side. I drilled as I suspected would work and then it all would go together fine and the angle of the crossover tube matched that of the bracket as I intended... I just had an extra egg shaped hole. The gap from the cutout was wider than the material itself, but I figured the tank is junk if I don't try to fix so I might as well. It's not pretty, but it is welded back in. I'd have to use body filler or something if I wanted it to look nice (not just in this spot). Some of my subscribers are gonna love this video whenever I'm done. 2 big fails so far (this and the filler neck). Surely more to come. All sorts of opportunities to look like a dummy... but I'd rather look dumb than never try and I'm not cool/smart enough to leave out all of my fails. Looks like it’s coming together nicely! Body filler or maybe even just smear some JB weld over the imperfections? It’s really entertaining to hear some of the suggestions you get. I really liked the one where a guy suggested cooling the motor with cold water, copper tubing, and a fan or something along those lines. LMAO |
|


