|
|
Post by meniscus on Sept 10, 2020 8:45:30 GMT -5
I am the mechanic who had the experience (and tools) to assist a friend who has an Icebear Maddog. Unfortunately, the factory over-torqued the nut for the variator. We ended up having to cut the nut to split it in order to get it off. We tried using a new nut, but the factory had flattened the threads on the end of the shaft. When we put the new nut on, it went on until it hit roughly 1/4" from being tight. At that point, with an impact, the shaft sheared off at the threads.
Since I was going to have to do a complete tear down of the engine and split the case to replace the crankshaft, we decided to move forward on a 72cc big bore kit. While we were at it, I installed several other parts. Being disappointed in the options out there for an oil catch can, my friend elected to purchase an oil catch can rather than me spending the time to fabricate one. The one we bought can be found here: www.amazon.com/gp/product/B07MXBZ58R/ref=ppx_yo_dt_b_asin_title_o05_s00?ie=UTF8&psc=1

It was a little pricey, but it did the trick. The item comes with a block off bolt on the top which I moved to the outlet. Using the NCY Oil Decompression Tube Kit, the tubing slipped right over the fittings without an adapter. I used Derale 13016 Transmission/Engine Oil Hose with a 3/8 inside diameter for the valve cover vent. I simply cut the existing tube on the bike short to make up the difference between the tubing and used a proper hose clamp to hold in place with the larger tubing over it. No leaking.
Here's the result:
It comes with a bracket, but there wasn't a good mounting location. Instead, we threaded the fitting right through a hole I drilled in the plate under the seat in the back. Then it was as simple as connecting the line from the decompression tube and from the valve cover to the catch can, while installing the breather filter on top.
It works flawlessly and no excess oil anywhere. To empty the captured oil and other particulates, it simply unscrews for easy disposal. I'll try to post some more pictures and I'm happy to answer any questions.
|
|
|
|
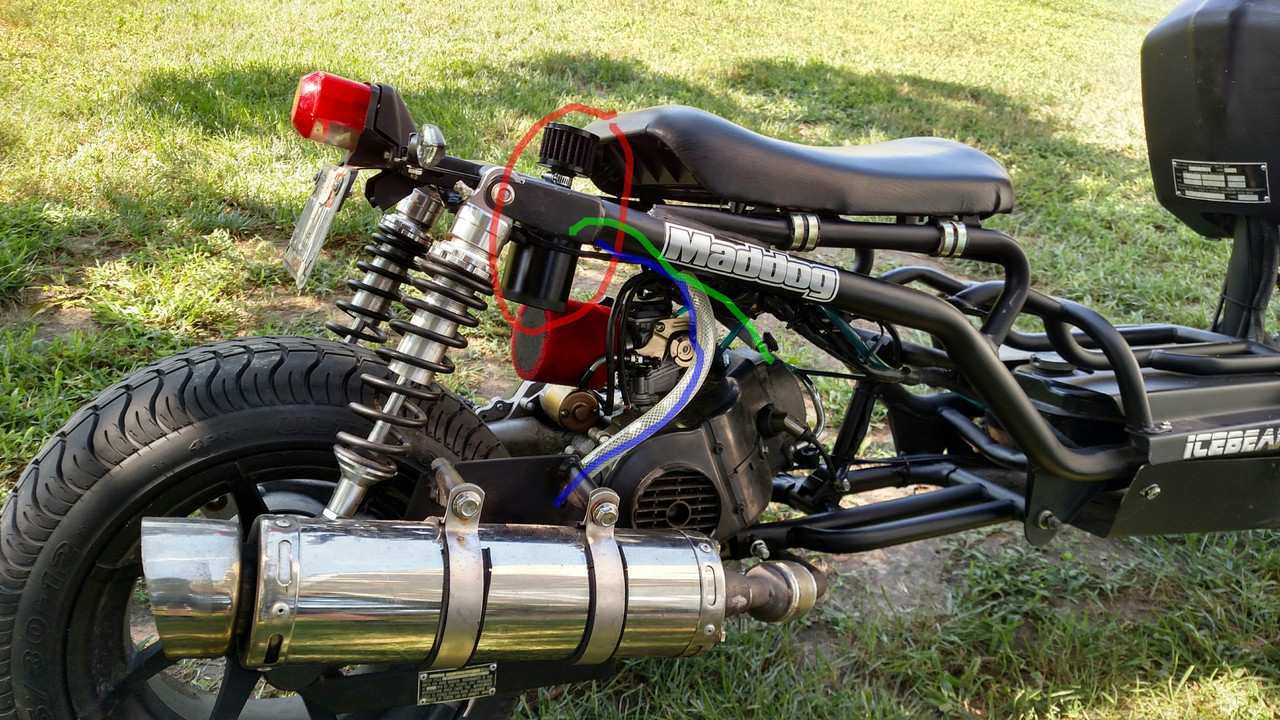
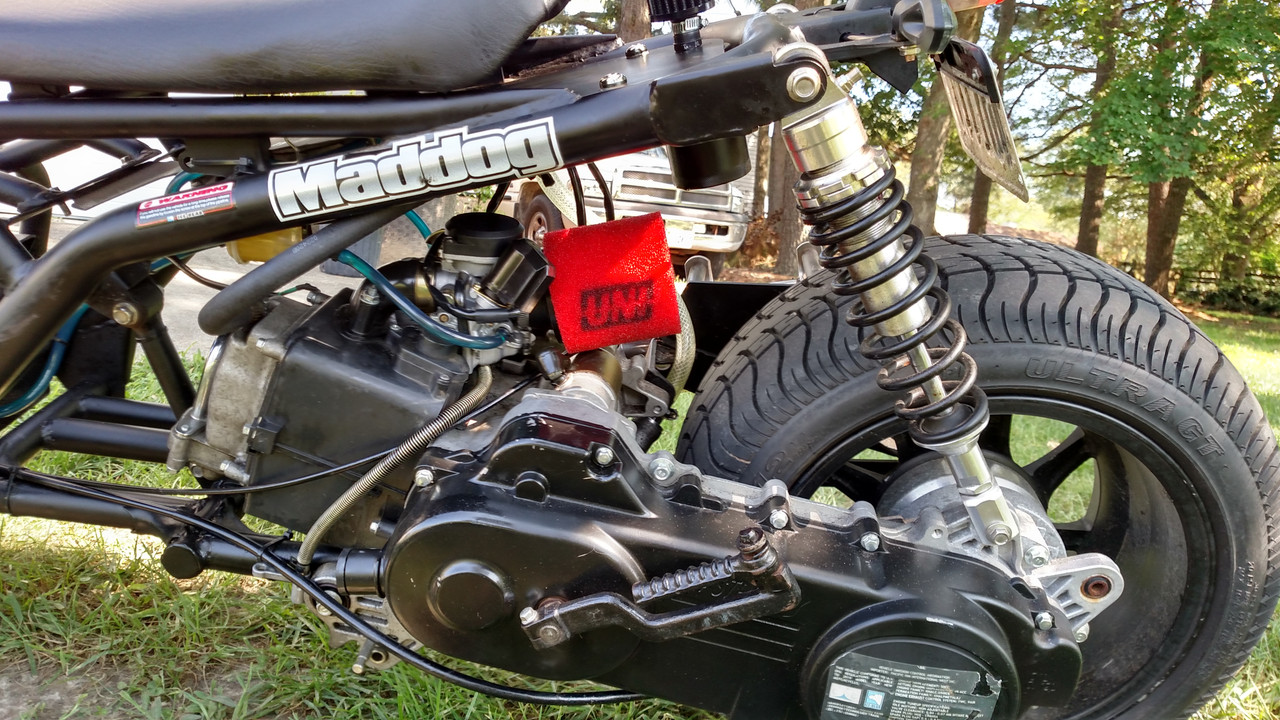
Post by meniscus on Sept 10, 2020 8:50:05 GMT -5
This picture shows the oil catch can circled in red. The blue line shows the oil decompression tube and the green line shows the line from the valve cover.
 Here's a picture of the other side:
 |
|
|
|
Post by meniscus on Sept 10, 2020 9:01:41 GMT -5
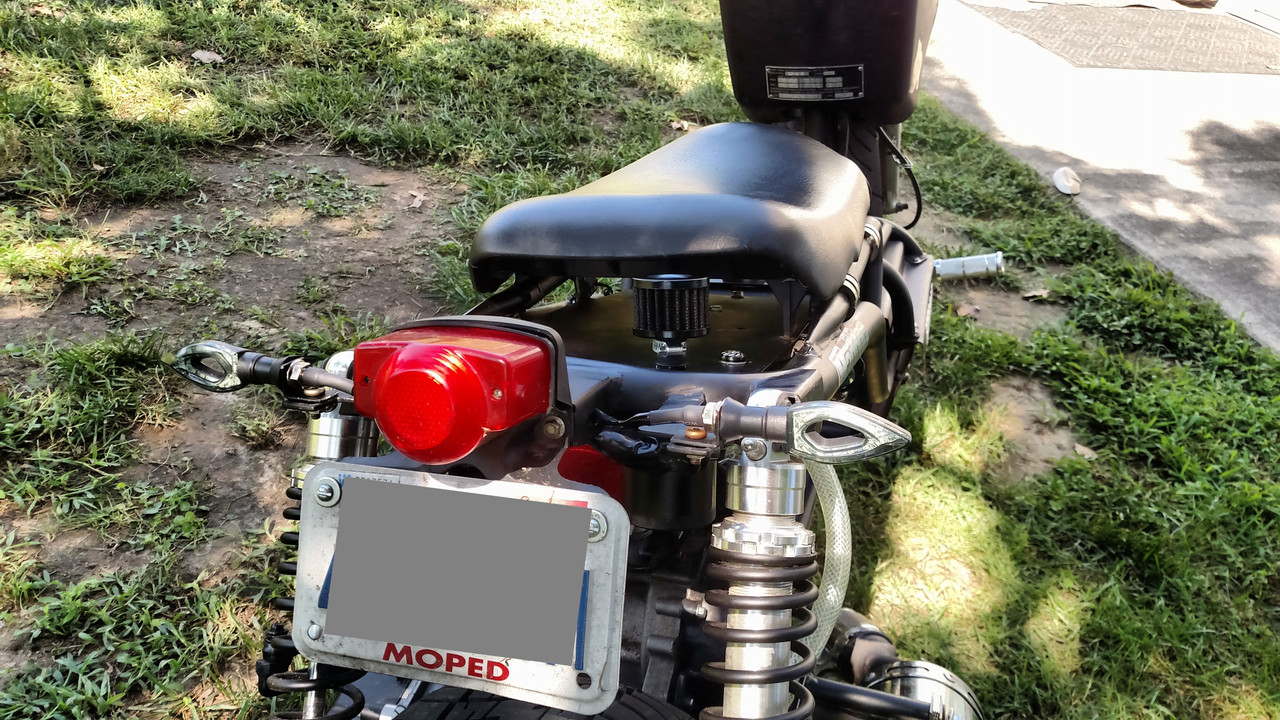 This picture shows the overall bike. The breather filter hardly sticks-up above the seat. (Note, my friend only has one eye which is why he chooses to maintain just one mirror).
Right now, on the 72cc BBK, the bike is doing 40-41mph with a 255 lbs. rider, verified using GPS. A9 Camshaft, 20mm carb, Size 28 idle jet, 88 main jet (could be 89 if we had that size, 90 is slightly too much at top speed, depending on the temp and humidity), and 6 gram rollers.
|
|
|
|
Post by GrumpyUnk on Sept 10, 2020 11:20:31 GMT -5
Have you had to empty the can out often? Looks pretty functional and well installed. I watched someone on yutube with a dorked thread on a crankshaft. He bored the end to fit a bolt diameter, and with heat/cold and a press, installed it so the threads were extended properly. Then ground the keyway. Looked as good as factory. Poked a bit: www.youtube.com/watch?v=PGMJRJCynOk I think it turned out well. Better to my mind than welding a tip onto the damaged end. For future reference, you can use a triangular file to 'follow' the threads and remove material that has squished into the groove. Then use a die to clean up to more 'normal' thread shape, etc. I use a nut and thread it on by hand until I meet resistance, then remove and inspect near the area where it jammed. Most times can find the bad spot, file a bit, and get past without use of any power tools. Maybe a box/open wrench. tom You sure are getting a lot out of a 72cc machine. |
|
|
|
Post by meniscus on Sept 11, 2020 8:04:06 GMT -5
Thank you for the positive comments and notes. My friend has maybe 160 miles on the new setup. He is planning to check the oil level in the catch can this weekend. I doubt there will be much oil, but we will see and I'll provide an update. However, without the catch can, we were getting a fair amount of mist and other spitting of oil from both the valve cover and the oil decompression tube. Since we weren't going with a stroker crank, it was very affordable to swap out the crankshaft for a new one. Luckily, it wasn't a lot of drama to split the case and install. The new crankshaft spent a couple days in the freezer and I didn't have to heat the case to slip it in. Obviously, new oil seals were in order, but we haven't had any issues. Admittedly, I did do a little work on the valves. Unfortunately, the keyway on the crankshaft we got was off by a tooth and we had to move the chain on the camshaft for true TDC, but after I got that sorted out, it ran great. I did mark it if anyone had to do any work in the future and didn't know it was not right. Regarding the speed we are achieving, we are running a Casoli CDI, but the connectors didn't match up correctly. As a result, we had to remove the pins and put them into the stock CDI connector for it to fit on this bike. The nice thing with the Casoli is that the timing in the low rev range is very similar to stock, but has a nice advance curve for the top end that seems to work well for a heavier rider and heavier bike. I'm certain it won't work for all setups, but it is working on this one. He's still breaking in the new piston and rings and hasn't really maintained the same RPM for too long. With the 6 gram rollers, the RPMs are a little low to take advantage of the torque. I'm sure it would do more, but I didn't want to do a crazy tune or push the RPMs because this is his daily driver, year round. I still think it would be prudent to increase the cooling for the CVT since it is pretty hot. At a later date, we may run a tube from the engine shroud in front of the fan at the flywheel over to the top of the CVT cover, but I've yet to do the research to determine how much moisture that may introduce or cause the belt to slip. I haven't seen a lot of threads on CVT cooling, especially for setups that are driven in the rain. I'll have to do some more research. In the meantime, I'm happy and more importantly, he's happy. I haven't done a lot of engine work for small engines, but I've done a ton of rebuilding car and truck engines in years past. You may notice that the turn signals are different in both the front and the back. A little over a month ago, he had his first crash, at low speed, when a pickup truck left a light and then stopped suddenly in front of him without any reason. He locked-up the brakes, skidded, and ended up laying it down. I ended up using the angle steel from the crate the bike came in a year ago to fabricate a new headlight bracket on the front. I used the same angle steel to fabricate mount for new turn signals in the back since they did not work reliably (poor connections to the bulb inside the housing). Since I had the bike for the engine tear down and rebuild, I added a temporary support bracket to the top mounting screw (I didn't even it paint it for now). I say temporary because I think my friend is going to go with a different headlight in the future. The bracket is just stabilizing the light from bouncing up and down on bumpy roads.
You may also note the exhaust pipe. Because a header is so hard to come by for the Maddogs that clears the back wheel and combined with the fact that my friend is on a limited budget, I just cut the exhaust in half at the catalytic converter, cleared it out, and put it back together. I also cleaned-up and smoothed the inside of the pipe where it mates with the engine. Because of quarantine, I didn't have the gas to weld things back together. Instead, I just wrapped the pipe with some HVAC aluminum tape and used an exhaust clamp to hold it together again. My friend said he might wrap the pipe with pipe wrap, but I don't think he's been worried about it. Needless to say, clearing the cat helped the flow a lot since it was not the best flow because of running rich in the past. The connection is solid and there's no leaking.
|
|
|
|
Post by GrumpyUnk on Sept 11, 2020 8:38:17 GMT -5
I don't think I would rob any airflow from the engine cooling system. It may be marginal already. Given how open the Maddog is, you could make a high-mounted(right under or close to the seat) air horn with a duct down to the inlet on the front of the CVT. The CVT inlet currently installed most likely has a screen at least, maybe more, so doesn't flow as freely as one might like. I guess you could use a 12VDC fan/blower if you thought that a good option. My understanding is squirrel blowers are more efficient than fan blades out in the open. Ducted fans would be better, but a squirrel cage is best, I think. I don't have the time or inclination, but it would be possible to conduct some experiments with a couple thermometers and pencil and paper or thermocouples and a data logger. Ambient air temperature coming into the CVT compared to the air leaving the CVT through the underside outlet would give an indication of how much heat was being carried off by the airflow. My impression is there's not a lot of airflow, and any improvement would be useful.
Then try with a 'ram charger' & duct from up by the seat, out in the airflow as you ride, then compare to squirrel cage... and so on until you get sick and tired of messing with it and clamp something on and call it a day. I do note the CVT cases do get hot. Not untouchable(I think) but hotter than I would expect.
tom
|
|
|
|
Post by meniscus on Sept 11, 2020 10:18:13 GMT -5
I haven't measured the temp, but back at the clutch, the outside cover is very hot to the touch and you want to take your fingers off after just 2 seconds. You make a very good point about not robbing the engine of cooling. The air inlet at the front of the CVT cover is very little air flow. For the QMB139 49cc engines, the fan on the variator can't be providing but so much air movement. The fins look anemic, unlike the larger ones on a GY6 150cc. For those folks not familiar with what we are talking about, this picture shows the inlet on the right, facing the front of the scooter. There's the outlet that comes out underneath around the center, plus a rear outlet with a baffle: 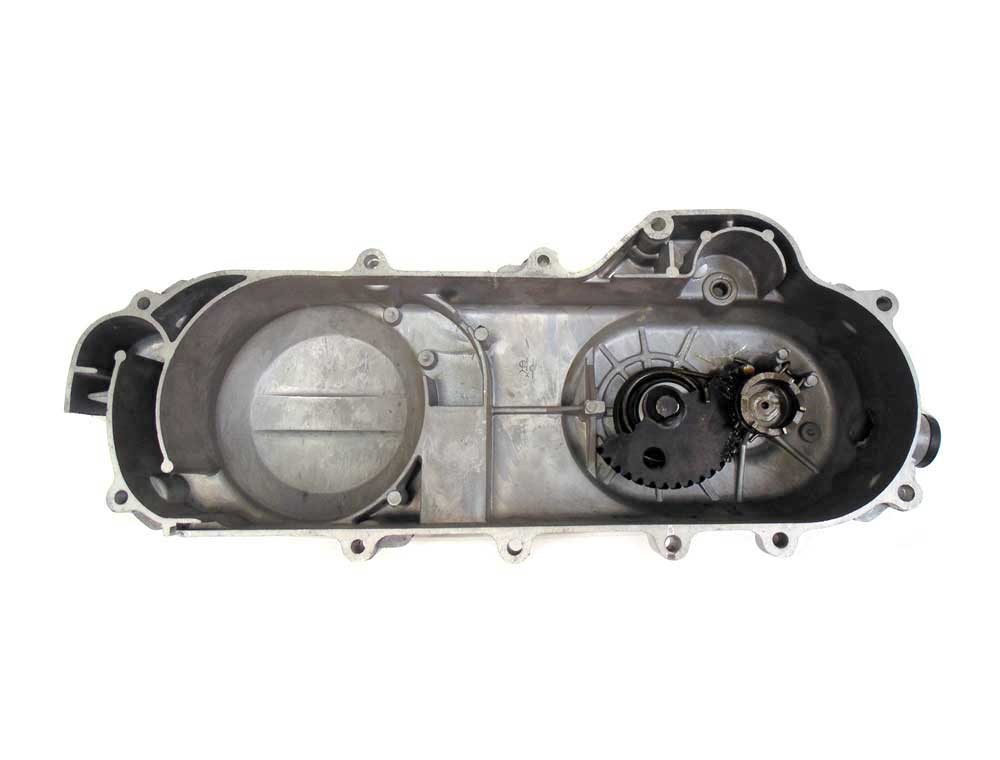 I suspect that the Icebear Maddog which uses an extra long case (not just the long case QMB139) probably compounds this issue. The thing I don't know is whether or not the cover is so hot just because of the induction of being bolted to the engine. I imagine that the belt will eventually heat up just from use and being there by proximity, but I wonder if the air under the CVT cover is actually much cooler than the CVT cover itself. Really, I guess none of it really matters except for extending belt life. Nothing else would really be affected by the higher temps. On this bike, the stock belt lasted about a year, but it's a heavy bike and rider and roughly 6000km or 3700 miles. When we swapped it, we put in a Naraku 788-18-30 belt (remember that this is an extra long case). I guess we will see how long it lasts and maybe open up the CVT periodically to inspect. As another thought, if the CVT cover is getting hot because of induction, then maybe attaching some heat sinks to the side may help the issue (that is, if it even really matters). |
|
|
|
Post by GrumpyUnk on Sept 12, 2020 8:57:37 GMT -5
If I had my druthers, I would want the clutch bell to have some fins on the outer diameter or the end. That would provide air movement when underway. The middle duct looks to be set for airflow coming from the clutch bell to turn a corner and exit out the bottom of the CVT case. I may be wrong, but if there was some way to induce the clutch to move air out that duct, I think it would cause external(hopefully cooler) air to come into the CVT.
I figure the heat is caused by friction(duh?), so there should be less heat developed if driving in longer runs, without the clutch having to slip when it engages. Slippage for sure causes friction, and heat generation.
I have not paid attention, but that would mean long runs should be less stressful on the clutch, and on the belt and variator as they would be running in a steady state.
If it lasts a year, doing anything may be a waste of time.
tom
|
|
|
|
Post by meniscus on Sept 14, 2020 14:18:38 GMT -5
Well, my friend had to work all weekend, so I don't have an update on the oil catch can and the amount of oil/other stuff it captured.
Is a year a good life expectancy for a belt with a daily driver (every except pouring rain or very cold, or at least cold for around here in Virginia at 20-30 degrees high temp)? Sorry, I don't know the answer since I don't run these motors or CVT setups a lot.
|
|
|
|
Post by GrumpyUnk on Sept 14, 2020 14:53:58 GMT -5
As they say, "It depends..."
Is the belt a brand name?
Is the rider a Olive Oyl or a Bluto?
Is the driver a Andretti or a Jim Clark?
Is the engine stock, or has it been 'improved'?
Lots of cruise or mostly stop-and-go?
Are the variator and torque spring worn or in good conditon?
Are the pulley surfaces chapped or smooth?
So, which what when where why? I have no better answer. I figure a good brand belt,
not driven to the limit all the time, a mix of stop/go and some cruise should likely
last a couple thousand miles. A SWAG.
YMwV. Not May, Will.
tom
|
|
Petro
Scoot Enthusiast

Posts: 149
Location: Gothenburg, Sweden.
|
Post by Petro on Sept 16, 2020 0:35:12 GMT -5
I played around with this years ago and came to the conclusion that a catch was unnecessary. On my current scooter though I got tired of the oil smear at the filter intake so I thought I'll put a longer hose to the rear of the bike so the smell doesn't hit me that much.
"a longer hose" I thought, "I will also need a larger pip since I triple the length..."
So I drilled up the original 4mm at the head to an 8mm fitting and put on a 10mm hose, three feet long to the rear of the scooter above the tank. I can now surprisingly say that NO oil is coming out that way since it has time to cool down. I still get the constant breathing blow but not a trace of oil at all, the hose is cold at the last 2/5 of it's length and I am doing like 90 miles a day in average.
|
|
|
|
Post by GrumpyUnk on Sept 16, 2020 11:04:38 GMT -5
The 'length' of the hose will grab most of any droplets or oil vapor on the inner diameter before it can go so far. You may get a tiny amount of misted oil on the tank or whatever is near. Just enough to possibly gather some of the road dust and keep it there. The 'barrier' of climbing a hill to get out will absorb a lot(most all) of the energy the heavier or denser particles have and cause them to fall out of the airflow before they reach the end of the tube.
You may not have needed to go to the larger diameter as long as you had good length and a bit of 'hill'.
tom
|
|
|
|
Post by meniscus on Sept 17, 2020 6:58:28 GMT -5
The purpose of this modification was to solve a problem. Because there isn't a lot of height on this bike, even using a long tube, it was spitting/misting oil and making a mess for sure. It was bad enough on the oil decompression tube that we had to temporarily put the oil filler cap back on. I would be inclined to agree that in another scooter where you have more height, this might not be necessary. However, for this build, it keeps everything clean. The other nice thing is that with the combination of the breather and the catch can, any moisture that may get into the breather (rain, etc.), is caught in the oil catch can rather than going back down the tube into the engine. Plus, having relief on both sides of the crank means it's not trying to push oil past the oil seals. As I said, it is the right solution for this bike, but may not be necessary for all builds. I don't have experience with scooters that have more height to accommodate more rise in the tube. 
I've yet to find out how much oil is being caught in the can, but I will update when I do find out from my friend.
|
|
|
|
Post by meniscus on Oct 9, 2020 6:51:28 GMT -5
Well, here is an update, even though it is delayed. There is maybe a half inch of fluid in the catch can after around 500 miles.
We finally traced down the intermittent issue where the engine shuts off and won't start. It wasn't overheating and it acted like it was the coil. Most of the time it had a good spark while testing. We put a multimeter on all of the wires from the pickup, stator, etc. and it all tested within tolerances. A new coil and wire didn't help. Finally, we swapped the stator and everything came to life. No more issues. In fact, I'm inclined to believe that the stock stator was never working this well.
One thing that is nice about this oil catch can setup is that if any water happens to get into the breather, it just drains right down to the catch can and not into the engine. Of the half inch of fluid, some of it had that milky color which I presume is a little water mixed with the oil, probably from rain even though the bike stays covered most of the time when not in use.
|
|
|
|
Post by snaker on Oct 9, 2020 11:52:32 GMT -5
Seems like a lot of fluid to me, especially if oil is also being redirected back to the crankcase?
Milky means water or blowby foaming, can you make certain whether its coming from engine or atmosphere?
If the engine, that would suggest piston blowby.
Also check that the valve cover has any intended breather baffle in place and in shape. Excessive oil mist will exit without the baffle working properly.
CVT heat: The clutch will usually have a fairly minimal effect. The portion of time its in the range of engage/disengage is normally low. Unless some pickle head is running the machine up against a wall and trying to do burnouts.
The majority of the heat generated in these torque sensing CVT's are from the driven pully sheaves rubbing against the belt and moving against each other (like pushing your palms together hard and rubbing). That's happening during upshifting and downshifting, nearly all the time on a typical ride.
That's why its important to use just enough contra spring to keep good belt tension and no more.
|
|


