|
|
Post by CrankingWithCG on Jan 11, 2021 14:44:42 GMT -5
Ill be posting the videos in this thread of progress on my Elite. If theres something not in a video, ill put it in a thread post. Anyways, bought this bike for 500 bucks. Its ratty and trashy, but thats not gonna stop me of course. You know how many Taotaos ive had?? 😂 But yeah, just a little beginner video of doing light cosmetics, just talking and overview of the parts. Next vid will most likely be wrapping the seat while I wait on parts to come in. But even the little bit we did in this video gave me hope for this little bike youtu.be/ZugV228yt4c |
|
|
|
Post by CrankingWithCG on Jan 11, 2021 16:37:35 GMT -5
So I was asking around, and the Tecnigas wont fit without modification. Ill wait till it gets here and show the process if you were to do it, but im currently talking with SSS about alternative pipe options. Im upset, but i guess i can only be upset at myself. Scootertuning did say this pipe only fits a Rapido and Honda Vision, I assumed all af05s were the same and I was wrong. This whole thing was kinda a bust, but eh. Ill update within the next few days with the seat wrapping
|
|
|
|
Post by CrankingWithCG on Jan 11, 2021 22:47:59 GMT -5
Heres my plan for the lights. Instead of using the coveted "Jap Tail", im gonna play it a little simpler. I ordered a set of two light pods, and im gonna mount one in the front. The other im gonna put some layers of tail light tape over to tint it red, then mount it under the back plastic and use the hole above the mudflap to mount. Heres how im setting up the wiring, all the positives tied together on one switch terminal, negatives on the other. I figure as its not crossing any positives and negatives before the switch it should be fine. Hopefully it all works good! 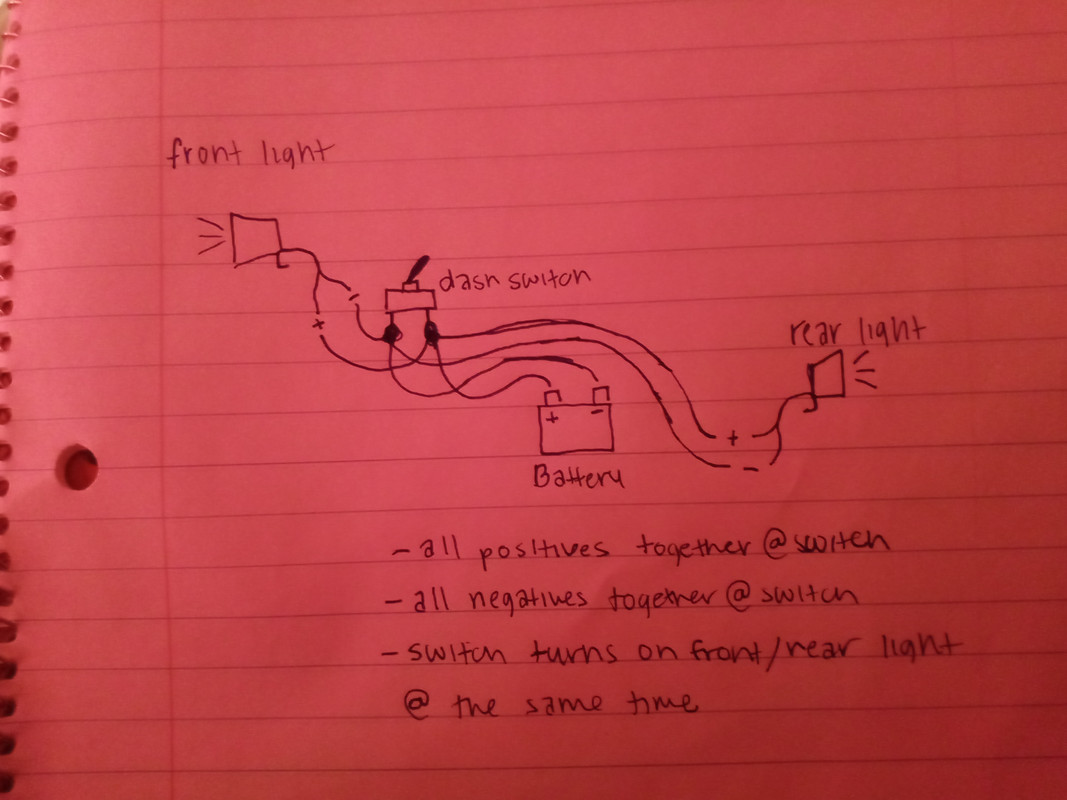 |
|
|
|
Post by oldgeek on Jan 12, 2021 0:17:16 GMT -5
Heres my plan for the lights. Instead of using the coveted "Jap Tail", im gonna play it a little simpler. I ordered a set of two light pods, and im gonna mount one in the front. The other im gonna put some layers of tail light tape over to tint it red, then mount it under the back plastic and use the hole above the mudflap to mount. Heres how im setting up the wiring, all the positives tied together on one switch terminal, negatives on the other. I figure as its not crossing any positives and negatives before the switch it should be fine. Hopefully it all works good! Your kidding right? |
|
|
|
Post by CrankingWithCG on Jan 12, 2021 5:04:31 GMT -5
The light pod was too tall for the back, so i found a led strip that is exactly the length of the rear signal panel, so were gonna rock with that
|
|
|
|
Post by CrankingWithCG on Jan 12, 2021 5:06:16 GMT -5
Heres my plan for the lights. Instead of using the coveted "Jap Tail", im gonna play it a little simpler. I ordered a set of two light pods, and im gonna mount one in the front. The other im gonna put some layers of tail light tape over to tint it red, then mount it under the back plastic and use the hole above the mudflap to mount. Heres how im setting up the wiring, all the positives tied together on one switch terminal, negatives on the other. I figure as its not crossing any positives and negatives before the switch it should be fine. Hopefully it all works good! Your kidding right? About what part? 😂 |
|
|
|
Post by oldgeek on Jan 12, 2021 8:01:01 GMT -5
Your wiring diagram. The way you have everything wired, in one position the lights will work. However in the other position the wires between the switch and battery become a direct short and will glow red hot melting the insulation off, possibly blowing the battery in your face. First off, always, always install a fuse in the positive lead very close to the battery. The fuse will protect you, your bike, and possibly home from fire. The inline blade type fuse holder that uses automotive blade fuses works great. 5 amp fuse will work for lighting. To wire up your lighting, all the negative/grounds from the lights should connect to a wire that leads to only the negative on the battery. All the positive wires from the lights go to one side of the switch. The other side of the switch connects to the fuse that you installed at the positive side of the battery. By the way, I  your enthusiasm for scooters, but you have a lot to learn grasshopper  Take you time and research the things you want to do carefully, it will save you a lot of headaches.  |
|
|
|
Post by CrankingWithCG on Jan 12, 2021 15:06:10 GMT -5
Your wiring diagram. The way you have everything wired, in one position the lights will work. However in the other position the wires between the switch and battery become a direct short and will glow red hot melting the insulation off, possibly blowing the battery in your face. First off, always, always install a fuse in the positive lead very close to the battery. The fuse will protect you, your bike, and possibly home from fire. The inline blade type fuse holder that uses automotive blade fuses works great. 5 amp fuse will work for lighting. To wire up your lighting, all the negative/grounds from the lights should connect to a wire that leads to only the negative on the battery. All the positive wires from the lights go to one side of the switch. The other side of the switch connects to the fuse that you installed at the positive side of the battery. By the way, I your enthusiasm for scooters, but you have a lot to learn grasshopper Take you time and research the things you want to do carefully, it will save you a lot of headaches. The thing is that all my bikes seem to blow fuses, so ive just never really bothered with em. You have a point though, i may just end up using two switches ran to each light separately then to the battery. I really just wanted to use one, but my old project shocked me and melted stuff so many times I kinda dont wanna deal with it 😂. Thanks for the heads up though! |
|
|
|
Post by oldgeek on Jan 12, 2021 15:57:42 GMT -5
Your wiring diagram. The way you have everything wired, in one position the lights will work. However in the other position the wires between the switch and battery become a direct short and will glow red hot melting the insulation off, possibly blowing the battery in your face. First off, always, always install a fuse in the positive lead very close to the battery. The fuse will protect you, your bike, and possibly home from fire. The inline blade type fuse holder that uses automotive blade fuses works great. 5 amp fuse will work for lighting. To wire up your lighting, all the negative/grounds from the lights should connect to a wire that leads to only the negative on the battery. All the positive wires from the lights go to one side of the switch. The other side of the switch connects to the fuse that you installed at the positive side of the battery. By the way, I your enthusiasm for scooters, but you have a lot to learn grasshopper Take you time and research the things you want to do carefully, it will save you a lot of headaches. The thing is that all my bikes seem to blow fuses, so ive just never really bothered with em. You have a point though, i may just end up using two switches ran to each light separately then to the battery. I really just wanted to use one, but my old project shocked me and melted stuff so many times I kinda dont wanna deal with it 😂. Thanks for the heads up though! Using two switches does not change the fact that you need to wire the switch in SERIES with the positive wire to the battery. What are these lights for anyway? |
|
|
|
Post by CrankingWithCG on Jan 12, 2021 16:24:59 GMT -5
The thing is that all my bikes seem to blow fuses, so ive just never really bothered with em. You have a point though, i may just end up using two switches ran to each light separately then to the battery. I really just wanted to use one, but my old project shocked me and melted stuff so many times I kinda dont wanna deal with it 😂. Thanks for the heads up though! Using two switches does not change the fact that you need to wire the switch in SERIES with the positive wire to the battery. What are these lights for anyway? Theyre the lights now since i deleted the headcluster and took the tail light off. The pod up front is gonna be the headlight, the light strip in back is gonna be the tail light. The big light in back looked out of place, and i didnt want it getting smashed every time the back rack serves as a accidental wheelie bar 😂 |
|
|
|
Post by CrankingWithCG on Jan 12, 2021 16:42:13 GMT -5
Updated harness based on this little diagram i found online. Hot from the battery right to a switch terminal. Negative going to the positive of one and the negative of another, then that leftover positive negative pair going right to the empty switch terminal. My diagram is wrong for that, but its basically just following the other diagram.   |
|
|
|
Post by oldgeek on Jan 12, 2021 20:17:13 GMT -5
That looks much better, now what are you doing for a brake light?
|
|
|
|
Post by CrankingWithCG on Jan 13, 2021 14:03:19 GMT -5
That looks much better, now what are you doing for a brake light? Er, well, i suppose it'll be built in to my hand signals 😂. Weve just never really worried about our bikes having everything. My Taotao ran for over 3 years with no brake light, finally put one on that auto sensed and turned a brake circuit on. But i even think that didnt work fully. If it really gets bad, i can always run a tiny strip under that tapped into the stock brake switch |
|
|
|
Post by oldgeek on Jan 13, 2021 16:02:42 GMT -5
That looks much better, now what are you doing for a brake light? Er, well, i suppose it'll be built in to my hand signals 😂. Weve just never really worried about our bikes having everything. My Taotao ran for over 3 years with no brake light, finally put one on that auto sensed and turned a brake circuit on. But i even think that didnt work fully. If it really gets bad, i can always run a tiny strip under that tapped into the stock brake switch  I have done some dumb stuff, but nothing like that. Good luck. |
|
|
|
Post by CrankingWithCG on Jan 16, 2021 23:04:37 GMT -5
The pipe is now (rigged up) installed, and the bike looks 100 times better. Ill see how she does when its not snowing and 20 degrees, but there is a tiny bog off the line. At times trying to come up to wheelie, it just had no power and was just dead. It hits harder when it does hit. Pulling.....eh. The old pipe felt a bit more violent when it pulls, but it could also be leaner. The plug went from being brown to having more grey, but its still dark with brown tones, so i dont think shes in any danger. Pipe on the canister actually was cold to the touch. Video will be out soon, but until then, heres some af05 action 😜   |
|


 your enthusiasm for scooters, but you have a lot to learn grasshopper
  Take you time and research the things you want to do carefully, it will save you a lot of headaches.
