sinfull
Scoot Enthusiast

Posts: 356
|
Post by sinfull on Apr 10, 2024 14:58:03 GMT -5
Do you think it is all iggy related, since you just did a rebuild ?? Maybe put the old setup on and make sure it is running properly and then do the iggy
|
|
|
|
Post by 90GTVert on Apr 10, 2024 18:44:24 GMT -5
Do you think it is all iggy related, since you just did a rebuild ?? Maybe put the old setup on and make sure it is running properly and then do the iggy I think it is. Don't know. My first thought was to do the rebuild and get it going with the MVT, but knowing the amount of timing that it has and what happened to the piston; I figured I'd be better off to go to the new ignition. I'd have to rework the harness a little again so I'll probably just wait on kickstart parts and see if I was never getting a good kick. I don't see why it should pop from that though. That really seems like ignition to me. Reeds were the only other thought that I had, but I don't think it would pop like it does and it idles very smooth when it starts and seemed to have plenty of power. Prob should look just to dot my tees and cross my eyes. |
|
sinfull
Scoot Enthusiast
Posts: 356
|
Post by sinfull on Apr 10, 2024 22:21:16 GMT -5
I know you are very thorough in your work and you know what you checked and probably rechecked lol. It does sound good when it starts and holds a idle, so that kinda rules out simple stuff associated with it not being sealed up and installed correctly. Hmmmm, you are using key way on the crank and setting it to the time marks and verify TDC. Guess you can check range and see how close you are to being correctly. Move it 180* out of where it is currently set. No start, then you know your original position is close to being correct and then go from there. If it runs 180* out then straight up drive your self crazy trying to figure out why.
|
|
|
|
Post by 90GTVert on Apr 10, 2024 22:33:17 GMT -5
It uses a key with the PVL rotor. That allowed alignment of marks at their spec of 3.59mm BTDC. If the marks align where it wants when using the key and orienting the stator as they show for Piaggio, I don't see why it should be way out. It felt so close with more throttle that it's hard to believe it should be way off.
Whenever I can kick it over again, one thought was to see if I could get a timing light on a stand or something with a camera behind it to try to measure kickover timing. If the flywheel weight has to be on, then I can't use the indicator that I made. I may be able to space out the MVT indicator that has a larger ID so it sits out past the big weight and use that. I should probably try to be prepared to take advantage of the opportunity to check timing if it starts again.
|
|
|
|
Post by 90GTVert on Apr 11, 2024 8:13:48 GMT -5
Random info... While looking for an image, I found a Polini compensator ring for their torsen. The ring is part # 290.0130 and seems not be in stock many places ATM. Not sure of the dimensions. I saw one pic showing a torsen bearing being a 6004, which is a 20mm ID so that would work with a 6204 as well if it's accurate. It's much thinner than the one that I got.  |
|
|
|
Post by 90GTVert on Apr 12, 2024 12:24:43 GMT -5
I setup a degree wheel on the CVT side so I could double check some stuff. Had to make an adapter to make it fit, because it hits the case and frame otherwise. I've only used it on the RC-1 outside of the scoot before. 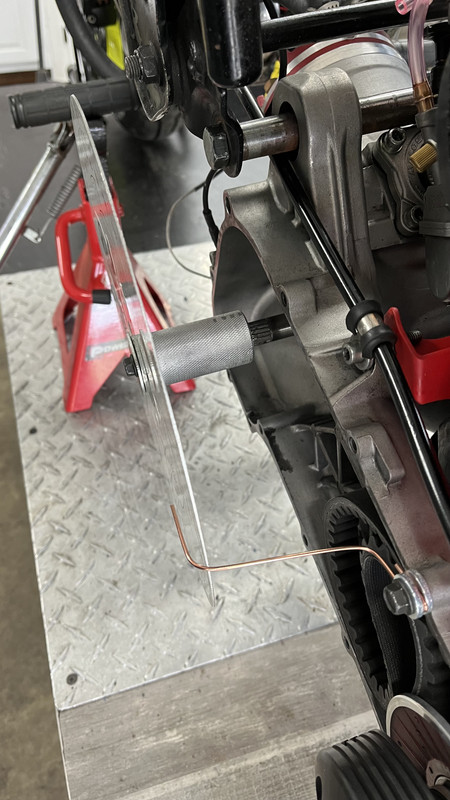 I set the ignition back to 3.59mm BTDC as advised in Stage6's instructions. Using the degree wheel, it looks like 30°BTDC. Calculating 3.59mm BTDC with a 44mm stroke and 90mm conrod shows that it should be 29.86°BTDC. Basically right on... beyond any level of accuracy I'd be capable of reading with even the large degree wheel. Then I made 3 longer spacers for the timing indicator that I used with the MVT and marked the flywheel at TDC.  I came in to look over the PDF that was on the flash drive with the S6 ignition because I wanted to try to clarify something. If I'm understanding this correctly, it's going to try to start at the mechanical timing set. So that would be roughly 30° BTDC. That's a pretty lousy place for starting advance to be, and should make it really hard to start. For comparison, Malossi's Selettra ignition manual shows that it's curves have between 4 and 24 degrees of timing below 1000RPM. Here's the quote of interest and a screenshot if anyone care's to tell me if they interpret this the same as I do or if you think I'm misunderstanding it. It just doesn't seem right. Anyone should know not to set starting advance at 30°. That said, it seems like what could be happening because it idled well and ran roughly OK so it didn't seem like the whole curve would be way advanced. It's just a mutha to start. "During engine cranking/starting the spark will
occur at the 'hardware ignition' point. In this
time the ANDROMEDA software curve has no
influence on ignition timing. Therefore a
mechanical adjustment of the hardware
ignition point can be performed to achieve
good engine starting behavior."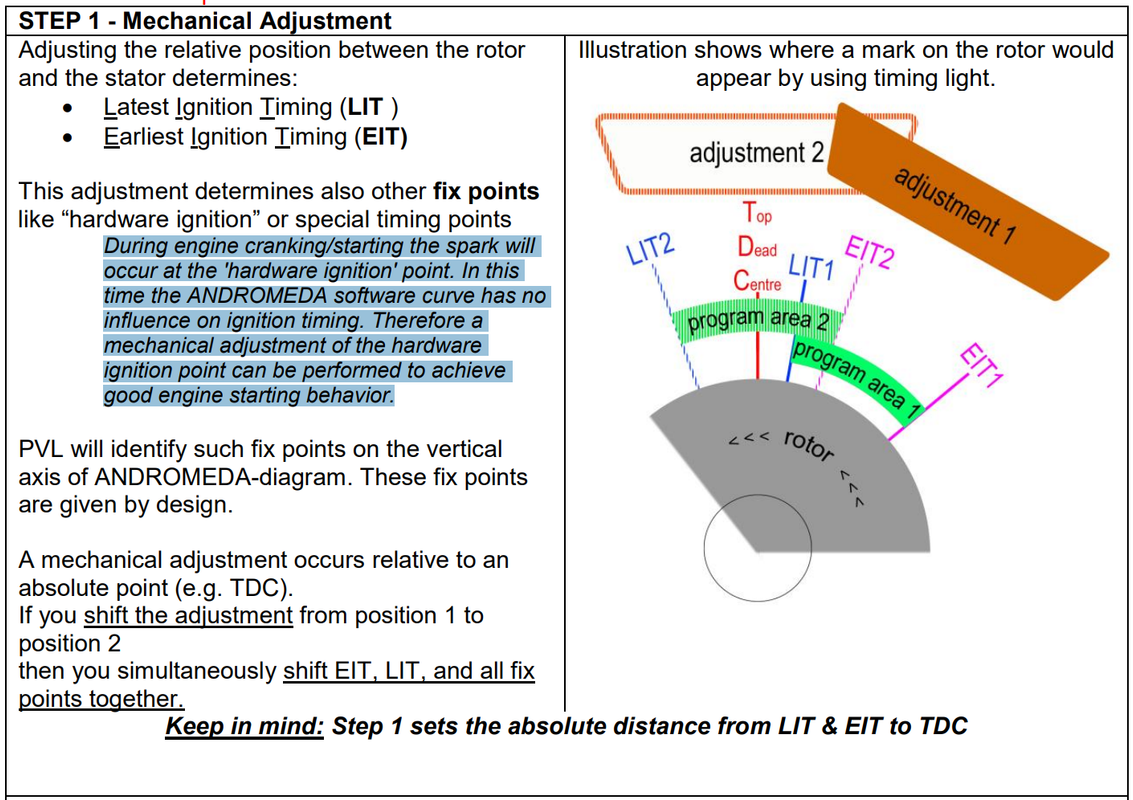 That's what it says for programming with the included software. I'm not certain if that applies to whatever is on the CDI from the factory. If I can get the kickstart components fixed up and figure out a timing light holder, hopefully I'll know for sure. |
|
|
|
Post by oldgeek on Apr 12, 2024 16:47:09 GMT -5
Looks like rocket science to me.
Did you check the plug boot? That's all I got LOL
|
|
sinfull
Scoot Enthusiast
Posts: 356
|
Post by sinfull on Apr 13, 2024 1:02:08 GMT -5
So if I am reading correctly, you want adjustments #2 set mechanical earliest eit position and then the software adjustments off your original hardware point
|
|
|
|
Post by 90GTVert on Apr 13, 2024 6:20:58 GMT -5
So if I am reading correctly, you want adjustments #2 set mechanical earliest eit position and then the software adjustments off your original hardware point That's how it sounds to me. I would need to set the stator and rotor to align at whatever I wanted starting advance to be, assuming the EIT is sufficient to allow whatever advance I'd want in the curve. That said, it wouldn't seem like they'd have you setting it at 30 degrees if that's how the CDI works with the pre-programmed curves. I had thought about trying to adjust and program it, but I really want to see what I can of the 2 included curves first because I think I can't go back once I program something else. |
|
|
|
Post by 90GTVert on Apr 13, 2024 16:21:38 GMT -5
I replaced the kick start shaft, spring, pinion and pinion spring. Only left the old bushing and lever. I took the reeds out and they look great. I checked the spark plug cap and it’s in spec. Also looked for a non-resistor cap, but I don’t have any. I checked the coil resistance and it’s in spec. I looked for resistance values for the stator, but couldn’t find them for the 1042. I checked anyway and it was 89.8 so I’m assuming this is a 3000 winding unit and in spec.  While searching for info about the 1042, I found some discussions about PVL ignitions and hard starting. Some say they don’t make spark at slow cranking RPM, others blame using resistor spark plugs with resistor caps and others say they start fine. I mounted a timing light to a camera tripod and set that, my camera and a GoPro with about 25 adapters up to see timing and RPM.   Got it fired within a handful of kicks and revved it for a bit so I can see timing later. Swapped to the other curve by grounding the CDI and revved it more. I think it's not making spark unless it gets a good kick... which kinda worries me. I realized that it rattles a lot at idle after the 2nd test. Thought the flywheel weight was coming off, but it’s not. Now I’m a bit worried that 15,000+RPM under no load may have been a bit much for it. EDIT : I just got the files on the PC and went to listen to the end real quick and I can see the flywheel weight bolts rotating a little so I think it's just that. 😅 I’ll have to sit down and go over the videos, but I think it was pretty far advanced… seeing at least 40* at times. |
|
|
|
Post by 90GTVert on Apr 14, 2024 7:39:58 GMT -5
It appears to be at 30° when kicking it over, so it does indeed appear to start at whatever advance the mechanical setting is at. No timing light flashing unless it gets a good kick. I'm not claiming this is 100% accurate because without much load it's tough to get it to stick at any high RPM long enough for a precise reading... plus my homemade indicator and so on... but I think it's pretty close. 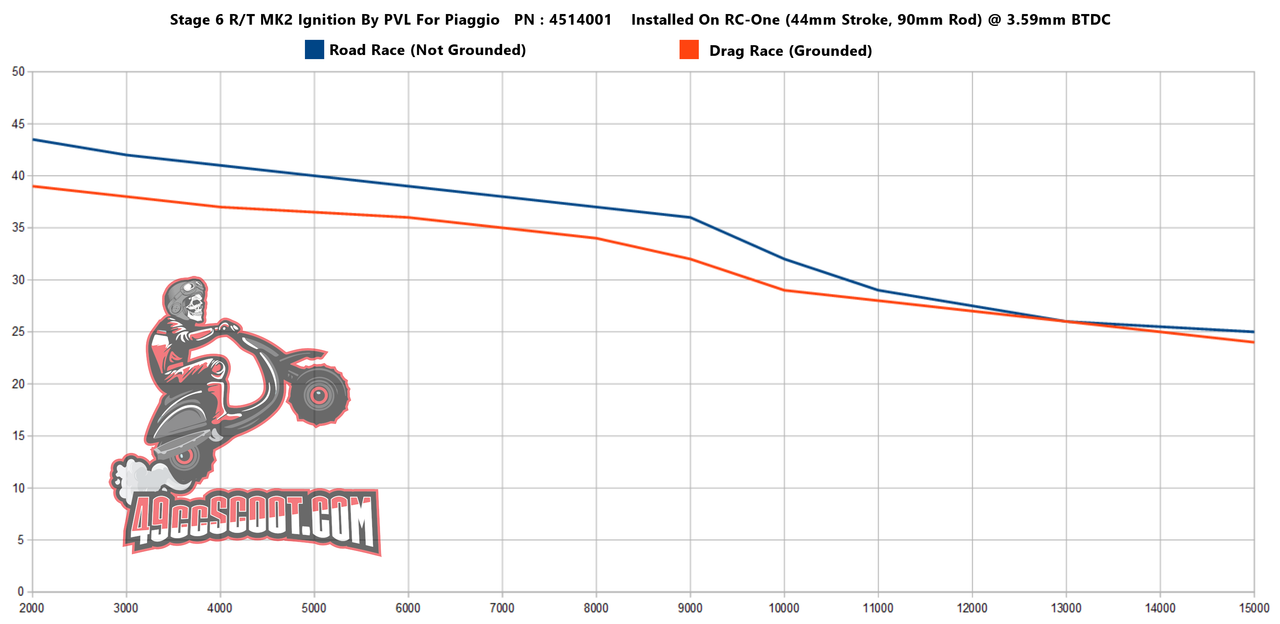 Now I really wish they published specs to compare. Seems pretty aggressive. I also figured the drag race curve would be the more aggressive of the two, but not so much. It seems like I'd want to retard either of them 5 degrees or more. I'm glad I got the programmable version, because I wouldn't be thrilled with this after moving away from the MVT because it had too much advance at lower RPM only to wind up in a similar place... though at least the powerband is more advanced so it could keep more timing in the powerband with a little less lower. |
|
|
|
Post by 90GTVert on Apr 14, 2024 11:30:09 GMT -5
Fiddling around with some more info. I added the MVT +3° curve that I was using and the average timing of Malossi's curves for the RC-One as well as what the road race curve would be like -9° and the drag race curve -5°.  The road race curve with 9 degrees less mechanical advance looks about as close as I'd get to something I'd expect to like. It's a bit off of MHR's intention and a bit off of info like Wobbly has given out about curves, but not bad. Peak should be around 13.5kRPM so getting to about 17 degrees there and staying at least near 30 degrees at low revs ticks some boxes and seems like a reasonable compromise. About as close as the provided curves would get to Wobbly saying 30-32 degrees till the pipe is coming in, 15 degrees at peak, and a line between those two things. This thing is programmable though, so I could put whatever I want in there. |
|
|
|
Post by 90GTVert on Apr 17, 2024 12:51:51 GMT -5
I've been having one heck of a good time with T2 over the last couple of days. I replaced the ignition switch that was making voltage change when the key was wiggled.  I checked the range of adjustment with the rotor installed with the woodruff key and it's roughly 20 degrees, from about 6.5mm BTDC to 1.84mm BTDC. I couldn't make the 9 degree mark that I calculated in the timing graphs at 1.78mm, but it should be 8.67 degrees of retard. I went to reinstall and tighten the flywheel weight, wanting to make sure it didn't come loose right away this time. I applied thread locker and then proceeded to snap a bolt off in the rotor. 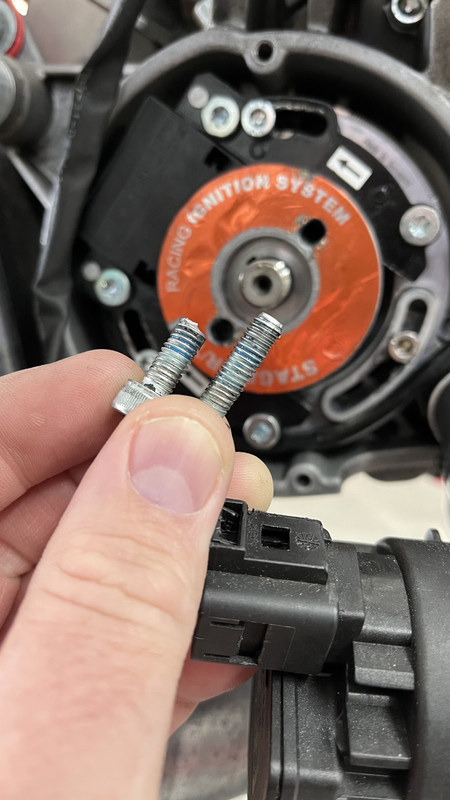 Can't even use a puller on it without both threaded holes so I had to extract the bolt on the engine. I used a transfer punch as an easy way to mark the center of the bolt. Didn't do the punch any favors as it's now a dull point, but I'd rather save a rotor than an amazon punch. I used a spring loaded punch after to be sure I had a good starting point. Tried a left hand drill bit to no avail and then just drilled it and used a screw extractor. 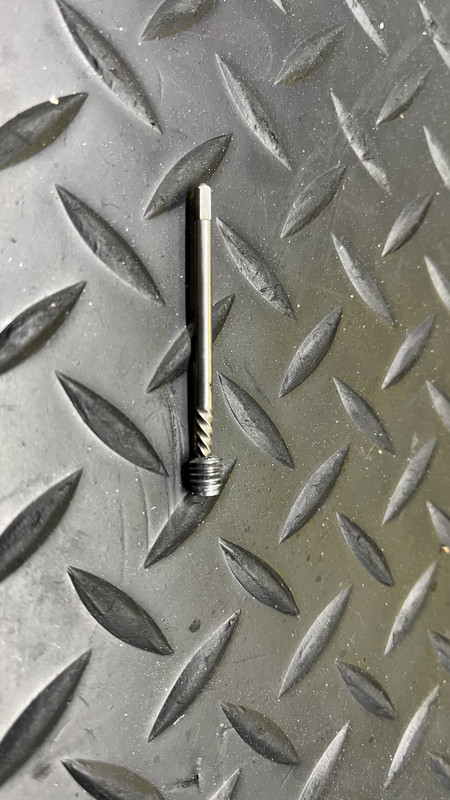 I put the weight on the flywheel so I could see the back and realized that these bolts don't hit too many threads, so I switched to 25mm bolts. 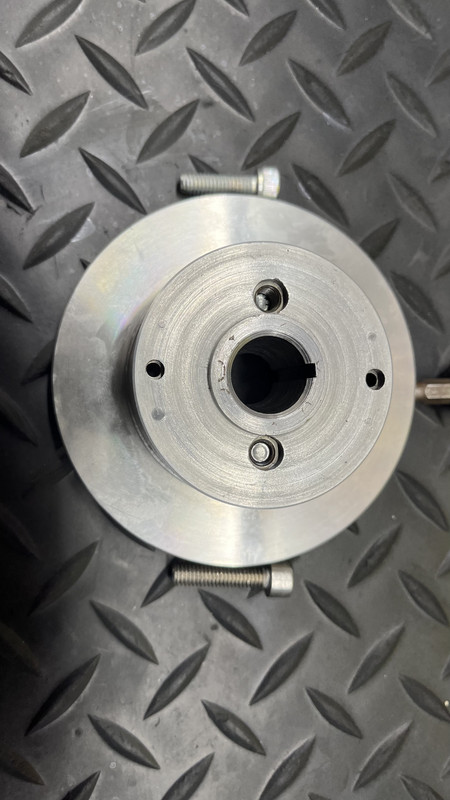 I checked with a timing light, then realized that it was drag timing and I intended to use the circuit race curve. The GoPro on the tach crapped out so I didn't even get all the info I'd need to verify with the drag curve. I also realized that I should recheck timing for the alignment of the marks, because I doubt that it goes back dead nuts on the timing with a woodruff key... but then I figured I had more room for error with the reading of mark alignment than I probably do with any change related to removing and installing the rotor... and more importantly I had a lot of stuff going on and didn't want to spare the time to recheck it right then. I switched over to the circuit race curve yesterday and filmed with a timing light, but I haven't had time to look it over. It was definitely way less advance. I also moved the needle clip up a notch to lean it some, because it was sputtering and breaking up bad at low throttle on my last brief ride. I wanted to take it down the road to see if it was at least roughly OK, and get slightly more break-in time before trying to really hammer it with acceleration tests and such to go back to carb tuning. I noticed immediately that it felt softer than I'm used to. It would come into power more gradually as I gently rolled the throttle, but it felt like it had power once I twisted more. I got a little over 4 miles into the ride and left a stop sign where a woman was walking her dog nearby. I sped up, let off to not blast the dog and her with the joyous sound of a 2T, and then got back into it making my way up to WOT. WOT lasted a handful of seconds before the engine died and felt like it may have seized as it coasted to a stop. It didn't want to start for me so I got a ride home in the truck. At least it was a nice spot to watch geese fly in during a breakdown I guess.  I looked at the plug later, expecting aluminum on it, but found that it was clean. Too clean. There's not even color down deep in the plug. Granted, this is a total of 6.1 miles in 2 rides and not much heavy throttle. 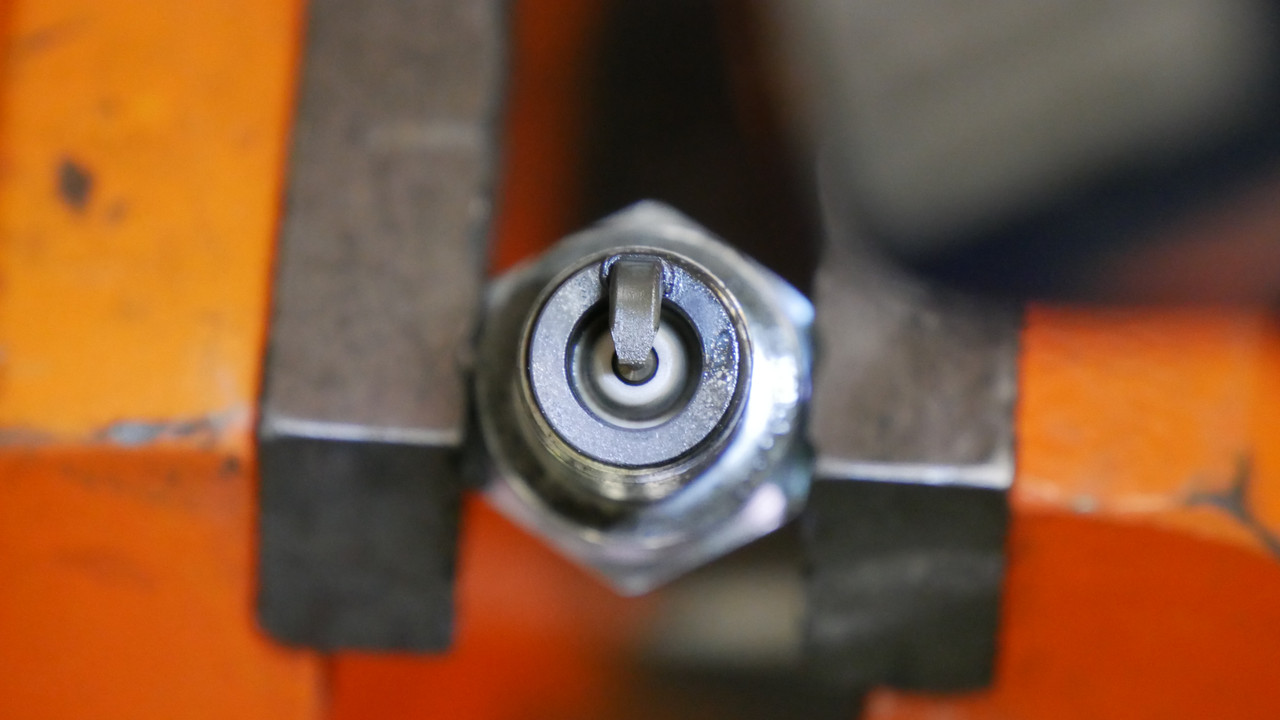 I used my cheap phone connected borescope to look at the piston and it's also very clean. 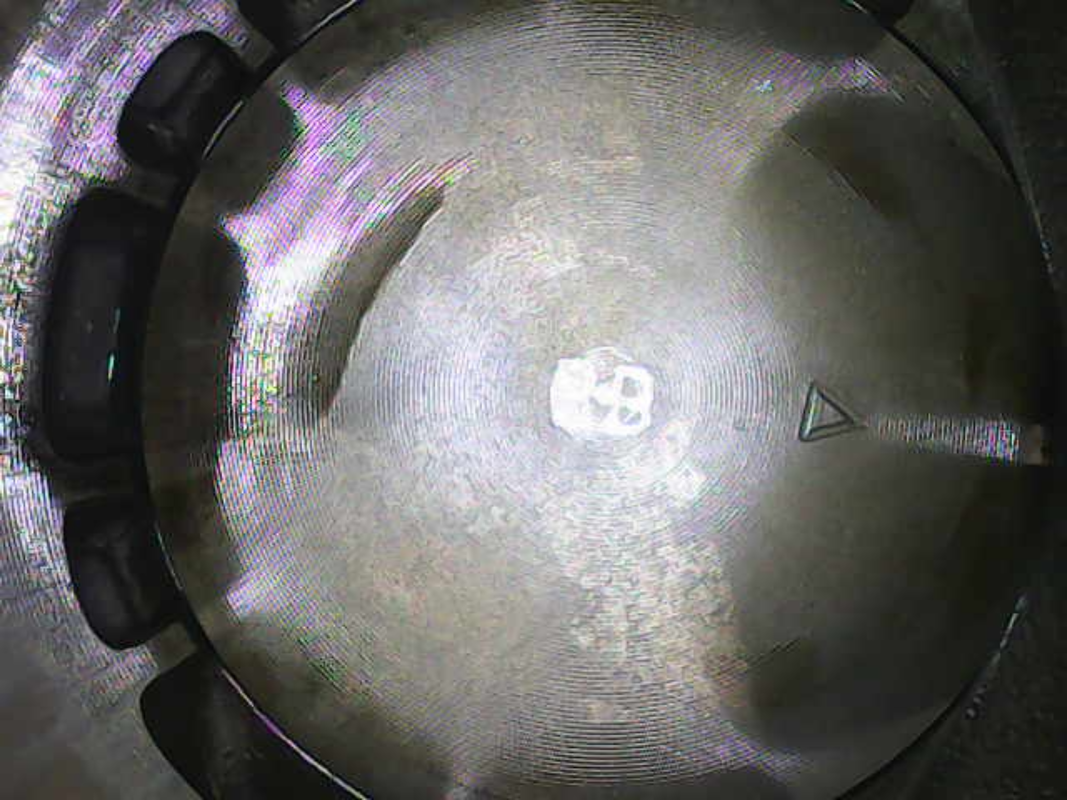 So, I'm guessing it's running out of fuel or just not fueling properly. I don't know exactly what I'm doing about that TBH. I've had people tell me in comments that I need more or less holes in the atomizer or none at all. Someone said you have to drill these out to let more fuel in. I can't help but go back to... but how come ryan_ott has used the same carb for years without all of this nonsense and no reports of major trouble tuning? That wasn't the end of my roadside fun though. As I looked at the scoot, I noticed that the powder coat was taken off of the high points on my back wheel from contact with the torsen arm.  I know it's petty, but I immediately felt sick. I've tried to avoid the sorta "burn this MF down" thoughts that come with long days and not being able to figure things out and such... but I absolutely pondered giving up on T2 altogether as I looked at my damaged wheels, thinking there's another thing I need to solve, while thinking that if I've trashed another piston I can't even get a replacement. By the time I was home I got over it and realized that scooters are kinda sadly almost literally my life. I was a bit surprised to realize that I had clearance between the wheel and the torsen. Probably about 2mm worth. I initially figured that it must just keep moving in as I ride, but now I'm wondering if it moves around because there's so much vibration and who knows what forces acting on it. 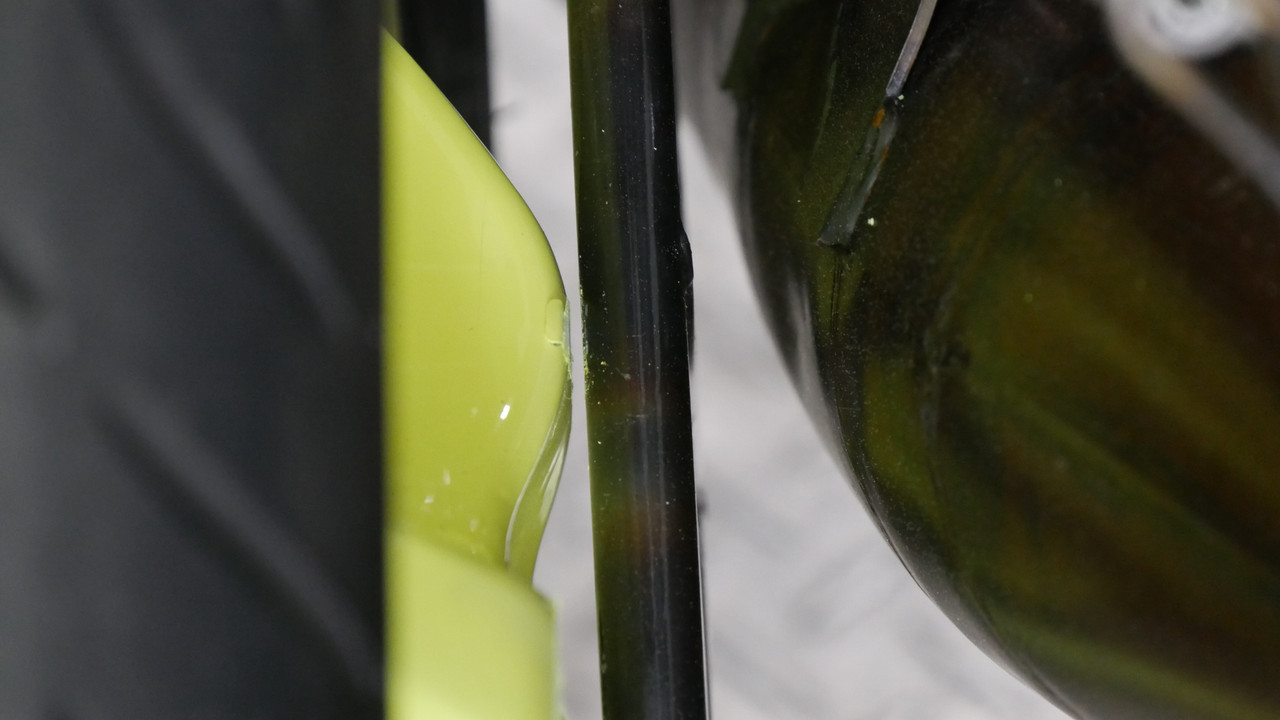 My first thought was that I need to build a whole new axle nut/adapter. Now I'm thinking I can fix this with a spacer. 2 issues there that I'm aware of. First, I think a slip on spacer is going to vibrate and rattle and such. Second, I have to cover part of the compensator ring. 
I think I'm going to try to make an aluminum spacer that is a press fit. That way it should stay in place and not make a bunch of noise. It can probably be large enough at one end to allow it to go over the ring without contact and hopefully still be strong enough not to break being pressed on. Probably with the help of some heating and cooling. I think I'd just have to be careful with the OD so I can still fit a socket to tighten to torque specs. Maybe one problem won't be terrible, and I'm not a fan of my wheels being messed up but I'm not gonna cry about it either. T2 is ugly. The main thing now is... WTH is going on with the carb still? I've had more than enough carb trouble for a lifetime already. I don't have a clear bowl and I'm not sure that one is made to fit, because it looks like PWKs can have different bowl bolt patterns. I don't have a spare drain plug to put a barb on to see if I could look at level with a hose pointed up and I don't want to mess up the one that I will use. I may see how much they are and how easily I can get one to use. Not really sure beyond that. 🤦♂️🤔🤷♂️ |
|
|
|
Post by ryan_ott on Apr 17, 2024 15:39:03 GMT -5
That’s a bummer about the wheel. My torsen has some spacer washers on the backside of the bearing so it’ll bottom out on the adapter before it could hit the wheel. Maybe that’s all you could need.
As far as my tuning and setup after the initial trial and error for the needle it’s honestly only been a few jet changes to find what works. It may have more in it but it works and gives good egt so I’m happy enough with it. The only trouble I’ve had besides the carb falling off was the Denso plugs fouling. It’s been fine once I switched to the NGK.
|
|
|
|
Post by aeroxbud on Apr 18, 2024 3:05:49 GMT -5
That's a real shame about the wheel. Especially with all the trouble you had getting it powder coated.
|
|


