|
|
Post by tsimi on Dec 7, 2014 4:11:19 GMT -5
Hi guys I have read through various threads here and in the www regarding scooter parts and wheel rim painting. There seem to be many ways to do that but one thing that everyone agrees is the preparation is the most important part of it. So i want to gather enough Info to be well prepared. I have seen these two threads 49ccscoot.proboards.com/thread/8589/custom-painted-roketa-bahama?page=149ccscoot.proboards.com/thread/5196/excellent-results-spray-paintI would like to know step by step what needs to be done. Here is what i got so far. 1. Sand down the parts. 2. Clean them with paint thinner or parts cleaner 3. Apply base coat 4. Apply paint 5. Apply clear coat so far OK now comes the part which I don't understand. (Regarding the video in the link above) 6. Sand down the clear coat with a 1000 wet/dry sand paper? Why is that? why not sand the bad areas before applying the clear coat? 7. After sanding the bad areas apply car polisher? Is that correct? Why not use another coat of clear coat? Some people seem to sand down again after step 4 and then at the end apply clear coat and that's it no car polisher. Is my understanding so far correct from step 1-5? Is it true that you get better results by warming up the spray can inside warm/hot water before using? ****************************************************************************************** Regarding Wheel Rim painting; We have wheel spray paint here in Japan (black or silver) which doesn't need any big preparations. So painting shouldn't be a big hassle but the bike shop guy said I should be careful when painting the Rim inside where the tire later touches. He said if the paint is uneven the tire can't seal completely and therefore you can't fill air inside the tire and pump it up. So he recommended to use an old tire around the wheel and only paint the area where the eye can see when the tire is on it. Is that true? Can that happen? Would be great to hear some Info from people with experience and that have painted their scooter. |
|
|
|
Post by 90GTVert on Dec 7, 2014 8:00:28 GMT -5
6. Sand down the clear coat with a 1000 wet/dry sand paper? Why is that? why not sand the bad areas before applying the clear coat? 7. After sanding the bad areas apply car polisher? Is that correct? Why not use another coat of clear coat? Not a great painter so I may be wrong here, but I think if you clear coat over sanded areas you will be more likely to see the sanding marks through the clear. It's counter-intuitive to me to not take orange peel out as you go, like you're just painting over a problem and could magnify it, but if what I've heard regarding the clear over sanding is correct it makes more sense. I believe if you were to re-coat the finish product with more clear vs buffing, you'd just end up with more orange peel to sand because it happens as the paint dries. Here's more paint info from DupliColor : www.duplicolor.com/pdfs/tips.pdfWe have wheel spray paint here in Japan (black or silver) which doesn't need any big preparations. So painting shouldn't be a big hassle but the bike shop guy said I should be careful when painting the Rim inside where the tire later touches. He said if the paint is uneven the tire can't seal completely and therefore you can't fill air inside the tire and pump it up. So he recommended to use an old tire around the wheel and only paint the area where the eye can see when the tire is on it. Is that true? Can that happen? I've had good results using DupliColor "high performance wheel coating" on my scoots. I just sand/scuff with 400-600 grit prior to painting, clean, paint with a couple of coats, and then clear. Definitely much more resilient surface than using any old spray paint as I've done in the past. I have painted over the lip and can't say I've had tire sealing issues from it. I've heard of people painting that area to help sealing if the area is rough/pitted. If you do decide not to paint that area, I wouldn't install an old tire just for that task. It would be so much easier to mask the wheel off real quick and that way you won't have to take a tire off later to add more risk of scratching your new paint. |
|
|
|
Post by scooterpimp on Dec 7, 2014 9:23:33 GMT -5
The wet sanding on final coat of clear coat then polishing allows for smooth glassy final appearance that clear alone cant achieve.
|
|
|
|
Post by tsimi on Dec 7, 2014 10:19:37 GMT -5
Thanks Brent & scooterpimp!
Regarding the wheels. Just saw i video how a dude paints his car rims with masking off the surrounding area. The result looked pretty impressive. That seems to be the easier way for me.
So if I understand that right i put around 3 coats of clear coat on it, sand the the "whole" thing down, and then "buff"/"polish" the whole thing with car polisher or something similar?
How much do i have to sand it down at the end?
|
|
|
|
Post by 90GTVert on Dec 7, 2014 12:48:39 GMT -5
As you wet sand the clear, you will need to wipe and dry it off regularly. When it's dry, you should be able to see the contrast of high (dull/sanded) and low (still glossy) spots.
If you use an auto polisher, be very careful. You can burn old fully cured paint with a buffer, and the fresher paint is even easier to burn. Considering the small areas involved and being a new experience, I think it would be safer to go by hand. At least try that and see if you can achieve good result would be my thought. Again I'm no paint pro so if the fellas that have shiny scoots offer different advice, go with them.
|
|
|
|
Post by niz76 on Dec 7, 2014 13:34:09 GMT -5
Now would be a good time to do my paint write-up!  Everything y'all are writing is correct. As far as the clear coat- it looks ok by spraying it on but nothing like a professional paint job or factory paint. There's a few sanding steps you can skip throughout the paint job and still get good results but I wouldn't suggest skipping the final wet sand and polish. For best results: Wet sand final base (color) coat, spray clear coat (I usually do about 3 layers) then wet sand final layer of clear coat and polish (I use headlight restore polish it has tiny bit of abrasive in it to really smooth things out) you will see after polishing the wax is not even needed! It's that nice! I wet sand with 1000 grit. Some vids suggest 2000 but I've found its not necessary. For just as good results but faster: Do everything above but skip wet-sanding final layer of color. The clear will fill in the orange peel and you'll never see it... 3rd option- still in testing/prototype phase! DANGER!: This is the easiest method I've stumbled across for a sweet factory looking DIY paint job: Do everything above, but after the 1000 grit wet-sand of clearcoat put the parts in an oven at 170 degrees for @30 mins. I stumbled across this method using the oven to speed up the painting process and I've duplicated the same results a few times now. The part will come out of the oven looking pre-polished!! I even took some compound and polished anyway but it didn't improve on the shine!- shazam!   |
|
|
|
Post by niz76 on Dec 7, 2014 13:40:35 GMT -5
I've painted a few sets of rims now and they all turned out great. It takes a bit of time to prep them but unless you're taking the tire off the rim there's no need to stress about painting the lip... Use an appropriate rim paint or epoxy. These whit rims I painted on an Eton Beamer were done in appliance epoxy!   |
|
|
|
Post by 2stroked on Jan 1, 2015 14:25:53 GMT -5
Nice thread idea. There's nothing worse than thinking you know what you are doing and finding out the hard way that you didn't.
By no means am I an expert painter, but I have painted several vehicles. In my experience a tack cloth is your best friend while finish sanding and before each fresh coat. They are great for polishing and detailing after clear coat as well.
That's just my opinion
|
|
|
|
Post by tsimi on Jan 12, 2015 7:57:53 GMT -5
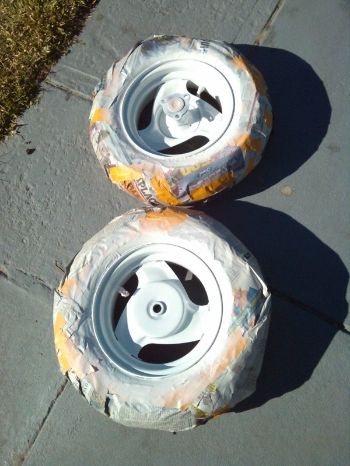
The weather outside is still not good/warm enough to paint the body parts but I had time to paint the rear wheel for starters. Had trouble removing the nut from the front wheel but got it off today and will start painting tomorrow. Below are some pics; my work space, no problem to work even when raining. otherwise I would paint in the garden out in the open.  during painting, back side  during painting, front side  result (close up)  result (far)  comparison (pics from 2 different Jogs) finally got my new Michelin S1 tire on it!   next would be the front wheel.  |
|
|
|
Post by niz76 on Jan 12, 2015 14:10:10 GMT -5
Looks really good. Night and day difference!
|
|
|
|
Post by scooterpimp on Jan 12, 2015 16:42:15 GMT -5
Looks awsome ! Im getting motivated again!   |
|
|
|
Post by tsimi on Jan 12, 2015 22:39:10 GMT -5
Looks really good. Night and day difference! I had great guidance...from you guys!  Nice avatar btw. Scooter addicted? scooterpimpLooking at all your guys awesome scooters here in the forum keeps me motivated to achieve a similar result. |
|
|
|
Post by tsimi on Jan 14, 2015 6:07:34 GMT -5
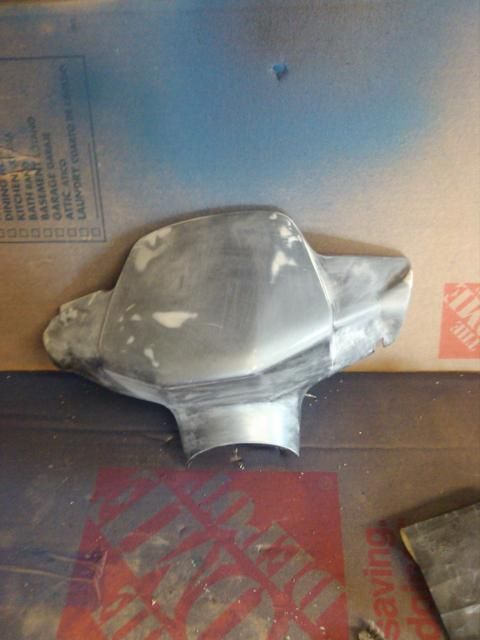
sanded (180 grid paper), cleaned and prepped for painting.  primer applied (2 coats)  don't know if that brings anything but i thought it might be a good idea to warm up the cans in warm/hot water before using.  i should be able to post some pics of the finished result over the weekend. |
|
|
|
Post by tsimi on Jan 15, 2015 5:39:21 GMT -5
Paint is dry (3-4 coats) and the wheel is ready for the tire change.  |
|
|
|
Post by tsimi on Jan 18, 2015 6:00:44 GMT -5
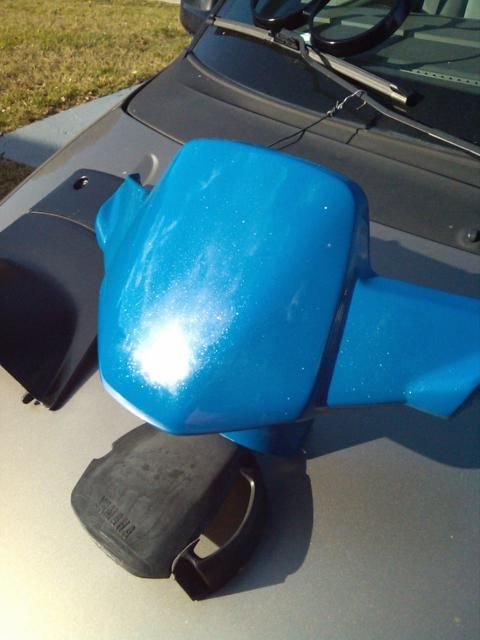
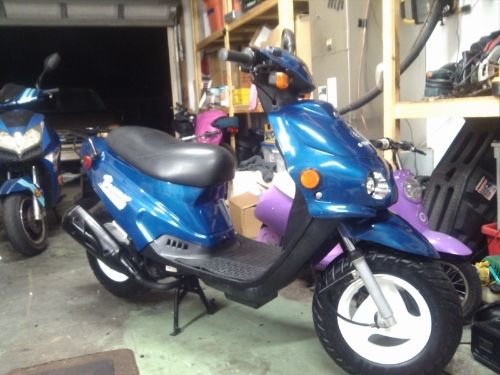
OK here are the promised pictures;   |
|


 Everything y'all are writing is correct. As far as the clear coat- it looks ok by spraying it on but nothing like a professional paint job or factory paint. There's a few sanding steps you can skip throughout the paint job and still get good results but I wouldn't suggest skipping the final wet sand and polish.


