Riding Safety Information, Tips, And Practices
Jan 30, 2015 1:00:32 GMT -5
Elektrey, iwannascoot, and 4 more like this
Post by 90GTVert on Jan 30, 2015 1:00:32 GMT -5
Riding Safety Information, Tips, And Practices
Scooters, mopeds, and motorcycles face challenges that cars and trucks don't. It doesn't take long on two wheels to realize that the experience is much different than what we may be accustomed to when piloting an automobile. There is nothing surrounding us to protect us from the elements or injury, stability in all conditions is a major concern, and other motorists have a harder time seeing us (even when they aren't using their cell phone, reading a newspaper, or trying to get their kids to stop fighting in the back seat as they drive). For all of these reasons and more, operating a two-wheeled vehicle requires your full respect and attention to stay safe. I've compiled some safety tips and information below that may be helpful, especially for new riders or those considering a two-wheeler.
Riding Gear
We all hope we will never crash, but no matter how safe we ride stuff happens and when it does it pays to be prepared. I'm sure wearing a t-shirt, shorts, and flip-flops feels great on a warm day scooter ride, but if someone told you that you'd be sliding across the hard and rough asphalt at 40MPH would that be the clothing you'd prefer to wear? If you're not sure, use your favorite search engine and look at some pictures of "road rash" (fair warning : they can be pretty graphic). Unfortunately no one can tell you when you will crash and how, so for maximum safety you have to be prepared for all situations the best you can. Protective gear goes well beyond preventing or lessening road rash and can help to avoid all sorts of injuries. The reality is that you can get hurt in a crash at any speed, even wearing the best gear you can get, but using the proper riding gear significantly reduces the probability and/or severity of some injuries.
In addition to protection from injury in the event of a crash, some clothing/gear also helps us remain comfortable in cold, hot, and wet weather. The less you are thinking about how cold you are or focusing on how the rain drops sting at speed, the more you can concentrate on the roadway and your surroundings. Full time, year round, riders may need separate riding gear for summer and winter as well as additional items for wet conditions. Here is some info specific to cold weather riding : CLICK HERE
Helmet & Eye Protection
A helmet and eye protection is one of the basic essentials for safe riding in my opinion. Some disagree about helmet safety, but I'll let you search for that info if you care to explore the anti-helmet arguments. Even if you don't wish to wear a helmet and eye protection, you may find that your state or local laws require you to wear them. Some areas allow no helmet on scooters and mopeds, but require them on motorcycles. Others don't even require them on motorcycles, but may still require some form of eye protection. If you do not wish to wear a helmet, at least check your local laws so you know if that's a legal option for you. Once you know what you need and want to wear, you'll have a few options.
Bicycle helmets are not suitable for use on scooters or motorcycles!
When shopping for a helmet you will probably notice some boast Snell or DOT certifications. DOT stands for Department of Transportation and helmets must be DOT certified for on road use in the United States. The DOT and NHTSA (National Highway Traffic Safety Administration) have standards that helmets should conform to in order to be DOT certified. The DOT or NHTSA do not test helmets before they are able to have DOT certifications placed on them. Instead the manufacturer agrees that their helmets conform to these standards via their own testing. Manufacturers risk fines if random samples are not found to meet the agreed upon DOT standards by independent test facilities. Snell certifications come from the Snell Memorial Foundation, which is a private non-profit organization. Snell certification is not required for on-road use so manufacturers may voluntarily attempt to attain Snell certification for their helmets. Snell performs tests before helmets are allowed a Snell certification, unlike DOT, and Snell sets tougher standards. DOT helmets are legal for on-road use in the US and helmets that are both DOT and Snell certified should meet both standards for a high level of protection while being road legal in the US. You can find lots more info on exact standards and procedures with a search if you are interested and CLICK HERE for a little more info on Snell and DOT.
It is very important to find a helmet that fits you properly. A poor fitting helmet could actually cause injury or at least not prevent it. For this reason I suggest purchasing your helmet in person in a store where you can try it on instead of buying online. I bought my first HJC helmet in a brick and mortar local shop after trying a few on and then continued buying HJC helmets online afterward. So far every HJC helmet in that size has fit me well. Each manufacturer may have a bit different fit for the same size, so I do not recommend switching brands unless you try on a helmet of that brand before ordering online. For best results you should try on the exact model as well or at least deal with an online retailer with an excellent return/exchange policy. CLICK HERE to learn more about how a helmet should fit.
Gloves
If you crash, most likely you will try to catch or protect yourself with your hands because it's an instinct. This makes gloves an essential for any rider at any speed. Choose a set of gloves intended for use on motorcycles and scooters. Regular winter gloves and work gloves are not designed to protect riders from road rash (damage to the skin from contact with the road) or other injuries. Riding gloves should have have a thick protective layer (often leather) for at least the palm and bottom finger/thumb areas where contact with asphalt is most common. Some gloves have padding, carbon fiber, or alternative additions to better protect other areas of the hand and wrist. They should also have a wrist strap to secure the glove to your hand and prevent them from coming off in an accident.
Gloves are made in many configurations to allow comfort in all reasonable riding conditions. Gloves with lots of mesh and vents improve hot/warm weather comfort. Gloves without insulation or thin insulation usually work well for mild to warm temps. Thick insulated and heated gloves should be used for cold/winter riding. Whatever you choose, make sure you are not sacrificing control because of glove design/thickness. This is especially a problem with winter gloves, so heated gloves or using grip heaters may be an alternative to thick gloves.
Footwear
Ideally footwear for riding should protect your feet and ankles from road rash and help to prevent foot and ankle injuries from impact, crushing, twisting, and hyperextension. Motorcycle specific boots are the best option for maximum protection. They should extend above the ankle for proper support. Leather provides excellent abrasion resistance and is great for blocking the elements. Thick soles help to make the boot more rigid and may also absorb more vibration from the footboard or pegs. Choose footwear with treaded soles for more grip. Boots with zippers or buckles may be easier to get on and off fast and can eliminate laces which may get caught on foot pegs or in the controls (more of a problem for motorcycles with foot brakes and shifters). Steel toes are a topic of debate. Some say they may be bent and injure or sever toes. There are now other rigid toe options available that may be safer. Research and consider all options before choosing a riding boot.
Many scooterists won't buy riding boots, but at least consider above ankle work boots. Sneakers at least offer some minimal degree of protection. Bare feet and flip-flops or sandals should be avoided at all costs.
Jacket And Pants
Riding jackets and pants should offer abrasion and impact protection. If you want maximum protection from road rash, check out leather riding gear and look at the specs for leather thickness. The thicker the better when you're sliding across the asphalt, although thick leather gear can be fairly heavy compared to textile apparel. Choosing gear with CE approved armor can add greater impact and abrasion protection in areas such as the elbows, shoulders, back, chest, hips, and knees. Some find armored gear to be less comfortable because of the padding/armor. Some jackets and pants can be zipped together to create something more similar to a one-piece suit which prevents any separation leaving parts of you exposed. Full leather suits are available, but generally used for racing or hard riding because they offer a lot of protection but not a lot of comfort or practicality.
Selecting a jacket with a removable insulated liner and vents that can be zipped open or closed can make one jacket good for a lot of riding conditions and temperatures. To be most effective in cold weather insulated liners should have elastic bands so they seal to the wrists and keep air out. For hot summer riding mesh riding gear can add protection without sacrificing a lot of comfort.
If you don't like the idea of looking like you're suited up for a race while riding your scooter at 30MPH, you can find jackets and pants that offer protection without looking like racing gear. Some jackets are quite subtle in their styling and resemble casual or dress jackets. Companies even make riding pants with protection that look much like standard denim jeans or cargo pants. No one even has to know that you're prepared for whatever comes your way.
I know it's tempting to go out in a t-shirt and shorts, but at least try to cover all parts of your body. Even a mesh riding jacket over a t-shirt and a pair of thick jeans can greatly reduce road rash vs bare skin.
Vehicle Checks And Maintenance
You've got your gear on and you're ready to head out, but wait... not so fast. A basic pre-ride inspection could prevent an accident, a close call, or a ticket. Issues such as a malfunctioning turn signal or low tire pressure can lead to accidents, so a pre-ride inspection is not only good for your scooter but it could also save your life.
In addition to pre-ride checks, you should keep your scooter properly maintained and in good working order. Never ignore issues with critical systems (brakes, steering, drivetrain). They should always be checked and repaired ASAP.
Visit the link below for more information on vehicle checks and maintenance :
49ccscoot.proboards.com/thread/344/periodic-checks-maintenance
Visibility
One of the major steps to being safe is making yourself visible to other riders. This can be done in many ways including clothing, lighting, and reflectors. Appropriate measures to improve the chances of being seen by other motorists reduces the risk of accidents.
High Visibility Apparel
Reflectors And Auxiliary Lighting
Even if you are wearing reflective clothing, your scooter should have reflectors installed. Most include a round amber reflector on each side of the front, often on the front fender; one round red reflector on each side near the rear; and a rectangular red reflector on the back of the scoot near the tail/brake light assembly. These help other motorists to see your scoot from most angles at night, or at least let them know something is there, even if your lights are not functioning or aren't very bright. You can add more reflectors if you'd like. I would suggest sticking to the amber front/red rear theme when using standard round and rectangular reflectors as it is an auto/moto standard to have amber marker lights and reflectors in the front and red markers and reflectors in the rear and may allow others to easily tell what direction you're headed in. Reflective tape or decals could be added, and as I mentioned earlier you can even find shops that custom cut reflective vinyl decals so you can personalize your scoot while adding safety features. You can also buy reflective wheel/rim tape or pinstriping tape and add accents to your scoots that can be seen in the daytime as customizations while increasing night time visibility.
Replacements for standard reflectors that can be wired into the tail/running light circuit so they light up are now becoming popular online. They look like a regular round or rectangular red reflector, but have LEDs in them so they illuminate. I have no personal experience with these, but have read reviews stating that they are not reflective. While I think it can be a good idea to add marker lights to your ride, replacing working reflectors with something that only illuminates if it has power is not a good idea. They cannot help you if you are broken down, have a malfunctioning lighting or electrical system, or if the scooter is parked.
Use your headlight's high beam for daytime riding. Headlight modulators and brake light modulators can be used to make your scooter's existing lighting more noticeable. Headlight modulators can make the headlight pulse or flash during daylight riding to draw other motorists attention. Some kits allow the modulator to be switched on or off by specific methods of using the existing high/low beam switch. Many have sensors that can automatically disable modulation when it gets dark. Be sure to select a modulator that works with the style of headlights your scooter has, AC or DC powered. Brake light flashers or modulators are also available. They can cause the brake light to flash a few times before remaining solid when you hold the brakes or flash continuously while braking to better catch the eye of other drivers. You can emulate this function on your own by quickly and lightly squeezing the brake lever(s) before you plan to stop or reduce speed.
Kits are available that allow a brake light or even a whole tail/brake and turn signal indicator setup to be mounted on the rider's helmet. Not only do they add more rear lighting, but it's placed high so it may be easier to see. Most of the kits have a controller that must be tapped into the scooter's tail/brake/turn circuits and a light assembly that communicates wirelessly with the controller. Riders using scooter luggage boxes/trunks can add tail/brake/turn indicators to their trunks for additional/elevated lighting.
Some riders install amber flashing/strobe lights that can be switched on for emergency use or when riding in poor visibility such as fog or inclement weather. I would advise checking your local laws to find out if this style of lighting is legal to use on public roadways.
Forward Visibility
It's hard to ride safe if you can't see what's around you. During daylight hours this mostly entails keeping your face shield or other eyewear, windshield (if so equipped), and mirrors clean. It's not a bad idea to carry a cloth or a few paper towels and a small bottle of cleaner. You can even find single use helmet/visor wipes that take up virtually no storage space.
Once the sun goes down we have to rely on our headlights, and many scooters don't have lights that are up to the task. It's not uncommon for stock scooters to have as little as 18 watt standard incandescent bulbs. Something as simple as a headlight bulb swap could make your night time riding experience much safer and less stressful. Most commonly used scooter headlight bulb styles have options available up to or beyond 35W as well as halogen and xenon versions that may burn brighter and/or whiter. LED replacement bulbs tempt many, but be careful what you get if you choose LEDs. Many of them are bright to look at, but do a poor job of casting light onto the roadway or need very focused housings to be usable.
Whichever style you choose, keep in mid that your scooter's lighting system has limitations. Expect typical 49cc scooters to support around 50-55 watts worth of total headlight power. Some support a little more, but don't be prepared for the possibility that anything above 50-55W won't reach full brightness. Larger displacement scooters may have more robust charging and lighting systems. Using LED tail/brake lights may free up a little extra power for the headlight(s). You should also be aware that scooter headlight housings may not be designed to or capable of supporting higher powered bulbs. In some cases the housing, surrounding plastics, headlight connector, or wiring may melt and could potentially be a fire hazard.
Riding Techniques
Use any of this information at your own risk and discretion.
All images and text original and © 49ccScoot - 2015. All Rights Reserved.
Scooters, mopeds, and motorcycles face challenges that cars and trucks don't. It doesn't take long on two wheels to realize that the experience is much different than what we may be accustomed to when piloting an automobile. There is nothing surrounding us to protect us from the elements or injury, stability in all conditions is a major concern, and other motorists have a harder time seeing us (even when they aren't using their cell phone, reading a newspaper, or trying to get their kids to stop fighting in the back seat as they drive). For all of these reasons and more, operating a two-wheeled vehicle requires your full respect and attention to stay safe. I've compiled some safety tips and information below that may be helpful, especially for new riders or those considering a two-wheeler.
Riding Gear
We all hope we will never crash, but no matter how safe we ride stuff happens and when it does it pays to be prepared. I'm sure wearing a t-shirt, shorts, and flip-flops feels great on a warm day scooter ride, but if someone told you that you'd be sliding across the hard and rough asphalt at 40MPH would that be the clothing you'd prefer to wear? If you're not sure, use your favorite search engine and look at some pictures of "road rash" (fair warning : they can be pretty graphic). Unfortunately no one can tell you when you will crash and how, so for maximum safety you have to be prepared for all situations the best you can. Protective gear goes well beyond preventing or lessening road rash and can help to avoid all sorts of injuries. The reality is that you can get hurt in a crash at any speed, even wearing the best gear you can get, but using the proper riding gear significantly reduces the probability and/or severity of some injuries.
In addition to protection from injury in the event of a crash, some clothing/gear also helps us remain comfortable in cold, hot, and wet weather. The less you are thinking about how cold you are or focusing on how the rain drops sting at speed, the more you can concentrate on the roadway and your surroundings. Full time, year round, riders may need separate riding gear for summer and winter as well as additional items for wet conditions. Here is some info specific to cold weather riding : CLICK HERE
Helmet & Eye Protection
A helmet and eye protection is one of the basic essentials for safe riding in my opinion. Some disagree about helmet safety, but I'll let you search for that info if you care to explore the anti-helmet arguments. Even if you don't wish to wear a helmet and eye protection, you may find that your state or local laws require you to wear them. Some areas allow no helmet on scooters and mopeds, but require them on motorcycles. Others don't even require them on motorcycles, but may still require some form of eye protection. If you do not wish to wear a helmet, at least check your local laws so you know if that's a legal option for you. Once you know what you need and want to wear, you'll have a few options.
Name | Description | Image |
Eye Protection | Some use standard eyeglasses or sunglasses, but specialty motorcycle glasses or goggles should be used. Eye protection designed for motorcycle use are often made of stronger materials for better protection and durability. They may also be made to shield your eyes from wind or debris from more angles than standard eyewear. Don't forget to look for UVA and UVB ray blocking even if buying clear lenses. |  |
1/2 Helmet | Half helmets cover the top of the head, just above the ears and up. They are the minimum protection allowed in most areas with helmet laws. As with any open face helmet, you should wear eye protection and may be required by law to wear eye protection with a half helmet. The tradeoffs for having the least protection are that these are the lightest and most open of any legal helmets. |  |
3/4 Helmet | Three-quarter helmets are similar to half helmets, but they add protection for the back of the skull and cover the rider's ears. Some have flip down shields that protect the rider's face from small debris like bugs and block the wind, but they offer no chin/face protection in the event of a crash. If there is no face shield, some other form of eye protection is needed with a 3/4 helmet. |  |
Full Face Helmet | Full face helmets cover the entire head and face for maximum protection from injury and the elements. A clear shield covers the eye area and flips up for additional airflow or to access your face for things like putting on eyeglasses. Many have venting systems that can be opened or closed to keep the rider more comfortable in cold or hot weather. As long as the face shield remains closed no additional eye protection is required. | 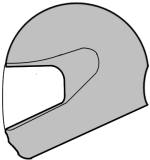 |
Modular Helmet | Modular helmets are a form of full face helmets that allow the chin and eye shield sections to flip up, leaving something similar to a 3/4 helmet shape. This allows easy access if you stop to take a drink or smoke without having to remove it as you normally would with a conventional full face helmet. Some even have fully detachable chin sections. | 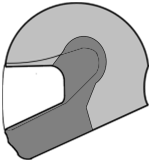 |
Off-Road or MX Helmet | These helmets are similar to full face helmets, but often have no eye/face shield built in and require the use of goggles for eye protection. Many have a brim/visor which can shade your eyes from sunlight and allows off-road riders to lean their head down to block debris coming toward them. |  |
Bicycle helmets are not suitable for use on scooters or motorcycles!
When shopping for a helmet you will probably notice some boast Snell or DOT certifications. DOT stands for Department of Transportation and helmets must be DOT certified for on road use in the United States. The DOT and NHTSA (National Highway Traffic Safety Administration) have standards that helmets should conform to in order to be DOT certified. The DOT or NHTSA do not test helmets before they are able to have DOT certifications placed on them. Instead the manufacturer agrees that their helmets conform to these standards via their own testing. Manufacturers risk fines if random samples are not found to meet the agreed upon DOT standards by independent test facilities. Snell certifications come from the Snell Memorial Foundation, which is a private non-profit organization. Snell certification is not required for on-road use so manufacturers may voluntarily attempt to attain Snell certification for their helmets. Snell performs tests before helmets are allowed a Snell certification, unlike DOT, and Snell sets tougher standards. DOT helmets are legal for on-road use in the US and helmets that are both DOT and Snell certified should meet both standards for a high level of protection while being road legal in the US. You can find lots more info on exact standards and procedures with a search if you are interested and CLICK HERE for a little more info on Snell and DOT.
It is very important to find a helmet that fits you properly. A poor fitting helmet could actually cause injury or at least not prevent it. For this reason I suggest purchasing your helmet in person in a store where you can try it on instead of buying online. I bought my first HJC helmet in a brick and mortar local shop after trying a few on and then continued buying HJC helmets online afterward. So far every HJC helmet in that size has fit me well. Each manufacturer may have a bit different fit for the same size, so I do not recommend switching brands unless you try on a helmet of that brand before ordering online. For best results you should try on the exact model as well or at least deal with an online retailer with an excellent return/exchange policy. CLICK HERE to learn more about how a helmet should fit.
Gloves
If you crash, most likely you will try to catch or protect yourself with your hands because it's an instinct. This makes gloves an essential for any rider at any speed. Choose a set of gloves intended for use on motorcycles and scooters. Regular winter gloves and work gloves are not designed to protect riders from road rash (damage to the skin from contact with the road) or other injuries. Riding gloves should have have a thick protective layer (often leather) for at least the palm and bottom finger/thumb areas where contact with asphalt is most common. Some gloves have padding, carbon fiber, or alternative additions to better protect other areas of the hand and wrist. They should also have a wrist strap to secure the glove to your hand and prevent them from coming off in an accident.
Gloves are made in many configurations to allow comfort in all reasonable riding conditions. Gloves with lots of mesh and vents improve hot/warm weather comfort. Gloves without insulation or thin insulation usually work well for mild to warm temps. Thick insulated and heated gloves should be used for cold/winter riding. Whatever you choose, make sure you are not sacrificing control because of glove design/thickness. This is especially a problem with winter gloves, so heated gloves or using grip heaters may be an alternative to thick gloves.
Footwear
Ideally footwear for riding should protect your feet and ankles from road rash and help to prevent foot and ankle injuries from impact, crushing, twisting, and hyperextension. Motorcycle specific boots are the best option for maximum protection. They should extend above the ankle for proper support. Leather provides excellent abrasion resistance and is great for blocking the elements. Thick soles help to make the boot more rigid and may also absorb more vibration from the footboard or pegs. Choose footwear with treaded soles for more grip. Boots with zippers or buckles may be easier to get on and off fast and can eliminate laces which may get caught on foot pegs or in the controls (more of a problem for motorcycles with foot brakes and shifters). Steel toes are a topic of debate. Some say they may be bent and injure or sever toes. There are now other rigid toe options available that may be safer. Research and consider all options before choosing a riding boot.
Many scooterists won't buy riding boots, but at least consider above ankle work boots. Sneakers at least offer some minimal degree of protection. Bare feet and flip-flops or sandals should be avoided at all costs.
Jacket And Pants
Riding jackets and pants should offer abrasion and impact protection. If you want maximum protection from road rash, check out leather riding gear and look at the specs for leather thickness. The thicker the better when you're sliding across the asphalt, although thick leather gear can be fairly heavy compared to textile apparel. Choosing gear with CE approved armor can add greater impact and abrasion protection in areas such as the elbows, shoulders, back, chest, hips, and knees. Some find armored gear to be less comfortable because of the padding/armor. Some jackets and pants can be zipped together to create something more similar to a one-piece suit which prevents any separation leaving parts of you exposed. Full leather suits are available, but generally used for racing or hard riding because they offer a lot of protection but not a lot of comfort or practicality.
Selecting a jacket with a removable insulated liner and vents that can be zipped open or closed can make one jacket good for a lot of riding conditions and temperatures. To be most effective in cold weather insulated liners should have elastic bands so they seal to the wrists and keep air out. For hot summer riding mesh riding gear can add protection without sacrificing a lot of comfort.
If you don't like the idea of looking like you're suited up for a race while riding your scooter at 30MPH, you can find jackets and pants that offer protection without looking like racing gear. Some jackets are quite subtle in their styling and resemble casual or dress jackets. Companies even make riding pants with protection that look much like standard denim jeans or cargo pants. No one even has to know that you're prepared for whatever comes your way.
I know it's tempting to go out in a t-shirt and shorts, but at least try to cover all parts of your body. Even a mesh riding jacket over a t-shirt and a pair of thick jeans can greatly reduce road rash vs bare skin.
Vehicle Checks And Maintenance
You've got your gear on and you're ready to head out, but wait... not so fast. A basic pre-ride inspection could prevent an accident, a close call, or a ticket. Issues such as a malfunctioning turn signal or low tire pressure can lead to accidents, so a pre-ride inspection is not only good for your scooter but it could also save your life.
In addition to pre-ride checks, you should keep your scooter properly maintained and in good working order. Never ignore issues with critical systems (brakes, steering, drivetrain). They should always be checked and repaired ASAP.
Visit the link below for more information on vehicle checks and maintenance :
49ccscoot.proboards.com/thread/344/periodic-checks-maintenance
Visibility
One of the major steps to being safe is making yourself visible to other riders. This can be done in many ways including clothing, lighting, and reflectors. Appropriate measures to improve the chances of being seen by other motorists reduces the risk of accidents.
High Visibility Apparel
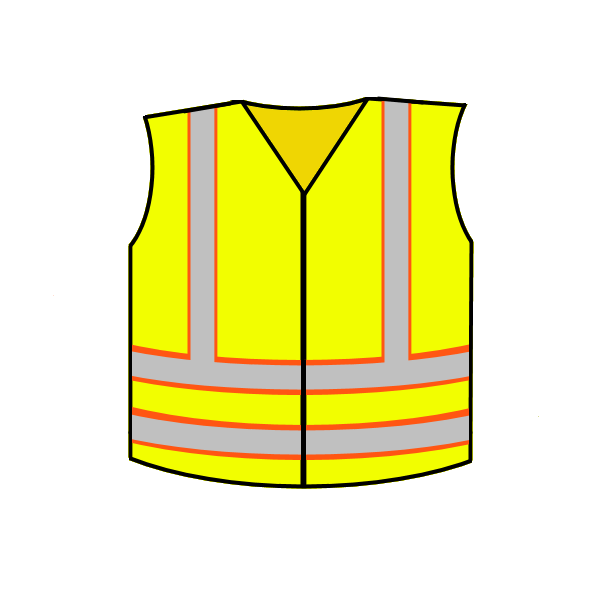 | When selecting the riding gear mentioned earlier, consider purchasing it in high visibility yellow or orange. You should also look for clothing with reflective areas like stripes or piping so you're easier to see at night or in low light conditions. Even if you already own gear or don't want to buy a neon or reflective outfit, there's a cheap and easy way to add high-vis gear to your wardrobe. You can find high-vis/reflective safety vests that can be fitted over your other riding gear for as little as $5-$10 in stores like Wal-Mart or Harbor Freight among others. Adding reflective decals to your helmet is another way to turn plain gear into high visibility gear and you can even get custom lettering done in reflective vinyl to make it your own. |
Reflectors And Auxiliary Lighting
Even if you are wearing reflective clothing, your scooter should have reflectors installed. Most include a round amber reflector on each side of the front, often on the front fender; one round red reflector on each side near the rear; and a rectangular red reflector on the back of the scoot near the tail/brake light assembly. These help other motorists to see your scoot from most angles at night, or at least let them know something is there, even if your lights are not functioning or aren't very bright. You can add more reflectors if you'd like. I would suggest sticking to the amber front/red rear theme when using standard round and rectangular reflectors as it is an auto/moto standard to have amber marker lights and reflectors in the front and red markers and reflectors in the rear and may allow others to easily tell what direction you're headed in. Reflective tape or decals could be added, and as I mentioned earlier you can even find shops that custom cut reflective vinyl decals so you can personalize your scoot while adding safety features. You can also buy reflective wheel/rim tape or pinstriping tape and add accents to your scoots that can be seen in the daytime as customizations while increasing night time visibility.
Replacements for standard reflectors that can be wired into the tail/running light circuit so they light up are now becoming popular online. They look like a regular round or rectangular red reflector, but have LEDs in them so they illuminate. I have no personal experience with these, but have read reviews stating that they are not reflective. While I think it can be a good idea to add marker lights to your ride, replacing working reflectors with something that only illuminates if it has power is not a good idea. They cannot help you if you are broken down, have a malfunctioning lighting or electrical system, or if the scooter is parked.
Use your headlight's high beam for daytime riding. Headlight modulators and brake light modulators can be used to make your scooter's existing lighting more noticeable. Headlight modulators can make the headlight pulse or flash during daylight riding to draw other motorists attention. Some kits allow the modulator to be switched on or off by specific methods of using the existing high/low beam switch. Many have sensors that can automatically disable modulation when it gets dark. Be sure to select a modulator that works with the style of headlights your scooter has, AC or DC powered. Brake light flashers or modulators are also available. They can cause the brake light to flash a few times before remaining solid when you hold the brakes or flash continuously while braking to better catch the eye of other drivers. You can emulate this function on your own by quickly and lightly squeezing the brake lever(s) before you plan to stop or reduce speed.
| Headlight Modulator | Brake Light Flasher |
 |  |
Kits are available that allow a brake light or even a whole tail/brake and turn signal indicator setup to be mounted on the rider's helmet. Not only do they add more rear lighting, but it's placed high so it may be easier to see. Most of the kits have a controller that must be tapped into the scooter's tail/brake/turn circuits and a light assembly that communicates wirelessly with the controller. Riders using scooter luggage boxes/trunks can add tail/brake/turn indicators to their trunks for additional/elevated lighting.
Some riders install amber flashing/strobe lights that can be switched on for emergency use or when riding in poor visibility such as fog or inclement weather. I would advise checking your local laws to find out if this style of lighting is legal to use on public roadways.
Forward Visibility
It's hard to ride safe if you can't see what's around you. During daylight hours this mostly entails keeping your face shield or other eyewear, windshield (if so equipped), and mirrors clean. It's not a bad idea to carry a cloth or a few paper towels and a small bottle of cleaner. You can even find single use helmet/visor wipes that take up virtually no storage space.
Once the sun goes down we have to rely on our headlights, and many scooters don't have lights that are up to the task. It's not uncommon for stock scooters to have as little as 18 watt standard incandescent bulbs. Something as simple as a headlight bulb swap could make your night time riding experience much safer and less stressful. Most commonly used scooter headlight bulb styles have options available up to or beyond 35W as well as halogen and xenon versions that may burn brighter and/or whiter. LED replacement bulbs tempt many, but be careful what you get if you choose LEDs. Many of them are bright to look at, but do a poor job of casting light onto the roadway or need very focused housings to be usable.
| Common Scooter Headlight Bulb Styles | ||
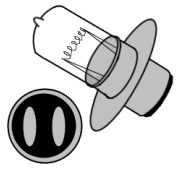 |  | 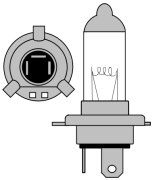 |
| P15D / "Bullet" | BA20D / "B35" | H4 |
Whichever style you choose, keep in mid that your scooter's lighting system has limitations. Expect typical 49cc scooters to support around 50-55 watts worth of total headlight power. Some support a little more, but don't be prepared for the possibility that anything above 50-55W won't reach full brightness. Larger displacement scooters may have more robust charging and lighting systems. Using LED tail/brake lights may free up a little extra power for the headlight(s). You should also be aware that scooter headlight housings may not be designed to or capable of supporting higher powered bulbs. In some cases the housing, surrounding plastics, headlight connector, or wiring may melt and could potentially be a fire hazard.
Riding Techniques
- Maintain a "cushion" of free space around you. Having room to react and move in all directions provides more time and more options for avoiding a crash.
- Maintain a following distance of at least 3 seconds behind the vehicle in front of you to allow yourself time to react. You can watch when the vehicle's rear passes a stationary object like a telephone pole or sign. Then count the seconds until the front of your scooter reaches the same object. It should take at least 3 seconds. This may also improve your visibility to the driver in front of you.
- Don't allow vehicles to follow you too closely. If a vehicle is too close behind you begin by tapping your brake just enough to illuminate your brake lights a couple of times. Sometimes that gets the point across and the other motorist will back off. If they continue to follow you too closely, use your turn signal, slow down gradually, and pull over when it's safe so they can pass or change lanes if you have the option. Simply slowing gradually may be enough to encourage them to pass, but don't put yourself at risk by slowing quickly or being aggressive.
Scooters may be in special situations because of local laws. For example many local laws require operators of 50cc scooters to ride to the far right of the lane to allow traffic to pass. Be careful about this because many motorists will attempt to squeeze by when they barely have enough room, putting you in danger. In some situations it may be safer to maintain a more central lane position and pull over when there is adequate room for other vehicles to pass. Do not impede traffic if it can be avoided, but don't put yourself or others at risk to allow traffic to pass.
- Avoid riding with vehicles or objects very near your sides whenever possible. If you have objects in close proximity in both directions, you leave yourself nowhere to move to avoid anything in your path. This can be a challenge in areas where small displacement scooters are required to use the shoulder or bike lanes. You may have cars immediately to one side and trees, a curb, a ditch, or other objects immediately to your right. If you must ride in those areas, reduce your speed and remain aware of what's going on around you. - Below is a picture showing three riding lane positions as they are most commonly labeled. #1 to the left of center, #2 in the center, and #3 to the right of center. Evaluate your surroundings and choose the lane position that allows you to see and be seen the best, gives you a cushion or escape route to your sides, avoids road hazards that may be present, and gives you dominance of the lane.
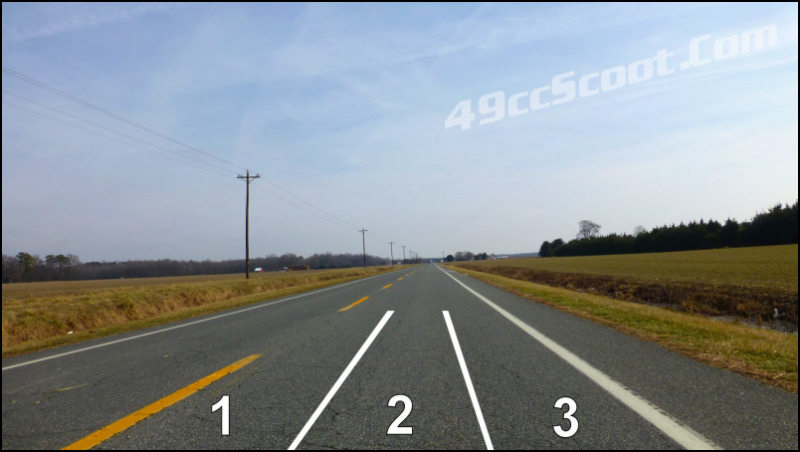
Dominance of the lane refers to exhibiting control of the lane in order to make it clear that other vehicles should not pass you within it or otherwise share the lane with you. #1 is usually thought of as the most dominant lane position. It leaves no room to pass within the lane to the left as is standard in the US. #2 also establishes lane dominance well. #3 is the least desirable position and motorists are tempted to pass when you ride far to the right of the lane. This can be a bit tricky for 50cc and under scooters in many areas because of laws requiring scooters to ride in or move to the far right to allow traffic to pass. Don't put yourself in a position where you are allowing cars to pass you too close or in an unsafe manner though. Consider dominating the lane and pulling over or off of the road once it's safe for traffic to pass. Consult your local laws and know your riding rights.
Lane position #1 is a popular sort of default lane position. As mentioned, it establishes dominance. It also offers good visibility of and for the rider in many situations. Riding in position #1 allows you to be seen in the side and rear view mirrors of vehicles in front of you (assuming you are at an adequate following distance). On roads as shown in the image above, position #1 makes you more visible to motorists heading in the opposite direction and behind you. When riding in position #2 or #3 someone a car or more behind you may think your spot is empty so they have room to pass and squeeze in. #1 also gives you a better view of what's happening ahead of and behind you so you can react. Another benefit is that riding to the left on a road like this allows drivers coming from roads or driveways to your left or right usually have a good view of you.
Lane position #2 gets called the grease strip a lot. Some say to avoid riding there at all. The idea is that fluids drip down into the center of the lane from cars and trucks and it creates a slick area. This is very often the case in areas where traffic is often congested or stopped. Even in areas with minimal traffic the center of the lane commonly has slick stuff present at and near red lights and stop signs. On open roads where traffic moves freely the grease strip tends to be less of an issue.
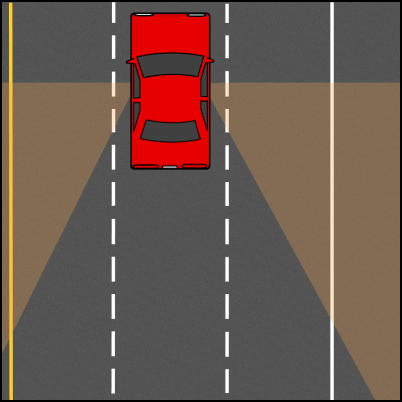
There is no one correct lane position in all circumstances. You must remain aware of your surroundings and the potential risks and decide which spot will make you the most visible to others, give you the ability to see the best, establish dominance, maintain a cushion of space to your sides, and keep you out of slick spots and hazards. In practice you will find that most of the time one position does not offer the best for all considerations and you must make an educated compromise. - Avoid riding in another vehicle's blind spots. The image below approximately illustrates common blind spots for cars and small trucks. These can be larger or smaller because of mirror adjustments and vehicle design. Semi-trailer trucks may have much larger blind spots, including directly behind them in close proximity. Some even have blind spots very near the front and sides because of their height. You should also avoid staying beside any vehicles if it can be avoided, especially to the rear of the other vehicle. At least if you are not directly beside the vehicle they may not collide with you if they move without seeing you.
- Adjust your mirrors to provide the best view of what's around you with the fewest blind spots possible. If you have large mirrors you may be able to add convex blind spot mirrors to improve your view. Many easily stick onto an existing mirror or other surface if you can find a suitable location. You can also find add-on mirrors like bar end mirrors or mirrors that mount to an existing mirror mount or support. Even with what you believe to be a good view from your mirrors, always turn your head partially and look before changing lanes.
- Always use a turn signal if you are changing lanes or directions, even if you don't think anyone else is around to see it. It could be just the warning that the other motorist you failed to notice needs to avoid a collision with you. The flashing signal draws attention and announces intention. ...And don't forget to cancel the signal once you've made your move.
- Learn the basic hand signals to alert others to your intended path or action in the event of a brake or turn signal failure, and repair the signal ASAP. Three of the most basics are shown below.
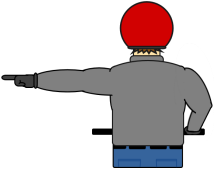


Left Turn :
Left arm extended straight to
the left with hand flat, palm
down or pointing.Right Turn :
Left arm out to the left and
bent 90 degrees upward. Fist
balled or flat palm.Stop :
Left arm out to the left and
bent 90 degrees downward.
Flat palm. - If you ride with a friend or in larger groups, everyone that you ride with should brush up on the signals and other practices illustrated by the MSF (Motorcycle Safety Foundation). They have a PDF HERE and a video HERE.
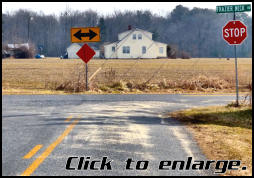
- Use caution when coming to stops signs and red lights. Do not wait till the last minute and brake hard. Not only can this surprise motorists behind you, but as mentioned earlier there are often fluids from other vehicles sitting at or near red lights and stop signs. You may find other hazards there as well. Some areas spread sand in intersections for winter weather and it stays around long after the snow is gone. On tar and chip or dirt roads you may find loose gravel or dirt near stop signs that make controlling the scooter more difficult. You should also be cautious around the center and edges of tar and chip or dirt roads as loose materials are more likely to be there.
- Exercise caution when riding in rain or on wet roads.
- Reduce speeds, increase following and stopping distances, and don't be aggressive with acceleration or turning on wet roads.
- Rain will lift oil and other substances to the surface of the road and make them more slick. This is often the worst shortly after rain begins. Use caution when putting your feet down at a stop as well because of the potentially slippery surface.
- Painted lines on the road or in parking lots are slick when wet, so use caution crossing them.
- Avoid riding through puddles and standing water whenever possible. Water can cause issues with steering or hydroplaning/aquaplaning and puddles may be deeper than you realize. Two-wheelers are generally less susceptible to hydroplaning because of their round tire profiles that can push water aside and a narrow contact patch which applies weight to a smaller area. Riding in the tracks of vehicles ahead of you may create a slightly more dry riding surface for you. If you feel any signs of hydroplaning, back out of the throttle and farther reduce your speed.
-Do not ride through rapidly moving water such as in flooding situations. The current can move you downstream and you may end up in big trouble. In addition if the water is deep or murky you don't know how bad the road below may be washed out or what you're getting yourself into.
- Waxing your visor may allow rain or other wet weather to more easily be cleared, but be aware that many chemicals are not suitable for use on visors and other plastics. With a slick face shield turning your head to the side may be enough to persuade droplets from your visor. Some riding gloves have a sort of squeegee sewn into a thumb or finger to help you clear the visor. You may also consider using a windshield if you'll be riding in wet weather often. - Avoid snow, ice, and other freezing weather if at all possible.
- If weather forecasts predict snow or ice, try to make other transportation plans in advance.
- Greatly reduce speed when riding on snow or ice or where it may potentially lie. Increase following and stopping distances. Be gentle with the throttle and brakes. Consider using the rear brake a bit more in slippery conditions. Take turns slowly and move your weight to avoid leaning the scooter into turns. In some situations you may want to put your feet down on or near the ground to help keep you and the scoot upright at slow speeds.
- Iced over roadways are no place for a two-wheeler. You cannot control your scooter properly on ice. Even if you are an experienced rider with a scooter prepped for ice or snow duty, the other vehicles around you probably are not. - Strong winds and wind gusts can be dangerous for scooterists. Headwinds or tailwinds tend to speed you up or slow you down, but aren't usually a big problem for maintaining control. Crosswinds can push you and your scooter side to side.
- Different riders have their own ways of dealing with crosswinds including leaning, repositioning their weight, or countersteering. Whichever you are comfortable with, be prepared to adjust as wind gusts happen and do your best to avoid overreacting to gusts.
- Choose a lane position that allows you room to move a bit as wind gusts hit you.
- Reduce your profile to reduce the effect wind or gusts have on you. Don't lean or otherwise reposition yourself in any way that compromises your control of the scooter.
- Be on the lookout for and prepared to react to objects being blown into or across the roadway by wind. - Stay alert and focused. Never ride under the influence of drugs or alcohol. Don't ride if you're very tired. Forget distractions like your phone.
- Ride defensively. Scan the area ahead of you and to your sides and be on the lookout for potential dangers. Don't assume that other drivers see you. You should be continuously evaluating what's happening around you and what you can do you minimize your risks.
Use any of this information at your own risk and discretion.
All images and text original and © 49ccScoot - 2015. All Rights Reserved.

