|
|
Post by niz76 on Feb 14, 2016 0:01:59 GMT -5
Ok sorry about the crazy spur of the moment post. I ran into an issue and it's quite a doozy. Hopefully I didn't just trash my brand new crank. First let me get caught up- Moving along nicely and ready to install all these new bearings and seals...  By now I know the inside of a Minarelli like the back of my hand- this Vespa engine, not so much! I've been spending A LOT of time watching and re-watching vids and reading articles to make sure I get things where they need to go... I got the clutch side crank bearing nice and smooth using the hot and cold method (heat gun and electronics duster). After that I got the new metal seal beat in real nice...  So now I'm ready to drop the crank in! Done!  Sweet right? Actually no- this is where I made a HUGE mistake. I forgot to- didn't realize I needed to actually- install the flywheel side bearing race onto the crank. CRAP! This thing is a real B!t*h to get on. Even using hot and cold it was extremely difficult. I got into a bit of a panic because I ended up getting it stuck on the crank halfway down. There's also supposed to be a .5mm gap between it and the crank when installed so this is quite technical. I don't have two sets of feeler gauges so I used a piece of 49cc head gasket snipped and folded over to make it .52mm- close enough! Halfway through the process I also realized I didn't have a correct tool or even piece of pipe to fit over the race and pound it down... At this point I'm in a mad rush trying to keep the race hot and shooting the crank with freeze spray to keep it cold and I finally found a square stock tube that fit quite nicely to knock the race on. In my hurry with the freeze spray and heat gun I started a fire! When I set the hot heat gun down on the top of the washing machine (where I do much of my work) and ignited the freeze spray liquid that was there! FIRE! lol I beat it out a few times with my sleeve- the flames actually made their way inside the washing machine where the freeze spray dripped in! Sheesh! So this whole time I'm beating this race down onto the crank I only had a plastic toothbrush that I hammered in between the webs supporting the crank- ugggghhhh I really hate to think how far I've whacked it out of true. What a mess. Hopefully the webs were supported enough by my "wedge" that they're ok... Here's the dang culprit that caused all this madness:  So here's the crank installed and looking all purty. I painted the engine stand!  |
|
|
|
Post by niz76 on Feb 14, 2016 1:03:45 GMT -5
Now getting the "Christmas Tree" in and all these tiny roller bearings:  Success!  Here's a little example of all the intricate little parts involved in this engine; This 'lay shaft nut' here:  Takes all these things to attach! During disassembly I wired them together so I didn't lose anything...  After you get all these on, then you have to bend the locking tabs in to secure it...  I suppose it's a good thing that all these security measures are designed into the scoot, but wow there's a ton of tiny little parts like this! |
|
|
|
Post by ThomasTPFL on Feb 14, 2016 2:20:54 GMT -5
Damn.... That thing is even more of a headache than the smallies it seems.
You're also taking a more obsessive approach. I just wanted to f'ing ride.
I'm rocking out with worn bearings, a trashed cylinder, and 50 year old brake shoes.
|
|
|
|
Post by Lucass2T on Feb 14, 2016 3:20:00 GMT -5
Aaaargh!! Been there done that. If you do a good job you gotta take out the crank an have it balanced. You might have wacked it out of line...happened with me once...
|
|
|
|
Post by 190mech on Feb 14, 2016 5:19:32 GMT -5
Niz,
Next time,cool out,have a beer and use the flywheel threads pull it down,,its kinda slow adding washers or whatever to a makeshift spacer tool so the nut can do its job on its short threaded area on the crank,but it works...I have a piece of big all thread rod,hole drilled and tapped into the end to fit the flywheel/vari threads ,screw it on the end of the crank,drop the bearing on,then a spacer tube,washer and big nut,screw it down..
|
|
|
|
Post by niz76 on Feb 14, 2016 15:37:10 GMT -5
Yes next time I'll be more prepared for sure! I'm mad at myself because I have seen articles that show how to remove that race from old cranks by cutting it with a dremel and chisel to get it off so I should've known to look for it. Oh well file it under "little more experience" I suppose. Enter boos and hisses here as I have decided to just run it as-is. I've taken my 90cc Mina crank in and out and manhandled it multiple times while retaining a runout of under .001 so call it a gamble or corner cutting or just betting on myself that I supported the web good enough or to be totally honest and frank- Probably mostly impatience of thinking about removing it and shipping it off to someone and waiting to get it back... In any event I'm running it and we'll all get to see the triumph or failure play out haha. Consider it entertainment at my expense!  That being said- here she is now: Case closed! (haha see what I did there??)  Installed fresh new gaskets and pleasantly surprised that there's a few o rings that I wasn't expecting and during tear-down I wished I had ordered. There's like 4 o-rings behind the rear brake cover thingy that I didn't know were there and luckily I have new ones to install. Sweet!  Sealed up nicely with my favorite- Permatex Motoseal1.  There's a little trimming that needs to be done...  So as happy as I am with S.I.P and the great service and speedy delivery from Germany, I would like to air my disappointment about one thing- The crank. This crank I ordered is a 'SeriePro' handcut and 'flowed' crank. The quality and cuts seem good enough (I think us DIYer's often actually do better and cleaner work than many of the "professionally" cut stuff- in my experience anyway). So my main disappointment is this: I specifically spent a little extra $$ to order this SeriePro brand crank because I was trying to stay away from the 'Mazzy's' (Mazzucchelli). The web is full of horror stories and pics like this when it comes to Mazzy cranks:  Apparantly 'ze Germans have even given the Mazzy's the name "Mazzuchocolate" as they say their metal is as soft as chocolate. So why would this bother me as I've gone ahead and ordered the SeriePro you ask? Good question. Well, as it turns out- while inspecting my shiny new crank in the box and reading the literature that came with it. There was really only this one poorly copied 'advice sheet' that pretty much just gives advice on how to best avoid the "inevitable breaking of the flywheel shaft" <--- Yes, I put that in quotations because it's literally a quote from them!  Here comes the real kick in the nuts- guess what name is on the masthead here? Yep u guessed it- Mazzuchelli. FU@K! Sorry about the language, but that's literally the word that I used when i slowly realized what this 'SeriePro' crank is- a hand cut Mazzuchocolate!  So wtf S.I.P.?? I feel like I've been bamboozled here. They do sell Mazzy cranks and at a lower price but nowhere in the description of the 'SeriePro' do they mention it's just a cut and re-labeled mazzy. Anyone interested in some free stickers? lol. I certainly don't plan to display them!  |
|
|
|
Post by niz76 on Feb 14, 2016 16:03:53 GMT -5
We interrupt this build thread to prematurely install this proper name badge...  Original programming will now resume... ;P |
|
|
|
Post by stepthrutuner on Feb 14, 2016 16:22:24 GMT -5
If I had a dime for all the questions raised after reading descriptions of scooter performance parts I would have enough to buy a few Vespas with the finest parts.  |
|
|
|
Post by 190mech on Feb 14, 2016 20:02:14 GMT -5
"Bean counters" say,,lets rebrand it,then we can keep selling it!Hoorayyy!!!
|
|
|
|
Post by ryan_ott on Feb 14, 2016 21:47:56 GMT -5
What no pic of the fire? Looking great Niz
|
|
|
|
Post by niz76 on Feb 15, 2016 5:05:55 GMT -5
What no pic of the fire? Looking great Niz U know I love lots of pics! Just for you! lol:  |
|
|
|
Post by niz76 on Feb 15, 2016 5:31:54 GMT -5
WARNING! Parental Advisory Explicit Tuning!  Got the clutch plates a oilin'  These are a little different than the stock cork clutch plates. Hoping for wheelie power!  Cylinder ports all painstakingly chamfered... 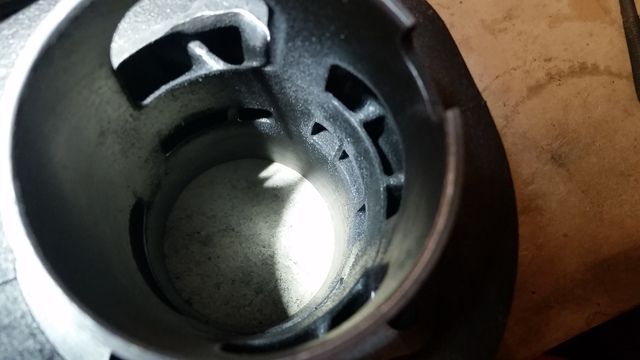 This is the base spacer I ordered to try and bump the durations up a bit. I believe it's .5mm...  The piston sits nicely just below the ports at BDC.  TDC... 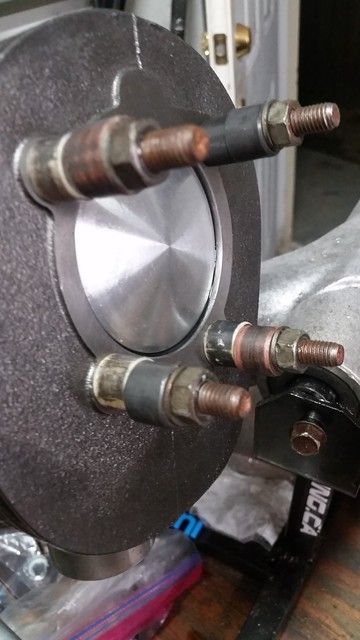 Polini 200?? It's 208 dammit!  Got her all degree wheeled up...  Exhaust Duration: 175 Transfer Duration: 127 (ish) Blowd0wn: 24 Hmm... Seems like a low RPM grunter for sure eh? I'm still not exactly sure how to measure the (intake duration??) of the crank as it opens and closes at the rotary valve... I'll have to do some Googlin' and get back with that one! Oh Btw spaz12- these are for you! Some of the 'lost' 36 pics! lol Interesting top ring on this Polini piston. Updated design?? The top ring is significantly wider than the bottom one...  A couple crank shots...    The big pin on the stock crank seems a bit blued I think. There's actually not as much difference between the two as I was expecting. It seems the stock crank is "flowed" a bit also. The main difference is the big ol' hunk lopped off the end of the 'SeriePro' (grrr still chaps my ass!) to increase intake duration- which is why I didn't elongate the intake hole on the cases like Polini suggests btw. Now I'm off to the Googlebox to figure out this dang rotary valve nonsense! (If it wouldn't have added like $200 to the price of parts I would've gutted her for a reed valve!). |
|
|
|
Post by niz76 on Feb 15, 2016 6:36:54 GMT -5
Ummm 'scuze me kitty, but can I have my chair back? I've got some serious mathematics here to do!  Still haven't figured out this whole rotary valve deal but here's what I have so far: So confusing!  |
|
|
|
Post by spaz12 on Feb 15, 2016 7:27:40 GMT -5
Never saw piston rings like that before.  |
|
|
|
Post by Raizer on Feb 15, 2016 7:38:57 GMT -5
Loving this build!
Would love to have a go on a Vespa one of these days.
That ring is almost like a Dykes ring (old school racing tech, still seen in some nitro RC and the odd automotive diesel) but I think they normally had a special piston design.
|
|


