|
|
Post by 190mech on May 21, 2011 16:48:24 GMT -5
Dang glass bulbs!
|
|
|
|
Post by 90GTVert on May 24, 2011 21:02:47 GMT -5
CDI TestingI decided to test a few CDIs and see what kind of timing figures I got. I know some folks believe they are all the same. I have three to test, so let's see if they really are all the same.  I tested each by using a degree wheel to mark 0° TDC on the flywheel relative to a timing pointer that I made up and bolted on. I used my digital adjustable timing light to measure advance in 500-1,000RPM increments and recorded those readings. I tested from 2,000 to 10,000RPM. I don't believe any of the CDIs have a rev limit. I only tested to 10,000RPM because the stock engine just doesn't want to go much higher, even on the center stand. 
The CDI that has been on the scooter since day 1 of the project is a stock replacement CDI that I got from Scrappy Dog Scooters. I picked it up a while ago just because it was cheap.  It's labeled with "1E40QMB".  All of the CDIs I'm using have 3 loose wires (2 male bullet connectors, 1 female bullet connecter) and a 2 wire connector. Here are the connections for this one. Wire colors on your scooter could vary. [/color][/center][/td][td] Dark Green [/td][/tr][tr][td] Red / Black [/td][td] Black / Red [/td][/tr][tr][td] Blue / White [/td][td] Blue / White [/td][/tr][tr][td] Orange [/td][td] White / Black [/td][/tr][tr][td] Black [/td][td] Black [/td][/tr][/table] Maximum Advance : 10.5° BTDC Minimum Advance : 7° BTDC
The next CDI I tested is a stock CPI CDI that came on one of my Vento Tritons.   [/color][/center][/td][td] Dark Green [/td][/tr][tr][td] Black / Red [/td][td] Black / Red [/td][/tr][tr][td] Blue / White [/td][td] Blue / White [/td][/tr][tr][td] Black / White [/td][td] White / Black [/td][/tr][tr][td] Black [/td][td] Black [/td][/tr][/table] Maximum Advance : 9.5° BTDC Minimum Advance : 5.5° BTDC
Finally, I picked up the cheapest performance CDI I could find on eBay. It looks just like the common blue racing CDIs, but it's got an orange heat sink instead.  [/color][/center][/td][td] Dark Green [/td][/tr][tr][td] Red / Black [/td][td] Black / Red [/td][/tr][tr][td] Red / White [/td][td] Blue / White [/td][/tr][tr][td] Orange [/td][td] White / Black [/td][/tr][tr][td] Black [/td][td] Black [/td][/tr][/table] Maximum Advance : 10° BTDC Minimum Advance : 7° BTDC
Here's a graph that I made up showing all of the timing curves. 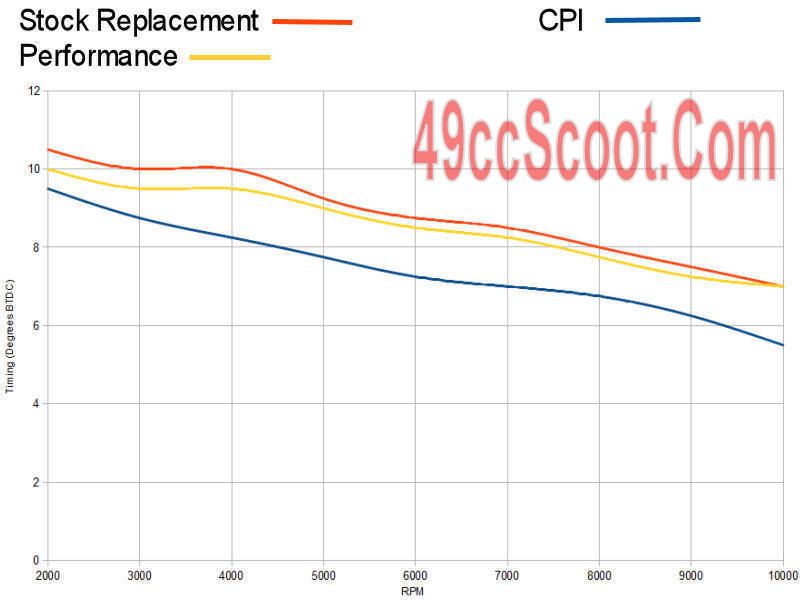 I never road tested any of the CDIs. The CDI with the most advance (the stock replacement) is already on the scooter so I wouldn't expect to see any gains. All of the timing curves are fairly similar. I think a base timing adjustment (accomplished by moving the flywheel or pickup relative to each other) could make each of the CDIs perform basically like the other. One thing that I noticed is that I got different readings with the CPI CDI on this engine than I did with it on another engine some time ago. On that engine it started at 12° BTDC. Perhaps some flywheels or stators are built different or tolerances are poor? [/center] |
|
|
|
Post by 2strokd on May 24, 2011 21:06:16 GMT -5
 Good work, i thanks ya! :thumb:
|
|
|
|
Post by lshigham on May 25, 2011 1:32:29 GMT -5
Very nice ;D
Why couldn't you do some testing on a piggy, you have far more patience than me!
|
|
|
|
Post by 190mech on May 25, 2011 4:42:23 GMT -5
Good info!Slotting the stator base plate allows you to adjust timing,but what you have now looks like the best for that ignition curve..
|
|
|
|
Post by reveeen on May 25, 2011 5:09:12 GMT -5
Perhaps some flywheels or stators are built different or tolerances are poor?
I would suspect manufacturing/material differences in the pick-up. The threshold CDI trigger voltage seems to be around .5 VAC which isn't a lot. A bit stronger magnet, a different/inconstant gauge wire, or a few extra turns of wire, would all translate into a "difference".
Just another reason why some seem to run poorly and others excellent.
|
|
|
|
Post by 90GTVert on May 25, 2011 6:44:37 GMT -5
Good info!Slotting the stator base plate allows you to adjust timing,but what you have now looks like the best for that ignition curve.. Yeah, that or elongating the holes in the pickup so it can move. The stator plate will give you more freedom of movement, but the pickup tends to be worth up to about 3 degrees either way with just enlarging the holes. I'm not playing with more timing, sorry. I use 92-93 octane now and it spark knocks when I let off the throttle. It's done it since day one, because of the compression this thing has with the stock setup and possibly that cylinder head design as discussed previously. I still have no idea where to find a 52mm cylinder head that has built in meat to allow for squish clearance. All of the stuff I see in 52mm is for high compression. I would have tried that as a mod on the stocker at some point.  Perhaps some flywheels or stators are built different or tolerances are poor?I would suspect manufacturing/material differences in the pick-up. The threshold CDI trigger voltage seems to be around .5 VAC which isn't a lot. A bit stronger magnet, a different/inconstant gauge wire, or a few extra turns of wire, would all translate into a "difference". Just another reason why some seem to run poorly and others excellent. Good info. Never thought of that. Electronics are not my strong suit.  |
|
|
|
Post by Thebatman on May 25, 2011 14:59:43 GMT -5
:clap: Great info, even though i don't have a mina......yet...  |
|
|
|
Post by 90GTVert on May 30, 2011 22:17:26 GMT -5
19mm Arreche CarburetorNext up, a larger carburetor. The stock carburetor is 14mm, so the Arreche 19mm is a pretty good upsize. Here's a look at the Arreche carburetor beside the stocker.  Stock  Arreche  Connections   Inside the bowl.  Pilot jet, main jet, atomizer, needle, throttle vavle.  Amal/Arreche jets can be hard to come by. If you choose this carburetor, I would suggest picking up a selection of jets when you order the carb. Here is the Arreche jet (left) beside a Keihin hex main jet. The Keihin jets are very similar, but cannot be used because they won't fit in the bowl of the Arreche carburetor.  These Keihin 6mm jets could work in a pinch.  A nut on the bottom of the bowl allows for quick main jet changes.   A 6mm socket, the same size as most bit drivers, can be used to remove the Arreche jet easily.  If you have to get to the bowl, be careful not to strip the screw that's partially blocked by the enricher.  Needle clip position changes are made easy by the large clip.  One of the things that makes an Arreche swap easier than most is how it hooks up. It works with the stock airbox and installs in the stock intake with locater tabs just like a stock carburetor. It is available with an automatic enricher that connects to the stock wiring. I believe they are available in different configurations, so if you want the easiest connection be sure to choose the right options.  It can connect to the stock throttle cable with ease, but I am using an aftermarket throttle and cable so I had to use a slightly different setup.  I used a 90 main jet, 15 pilot, and the needle was set in the center position. I took a 21 mile ride, where I observed 39.5MPG. I was being quite liberal with the throttle, but that's the worst gas mileage I've seen so far with this project. Maximum speed was once again 51MPH. Cruising speeds were the same as stock, in the low to mid 40s. I noticed two changes. First, it seemed like power from 7,500RPM and above increased slightly. The problem being that this engine configuration really doesn't like to rev far beyond that point. The other change I noticed is a lack of spark knock on deceleration. From the time project started, I've had spark knock when I let off of the throttle. The only way to get rid of it with the stock carb was to keep the needle high and jet richer than it should be. It's brief and seems to be of little concern, but it was non-existent with this carburetor. I believe that shows the Arreche is keeping the cylinder cooler and/or delivering a more appropriate amount of fuel at part throttle positions. I was surprised at the lack of performance increase witnessed with this modification. I can't call it a bust though, due to the positive points made above. I was planning on testing other and larger carburetors, but the lack of gains with this 19mm Arreche leads me to believe that farther carburetor testing would be futile at this stage. |
|
|
|
Post by 90GTVert on May 30, 2011 22:18:27 GMT -5
If you folks think there's a reason to try other or larger carbs I can. I just don't see the point right now. I feel it would be a better test at a different stage of the project.
|
|
|
|
Post by lshigham on May 31, 2011 1:45:35 GMT -5
I think it's probably something for a more higher revving setup - after all, it probably came with 14mm for a reason.
|
|
|
|
Post by 190mech on May 31, 2011 4:43:23 GMT -5
Very interesting!Seems like for stock applications the original carb is a good choice!  |
|
|
|
Post by lshigham on May 31, 2011 6:54:15 GMT -5
Oh, that reminds me, I know someone over here who sucessfully runs a 28mm OKO on his modded jog 90 quad, I wonder how some of your higher revving setups would fare? I might be able to lend you one for testing, if you like?
|
|
|
|
Post by 90GTVert on May 31, 2011 7:19:14 GMT -5
Right now I have a 19mm Arreche, 19mm DellOrto, 21mm DellOrto, and 24mm DellOrto. I don't know if this project will ever get to the point that it needs anything over 24mm. I don't plan to go wit anything that revs really high at any point with this. T1 is the only scoot I think could possibly benefit from a 28mm, but it's revving above 11,000RPM @ 103cc. I've got a 25mm on it, which I suppose I could swap over too if the 24mm shows good gains at some point. I'd say hang on to it for now. Thank you for the offer though, and I may take you up on it at some point. Not sure. It's gonna be a while for me to get to any point where it may be effective.
I was up till 2:30AM last night getting 2 more mods done and tested, so you should be seeing more updates today.
|
|
|
|
Post by 90GTVert on May 31, 2011 8:43:42 GMT -5
Hoca Performance VariatorThis test involves the Hoca performance variator (Part number 169-140) sold by Parts For Scooters. 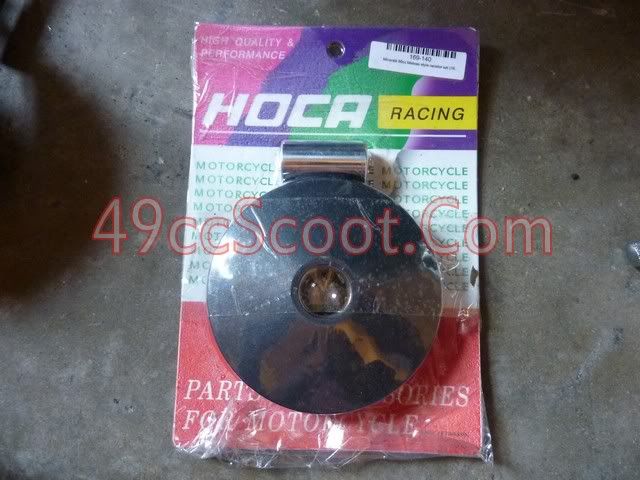 As the tag right on the product indicates, it's a clone of one of the Malossi MultiVars.  The kit comes with the variator, ramp plate and guides, drive boss, and a set of 4g roller weights. This variator uses 16x13mm rollers or sliders, while the stock setup uses 15x12mm. The bushings or guides on the ramp plate can be replaced with those from a 139QMB/GY6 50 stock variator if you ever lose or break them. 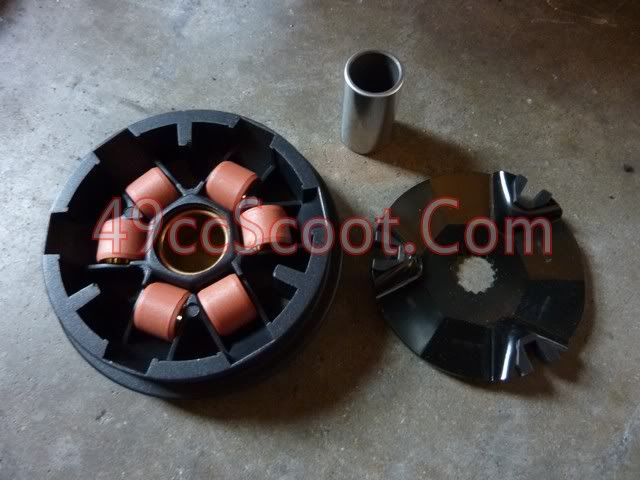 The Hoca variator offers increased roller travel with longer tracks and the angles of the tracks are optimized for better performance.  The angle of the drive face is similar to stock.  Outside diameter of the variator is just barely larger. The stocker measures roughly 95mm and the Hoca measures just over 97mm.  The drive boss that fits over the crankshaft's splines is made with a smaller outer diameter. This can allow the belt to travel slightly farther down in the front pulley for the strongest takeoff or "1st gear" if properly setup. The Hoca's drive boss is a couple of millimeters shorter than the stock drive boss.  For the first attempt, I installed the variator with only what comes in the kit. As you can see, the drive boss is on the short side. 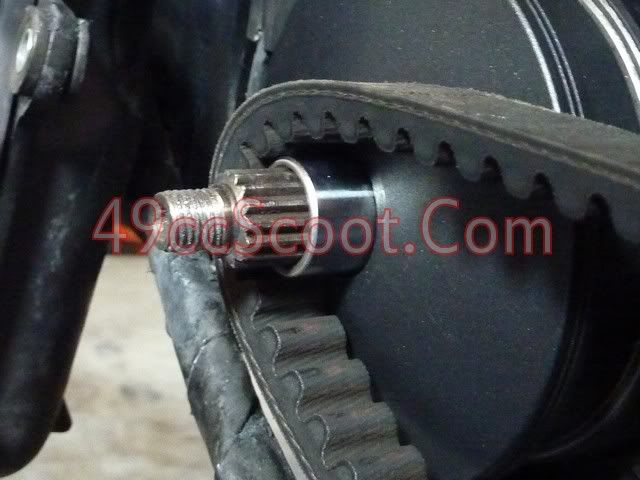 Since the drive boss is shorter, I couldn't get everything secured properly without adding a washer to the outside.  The short drive boss also means the belt doesn't travel very far down in the front pulley, which can cause a major change in initial acceleration. I show the belt in the rear pulley, because the position of the belt in the rear pulley and front pulley are directly related and it's much easier to get a shot of the belt's location in the rear pulley at rest.  I ditched the 4g rollers that came with the variator in favor of a set of heavier 5g sliders to start with. I have shown the benefit of sliders in previous tests, and sliders are what I've been using in the stock variator. The 5g sliders were too light, and I eventually ended up finding 7g sliders to be the best choice for this setup. I immediately noticed a bad bog from 0-20MPH and an effect similar to using no clutch springs. The belt riding so high and binding up in the front pulley at low speed and RPM causes the slow takeoff and lack of transmission disengagement. Once past 20MPH, with the variator then working as it should, acceleration was greatly improved vs stock. I would say the increase in acceleration is comparable to what some of the aftermarket exhausts did, and that's a pretty impressive change IMO. Not only did acceleration increase, but top speed improved 3MPH to 54MPH. That's the highest speed of the project to date with any mod. The variator does an excellent job of keeping in the proper rev range longer, which also upped cruising speeds to the mid 40s reliably, up from the low to mid 40s with the stock setup. The ability to handle headwinds and inclines was also improved.  Here you can see the belt travel achieved in stock form. 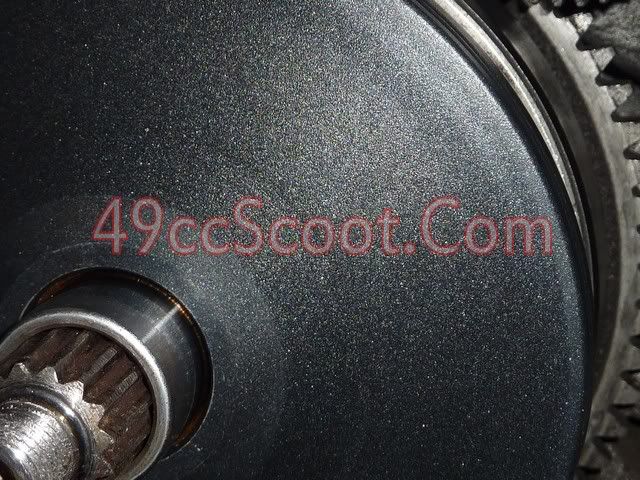 For the next try, I added 1.5mm worth of spacers to effectively lengthen the drive boss and get the belt a little farther down in the front pulley. It actually needs more spacers than that to get the belt all the way down, but I wanted to do a safe test. The spacers (actually shimming washers found at McMaster-Carr) were ground down to be small enough that the variator could travel over them without hanging up. Since the variator can travel farther, you should always check to see if the ramp plate will pass the guides in the variator. If it does, you will break the plastic bushings at speed and you can cause all sorts of other troubles like damaged rollers and getting stuck in "high gear" and snapping belts. Test by sticking the spacers you plan to use on the end of the drive boss while it's in the variator as shown. Then put the ramp plate on and make sure it can't turn. Leave a little room for error.  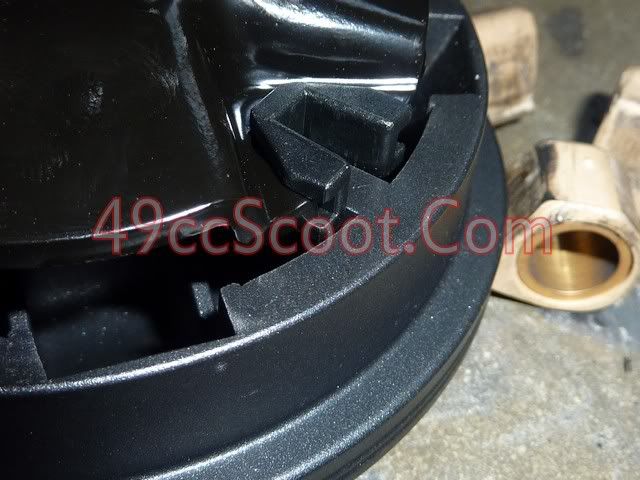 It's not a huge difference to look at, but the 1.5mm definitely helps.   I found that being setup that way, top speed remained the same. The bog on acceleration now only lasted from 0-10MPH instead of 0-20MPH as before and was much more bearable. I have a modded version of this variator sitting around from one of my other scooters, so I thought I'd try that setup as well just to see what could possibly be expected from this variator with some work. It's filed down in the center to allow it to open wider at rest and to close tighter at speed.  I coupled it with a similarly modified fixed face, as shown in a previous update to this project.  I added spacers to this setup as well to get the belt down deep in the front pulley.   That attempt was not so successful. I ended up with slip on takeoff that later turned to a bog. The slip is from the altered drive face angles coupled with the acceleration rate of the sliders on takeoff. The bog is from the pulley getting into a "higher gear" than usual with the mods I did. I've seen this work well on other scooters with more power, but the stock setup just can't handle the gearing this provides. I did manage 53MPH, but the RPM was nearly 1,000 below where it was before at that speed. I didn't want to move to lighter sliders because the slip on takeoff would increase. The extreme RPM drop with modding shows that this could increase speed if you have enough engine to pull it. I would definitely not recommend doing all of this at the stock power level though. This turned out to be an excellent mod. The best so far with an acceleration increase rivaling the performance pipes and a max speed surpassing all other mods to date. At a price of only around $50, (plus the cost of larger rollers or sliders if you don't have them already) this one's hard to beat. |
|