Porting And AdjustmentFinally, I got to move on to the mod I've wanted to do since the day the project started. Watching most of the modifications that have been tested do very little, I have been assuming that the port setup is a major factor in their failure.
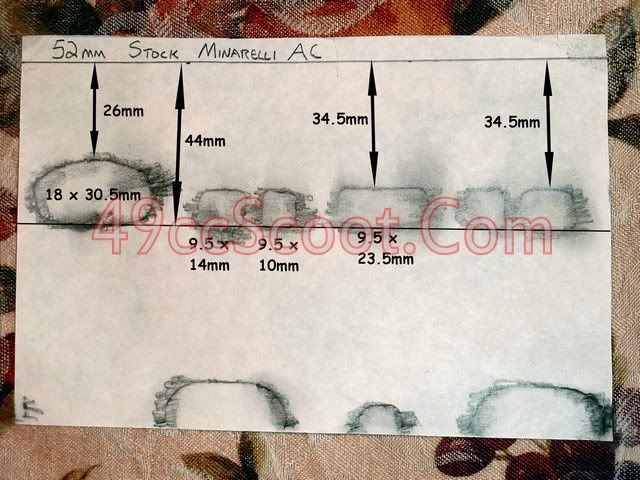
I made a port map of the stock cylinder. As setup stock, it had 172° of exhaust duration and 118° of transfer open time.

My next step was to determine what my goals were and what I needed to do to reach them. I wanted to try to set the cylinder up to work well with aftermarket pipes in the future, and to have a strong powerband. I needed to know the port durations I was shooting for, consider exhaust port shape, and determine the width I wanted to make the exhaust port.
Modifying the transfer port shapes is out for me, because I don't have the proper tools. You need a Dremel or Foredom style rotary tool and small angled handpieces to reach the transfer and boost ports. Once you can reach them, you have to be very careful how you modify them. They are designed at a certain angle to aim the mixture upwards as it enters the cylinder. Blindly changing this angle could lead to a poor performing cylinder.
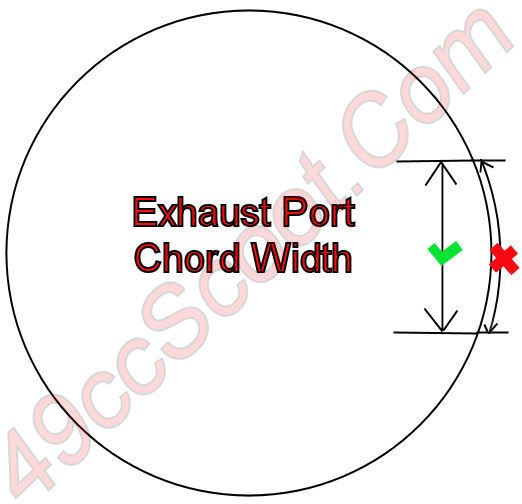
I started out by determining the width I wanted to make the exhaust port. I wanted to go as wide as I felt would be a safe setup to try and get the most from the cylinder. Going too wide will have your piston rings traveling deep into the port and snapping or at least wearing quickly. For a standard single port exhaust, the figures most used for maximum exhaust port width tend to be from 60-75% of the cylinder bore. 60% usually being considered very safe and 75% generally being for max performance where longevity is of very little concern. I chose to go with 65% to stay on the safe side. 52mm x 0.65 = 33.8mm.
The number I have just came up with is the chord width of the exhaust port. That means the width as measured across the curve, rather than around the curve. I'm not sure if just stating it that way makes sense, so here's an image that may help.

Next, I moved on to determining the exhaust port shape that I wanted to use. Exhaust port shape can have dramatic effects on the powerband and piston ring wear. To keep piston ring wear to a minimum the exhaust port would have gentle curves, especially the port roof. An oval shape is generally considered to be the easiest on piston rings, because the rings travel gradually into and out of the port, rather than abruptly meeting up with the port roof or floor.
When considering the shape of the exhaust port for power output, look to the roof. The flatter and wider a port is at the roof, the better it's output will be in the rev range that it's setup for. A flat roof tends to create great peak power, but makes power peaky. That means that power below the intended range tends to drop off, but power in the intended range is usually very good. CVT tuning must be more precise, keeping within a narrow range, for the best results. Of course the other downside to a very flat roof is that it's harder on rings as mentioned previously.
A port that takes a more gradual curve to reach it's peak height has the opposite effect. Maximum power output will be lower than the wide, flat, roof, but the cylinder will have a much broader powerband. A wide powerband can be very nice for a street ridden scooter. It makes the CVT easier to tune, because you don't have to keep the RPM in a very specific range. As stated earlier, a gradual curve is also easier on the piston rings.
The best street setup in most instances, especially with an otherwise stock engine and CVT, is the oval port that provides a nice wide powerband and minimal piston ring wear. I wanted to see a little more peak power, but I wanted to keep the ring wear down. For those reasons, I decided to shoot for a mix of both ideas. A fairly wide roof that isn't completely flat.
Now that I know basically how I want my port to look, I need to determine how tall it will be by deciding what duration I want to achieve. In order to choose a duration figure, I need to know what RPM I am hoping to see peak power at. My goal is to make the cylinder work with any of my aftermarket pipes reasonably well. Of course they don't all operate at the same peak RPM, so that makes life a little harder for me. For those of you that won't be using a slew of exhausts, this will be much easier. The pipes I plan to use claim peak power anywhere from 8,500 to 9,500RPM. I decided I wanted to look for peak power in the 9,000-9,500RPM range. I believe any of the pipes I have will respond pretty well to this.
To determine the durations I need to shoot for, I use past experience and the experience of others online and in books. These guidelines are from A. Graham Bell's book,
Two-Stroke Performance Tuning. He lays out most of this info, I'm just dumbing it down a bit and made slight adjustments with the table below and trying to make it easier to read. I'm not a pro tuner, so I still advise doing your own research, but this may help for a starting point.
RPM | Exhaust Duration | Transfer Duration |
7,000 | 172-176 | 118-120 |
7,500 | 176-178 | 120-122 |
8,000 | 180-182 | 122-124 |
8,500 | 182-184 | 124-126 |
9,000 | 184-186 | 126-128 |
9,500 | 186-188 | 128-130 |
10,000 | 190-192 | 130-132 |
10,500 | 194-196 | 132-134 |
11,000 | 196-199 | 134-136 |
11,500 | 199-202 | 136-138 |
12,000 | 202-204 | 138-140 |
I chose 186° exhaust and 130° transfer as my target durations. 186° is right in the range above for the exhaust. 130° is on the higher end, but still in the above range for the transfers. Myself and other members here have found a little more transfer duration to have good effects. With those things determined, it was time to get to work.
I started out by using multiple base gaskets to raise the cylinder about 2.1mm so the piston would clear the ports at BDC. This upped the durations to 180° exhaust and 130° transfer. The exhaust will still need work, but the transfer duration is right where I was hoping to be. If you need to increase the transfer duration more, you may consider filing the piston.
CLICK HERE for more info.

Now I needed to get the exhaust port to the specs I was hoping for. Here's a look at the exhaust port pre-op.

I used a black permanent marker and colored in an area above the exhaust port. Then I used the degree wheel to set the piston at 87° from TDC, where the roof needs to be to achieve 186° of open duration. I used a razor knife to score a fine line at the top of the piston. You can really see how curved the roof is in relation to the straight line.

I wanted to open up the outlet of the exhaust port as well, and doing this first can help you get tools in to the exhaust port easier. If you're lucky, you'll have an exhaust with a detachable header flange so that you can bolt it up and port match. I'm not that lucky, and I would be attempting to match to multiple exhausts for this project. I used the outline from the stock exhaust being ran on the cylinder as a rough guideline and got to work.

It's sure not the best port job, but it'll work. I didn't spend a whole lot of time here since I don't know exactly what exhaust I'm hoping to match.

After some time with a Dremel and a drill with a carbide burr, the exhaust port took shape. Looking at the photos, I didn't do a great job getting the port roof as smooth as I would have liked and I can see a little more work that could be done inside the port, but it's still a big improvement and the size and shape ended up where I wanted it. I always notice more flaws in photos than I see at the time. Perhaps reviewing pictures before finishing up or using a lighted magnifying glass would help.


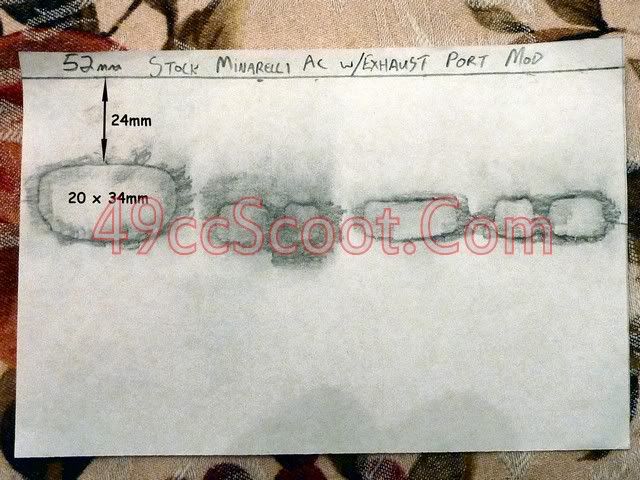
I made a port map after I finished and cleaned the cylinder.

Here's a before and after look at the exhaust port so you can easily see the change. These are laid side by side, not edited together, so the difference is in scale.

I re-installed the cylinder. Since I moved the cylinder up with additional base gaskets the piston is farther down in the bore at TDC. Making the exhaust port so much larger also makes healthy compression figures are harder to come by.

I ended up using the high compression squish band head, tested earlier in the project, with one 0.3mm uncompressed head gasket to get 158psi on a compression check with squish at 1.4mm.

I swapped to a 90 main jet, from an 85. The needle remained in the same position, next to richest, and I made a minor adjustment to the idle mixture.
The engine now seemed less responsive revving from idle. On initial test passes I noticed a lack of power at low revs. Anything below 6,000RPM was pretty dead. Once RPM raised to 7,500 though, it really started kicking in. I tired going to lighter 5g sliders, but the revs would raise so much while shifting that I found it unpleasant. I ended up with the same 6g sliders I've been using and stiffer clutch springs. Unfortunately, the clutch springs have less affect than they should, because the belt is hung up in the front pulley at rest as the CVT is setup stock. As it stands, there is a very brief bog, then the RPM raises quickly and the scoot accelerates well to 25-30MPH, then the RPM drops down to 5,800 or so when the torque driver shifts to the second angle. Acceleration slows until about 7,000RPM and then it comes to life again and pulls very well. When above 7,500RPM, power feels like it is significantly increased. The maximum RPM that I have seen is 9,550.
I went for a 50 mile ride to really see what the porting would do. On this ride, I got 44.7MPG. Again on par with most past results. Max speed was 54MPH. Cruising speeds increased to the upper 40s to 50MPH, with RPM hovering around 8,500RPM most of the time.

I didn't notice much detonation when I was riding. The only time I heard any was rolling out of the throttle very slowly once I reached 1/2 throttle or so. That would probably make for a very good tune if I needed to use a lower octane fuel, but I've been sticking with premium to get a little more from the engine so I wanted to up the compression a bit. I switched from a thin head gasket to no head gasket and ended up with 180psi with 1.15mm squish.

I didn't see a whole lot of improvement in power, but there was some improvement. It seemed like keeping speed on inclines and against wind improved more than anything. It's still pretty dead at low revs. I did once again bring back the rattle of detonation, but it isn't really any worse than stock. I hear it when i let off of the throttle a bit and I get some spark knock when the engine is under much load, like at low RPM. Otherwise it's alright. I don't have any desire to push it farther, but it's OK where it is. I did manage to make the highest speed so far in the project, at 55MPH. To be fair, it was very close to that speed without the increased compression. My speedometer was reading 54.5MPH on the previous test.

To sum it all up, this is absolutely a good mod to do if you feel comfortable with it. I saw the best MPH of any mod I've tried, and it's one of the cheapest to do if you have the tools. Acceleration isn't that impressive in my case, but you can always opt to tailor the setup to what you want. I think that this cylinder will start to shine with more tuning like a CVT that can keep within the powerband better and and exhaust better suited for more revs for example. Using a less aggressive exhaust port shape and duration should allow you to see good gains all around and not lose the low end power as I did. I use 184/130 durations with a less aggressive port shape on my Venus' 96cc and it makes excellent power from 4,500 to just over 9,000RPM.
If you do your homework, take your time, and properly execute a porting mod, you can see some very impressive gains without spending much money at all. The Hoca big bore kit that I tried definitely had a wider powerband, but it did not pull any harder at higher revs than this cylinder. Of course it had the benefit of adding 7cc of displacement. It also had a lot of detonation as I tried it and would have needed the compression lowered to make it a really good street setup. You can make and/or buy the gaskets you need for this mod under $20 and the Hoca or other big bore kits will cost you around $150.