|
|
Post by spaz12 on Sept 7, 2017 21:47:44 GMT -5
Genius, now market it.
|
|
|
|
Post by oldgeek on Sept 7, 2017 22:01:08 GMT -5
One of your best ever! Thanks for the plug  |
|
|
|
Post by spaz12 on Sept 7, 2017 22:03:35 GMT -5
Maybe John can mill another boring bar so that the tool can be run in a clockwise direction?
|
|
|
|
Post by honda4life on Sept 7, 2017 22:43:51 GMT -5
Saw your YouTube video this evening. Great job man. Very entertaining!
My wife and I watched it and it was great. Thanks for the vid!
|
|
|
|
Post by jackrides on Sept 7, 2017 23:05:09 GMT -5
Wow!
|
|
|
|
Post by AtariGuy on Sept 7, 2017 23:24:15 GMT -5
Well done Brent! I was considering a flycutter in a drill press already, but with the bearing supports, that looks so much cleaner. Perhaps you could use c1 bearings with tighter tolerances to take out some of that wobble you still have left
|
|
|
|
Post by FrankenMech on Sept 8, 2017 1:20:34 GMT -5
Very nice work, great background info.  That second bearing is a big help, -as you noticed when you tried it with only one bearing. Machine tools require rigid setups for best performance. WD-40 or kerosene works best for machining aluminum. Sealed bearings will keep chips out better than shielded bearings. |
|
|
|
Post by 90GTVert on Sept 8, 2017 6:32:11 GMT -5
Perhaps you could use c1 bearings with tighter tolerances to take out some of that wobble you still have left Good idea, but they seem to be hard to come by based on a few quick searches. A little tighter fit through the bearings would probably help a little too, but at some point it will be hard to move with both bearings in place. WD-40 or kerosene works best for machining aluminum. I actually did use WD-40 pretty much all but the first pass or two, where I used 2T oil. |
|
|
|
Post by catchacuda on Sept 8, 2017 11:03:00 GMT -5
Great to see this come together, nice work! I think this tool is something you should consider loaning out, at an appropriate price of course.
|
|
|
|
Post by 90GTVert on Sept 8, 2017 20:13:35 GMT -5
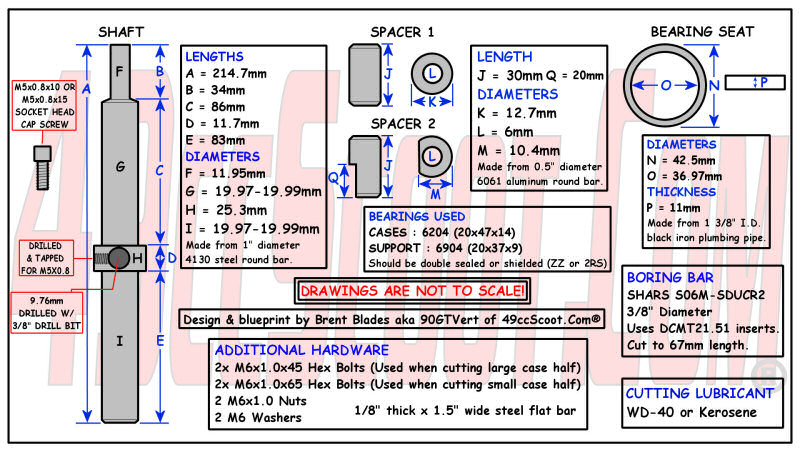
I know I said I'd get the template and measurements up today, but I had no idea how long it would take me to draw this up so for now I've just got this for you. I'll try to get the template for the plate up soon and some more pics/info. Click to get it full size.  There is wiggle room in some of those measurements. F on the shaft could be cut however needed to fit your drill (1/2", 3/8", etc...). D is basically just cutting close to the hole for the boring bar so you get plenty of travel. A big lip below the boring bar hole wouldn't let you reach the bottom of the cases. Put a straight cut there, not a chamfer, again to maximize travel. You may want to start large and do some test fitting for G & I so the feel is right. Don't get it too snug or it won't want to move well once it's in 2 bearings. Too loose and you get more wobble in the cutter. The bearing seat says 1 3/8" black iron plumbing pipe. Not sure if that's accurate, but it measured just over 35mm ID and it's plumbing pipe that I got from a local hardware store long ago. |
|
|
|
Post by ryan_ott on Sept 8, 2017 20:35:28 GMT -5
Excellent work Brent! Im surprised how well that worked out for you. Now I just need a lathe to make that shaft...
|
|
|
|
Post by honda4life on Sept 8, 2017 20:38:00 GMT -5
Speaking of shaft...
In your video you mentioned nuts, shaft, and lube multiple times😂
Great video though!!
|
|
|
|
Post by 90GTVert on Sept 8, 2017 20:40:47 GMT -5
Speaking of shaft... In your video you mentioned nuts, shaft, and lube multiple times😂 Dammit Beavis!  |
|
|
|
Post by 90GTVert on Sept 9, 2017 17:46:10 GMT -5
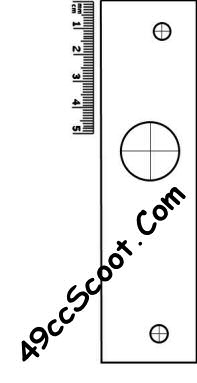
Here's the template for the support plate. Click the image to get the pdf so it's easy to print in actual size and make sure nothing is trying to resize it before you print. Check scale by comparing to the ruler printed with the template. This is what the 1/8" thick by 1.5" wide steel flat bar is for. The hole for the shaft may be smaller that you want, but the important part is that it's a starting point on center. Definitely check all fit before you go transferring it onto steel.  Just in case there's any issue with the template, I took a few pics today to show you how it's done so you can make your own. Start off with a piece of poster board or something similar. I used a piece of an old folder, cut to about 1.5" wide and around 5.5" long.  Lay that across the case and try to get it so it's centered over the bearing in the case where the shaft will be. Then mark where the holes in the case are by pressing on the template material. You can use a small hammer and light tapping if you can't get a good mark just pressing with your fingers. You could also try a rubbing with a pencil. Whatever you do, make sure the paper is kept taut as you work. Slack will mess up the spacing.   A hole punch is about the right size and the easiest way to knock out those holes. Take your time to get the alignment correct.  Check the alignment of the template to the holes. If they aren't spot on, redo the template till you get it just right. If all is well, bolt the template to the case, preferably using large washers to spread the load out and keep the material from tearing.  Then slide the shaft up through the bearing and press/tap so you can see it's position. Remove the template and you can cut that hole out or mark for the center of the hole and just poke through there to apply a center drilling point to your template. The hole will need to be larger than the shaft anyway. I went larger than the 1" boring bar section with mine. If you don't get the shaft near the center of the template, start over from the beginning. Something like the quick example that I did would not be good. It doesn't leave much material by the time you drill it out. Put your time into working with poster board so it's easy once you get to making it from steel.   |
|
|
|
Post by gsx600racer on Sept 10, 2017 0:12:44 GMT -5
Here's the template for the support plate. Click the image to get the pdf so it's easy to print in actual size and make sure nothing is trying to resize it before you print. Check scale by comparing to the ruler printed with the template. This is what the 1/8" thick by 1.5" wide steel flat bar is for. The hole for the shaft may be smaller that you want, but the important part is that it's a starting point on center. Definitely check all fit before you go transferring it onto steel.  Just in case there's any issue with the template, I took a few pics today to show you how it's done so you can make your own. Start off with a piece of poster board or something similar. I used a piece of an old folder, cut to about 1.5" wide and around 5.5" long.  Lay that across the case and try to get it so it's centered over the bearing in the case where the shaft will be. Then mark where the holes in the case are by pressing on the template material. You can use a small hammer and light tapping if you can't get a good mark just pressing with your fingers. You could also try a rubbing with a pencil. Whatever you do, make sure the paper is kept taut as you work. Slack will mess up the spacing.   A hole punch is about the right size and the easiest way to knock out those holes. Take your time to get the alignment correct.  Check the alignment of the template to the holes. If they aren't spot on, redo the template till you get it just right. If all is well, bolt the template to the case, preferably using large washers to spread the load out and keep the material from tearing.  Then slide the shaft up through the bearing and press/tap so you can see it's position. Remove the template and you can cut that hole out or mark for the center of the hole and just poke through there to apply a center drilling point to your template. The hole will need to be larger than the shaft anyway. I went larger than the 1" boring bar section with mine. If you don't get the shaft near the center of the template, start over from the beginning. Something like the quick example that I did would not be good. It doesn't leave much material by the time you drill it out. Put your time into working with poster board so it's easy once you get to making it from steel.   Gotta love old skool hole transfers.  |
|