|
|
Post by oldgeek on Nov 26, 2023 21:39:36 GMT -5
Spent the better part of 8 hours today working towards installing the HPI ignition, it fought me all the way and still is not done. First off I went to set up my degree wheel on the CVT side and I could not find the thread adaptor that fits the M12x1.25 threads, so I decided to make one. I found out that I did not have a M12x1.25 tap so I made one from a old Kymco crank stub. Finished the adaptor, mounted the degree wheel and moved to the flywheel side of the scoot. Removed the stock iggy and tried to mount the HPI backplate but the screws were too long and bottomed out before the plate was tight, weird thing is the screws tightened up fine when I test fit everything on the other set of cases. Got the screws trimmed and found the stator did not seat on the backplate evenly, so I had to put the backplate in the lathe to open it up just a little. Then the heads of the backplate mounting screws interfered with the stators ability to rotate, so I had to chuck the screws in the lathe to thin their heads down. Finally, I went to mount the stator to the back plate and 2 of the three screws were too long and hit the case screws behind the backplate, so I trimmed those screws off. I lapped the Flywheel to the crank a bit using valve grinding compound, that was easy enough. Next I needed a piston stop so I made one from a spark plug, got fancy and drilled a hole through the center of the stop screw so I would not have to fight compression when turning the crank. Then I spent way more time than I should have needed setting TDC on the degree wheel, I am not good with circular numbers  Let me tell you it is not easy trying to put a degree wheel on TDC, move over to the flywheel side and try to install a flywheel clocked in the proper place when you are also fighting magnets in the flywheel. I got tired and confused along the way because the alignment was not matching up to what I thought it should be. I ended up using the calculator 90GTvert provides here to find that 2mm before TDC equals 20 degrees on my setup (52.4 stroke 90mm con rod) I used the iggy micrometer to check the setup, and dialed 2.15mm into the micrometer instead of 2mm due to my earlier tests using the spare head. With the timing marks aligned I found I was dead nuts on 20 degrees before TDC. To get 25 degrees BTDC it would require about 3mm on the micrometer. I still need to recheck everything again with a clearer head then wire it up which should be the easy part, I hope. Here are some pictures made with my cheap borescope through the plug hole. The plug looked rich and so does the piston I think. I am using a 9 plug, should I be using an 8 or? 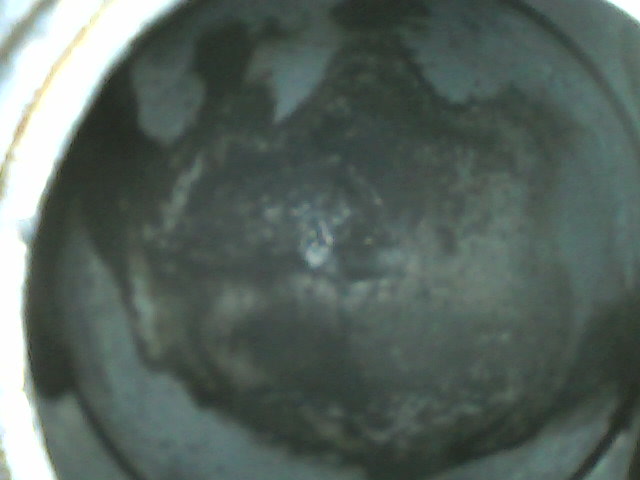  |
|
|
|
Post by oldgeek on Nov 27, 2023 19:50:39 GMT -5
Finalized everything today except for one wire. The HPI stator has only 1 yellow wire from the stator and no white wire. I guess it has a single 60 watt "lighting" coil, no charging coil.
Does anyone know if I can use a standard regulator with only the yellow wire hooked up to regulate the lights? I will just leave the white wire at the regulator disconnected.
Or maybe just hook up the yellow "lighting" coil wire from the stator to the white wire from the regulator so it will charge the battery. Then convert the lights to DC from the battery?
Alternately Trailtech makes a 2 wire regulator that Treatland recommends you use with the HPI stuff. 1 wire to yellow and the lights, other wire to ground.
If I had realized the HPI was like this, I would have got a MVT or something similar instead and tried to mod it to fit this motor.
|
|
|
|
Post by 90GTVert on Nov 27, 2023 23:38:13 GMT -5
I'd probably just try the standard regulator and see what happened with a meter. I wired my lights DC long ago and haven't regretted it. It's possible to drain the battery, but I don't miss dimming or flickering lights and if it ever stalls at night I'm not left in the dark. I've got far from perfect charging and the regulators I've tried don't really like to regulate. I handle it with 2 stages of headlight basically. I have a running light (halo) that I can use to allow it to use less energy but still making it easy to see me. Then I use the headlight itself if voltage is on the high side (anywhere outside of low speed town riding basically). Not ideal, but it works well for me. The catch is that you need a voltmeter mounted on the scoot. My water pump cuts out somewhere over 15V as a protection feature so if I don't pay attention to volts then I'll notice my coolant temp shoot up. It cools quickly once I turn the headlight on to drop voltage though.
|
|
|
|
Post by 190mech on Nov 28, 2023 6:46:11 GMT -5
HPI lists a regulator for it . Shown on the paper you posted on the previous page.. 210V261
|
|
|
|
Post by oldgeek on Nov 28, 2023 8:04:08 GMT -5
HPI lists a regulator for it . Shown on the paper you posted on the previous page.. 210V261 Yes but depending where you look there is conflicting info about how to wire it. This first picture is from HPI directly and it shows 2 wires coming from stator for the lighting coil. However none of the mini rotors have 2 wires coming from them for the lighting coil. 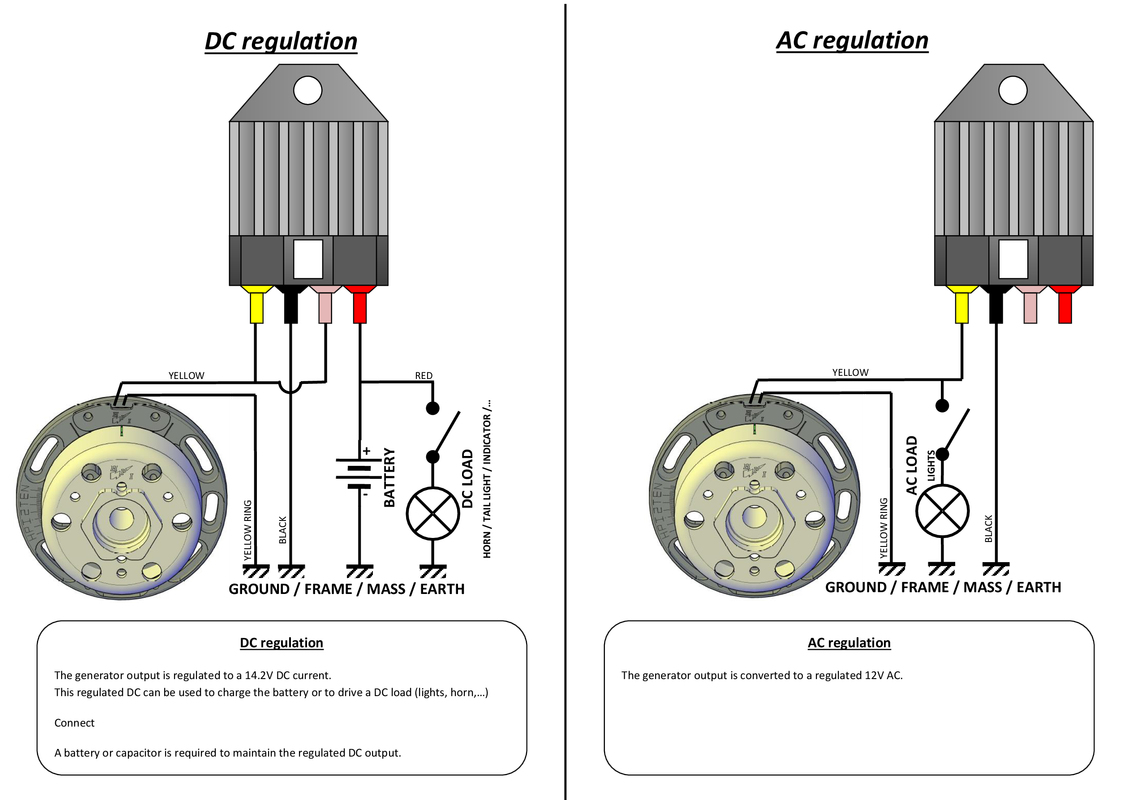 Here is a picture from Treatland, it says this is the instructions that come with the regulator ($65) that shows several different ways to wire up the regulator, but clearly different from the instructions from HPI. 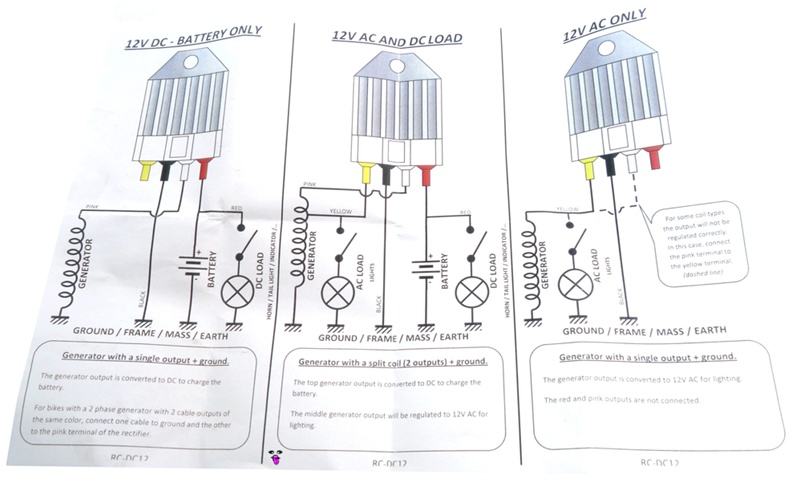 I'd probably just try the standard regulator and see what happened with a meter. I wired my lights DC long ago and haven't regretted it. It's possible to drain the battery, but I don't miss dimming or flickering lights and if it ever stalls at night I'm not left in the dark. I've got far from perfect charging and the regulators I've tried don't really like to regulate. I handle it with 2 stages of headlight basically. I have a running light (halo) that I can use to allow it to use less energy but still making it easy to see me. Then I use the headlight itself if voltage is on the high side (anywhere outside of low speed town riding basically). Not ideal, but it works well for me. The catch is that you need a voltmeter mounted on the scoot. My water pump cuts out somewhere over 15V as a protection feature so if I don't pay attention to volts then I'll notice my coolant temp shoot up. It cools quickly once I turn the headlight on to drop voltage though. I think I will try to wire up the existing regulator like it shows in the diagram directly from the HPI site, yellow from stator to yellow and white at the regulator. Anyways in all of the examples one side of the lighting coil is grounded so it really does not matter if there are 2 wires coming out of the stator or not because one of them is grounded. I wonder if there is much difference between a standard reg/rect and the one from HPI, besides price? |
|
|
|
Post by Lucass2T on Nov 28, 2023 10:16:35 GMT -5
I wonder if there is much difference between a standard reg/rect and the one from HPI, besides price? I am pretty sure there is no real difference between the HPI one and other quality items. HPI's reg/rect is pretty expensive for what it is. But a good OEM one is too. I am 99% sure you can wire up any 4 pole reg/rect and it will work like the HPI one. You have the HPI 2-ten version right? Or the pure race version? Because with the latter you need a seperate lighting coil. I built a wiring loom and electrical circuit from scratch for my cr500 supermoto a few years back. It had 1 single yellow wire coming from the lighting coil behind the flywheel. That was what I was working with. Did some digging around and found out a generic china scooter reg/rect should work fine. And it did! I had the lighting coil keeping the battery charged through the reg/rect. They (LED) lights were powered by the battery. I can send you my notes and diagrams if you like? |
|
|
|
Post by oldgeek on Nov 29, 2023 20:00:54 GMT -5
I finished up wiring and then spent a couple days trying to set the HPI iggy up. It gave me hell, mostly because of my stupid mistakes but with some help I finally got it running today before I left the shop. I likely will not have time for a test ride before late tomorrow or sometime Friday.
|
|
|
|
Post by oldgeek on Nov 30, 2023 20:59:09 GMT -5
Took a couple quick runs with the HPI iggy's first ride. Dragy says no faster really, but who knows for sure because I put a new variator on it just before I installed the new iggy and did not fully test it out yet. Got a Malossi variator from ScooterTuning.ca during the black Friday sale.
The HPI setup is a wasted spark type and required me to set the Vapor to 2 pulses per revolution to get the Tach to read correctly. I can feel the difference between the HPI and the stock iggy. It feels like the HPI spins up quicker but the motor shakes more due to the lower mass of the HPI mini rotor I guess. It does seem to smooth out above idle. Temp seems to be running in the same range as the stock setup.
HPI instructions say to set it up at 2mm BTDC, which is where it is now, but also says to vary it from 2mm-4mm for best performance. So should I try 3mm?
|
|
oldskool
Scoot Junior
 125cc WC Dio/ZX50 Kit is here :) Now Honda or Kymco ??
Posts: 6 
|
Post by oldskool on Nov 30, 2023 23:22:05 GMT -5
I would take a much shorter jump in testing. You had mentioned that 1 mm was about 10 degrees in timing. I would only go one or two degrees at a time and test. Just my opinion. Did sound good today with little to no delay in throttle response. I am saying that it spun up quick with that iggy. Good luck getting it the rest of the way dialed in .
|
|
|
|
Post by oldgeek on Dec 3, 2023 19:49:19 GMT -5
I have not changed the timing any because I want to see how this new Malossi variator does. I took a couple quick rips down the short street near the shop and decided to take a run on the longer test loop. I was coming down the home stretch on the bypass and the variator nut came off. I didn't know what had happened at the time, it tried to lock up a bit like a seize does. I coasted it onto the shoulder and started the scooter push of shame, probably just over an 1/8 of a mile back to the shop. No real damage except a shim, a lost nut and some wear on a section of the belt. The splines on the crank were very slightly damaged and the threads on the crank had to be touched up with a file in order get the new nut threaded on them. I am not sure why it came loose, it was a much thicker nut than the stock one. I have noticed it was occasionally easy to remove lately, I have even stopped using the torque stick and just pounded it on with the 20 volt impact. I may have to start using threadlocker. 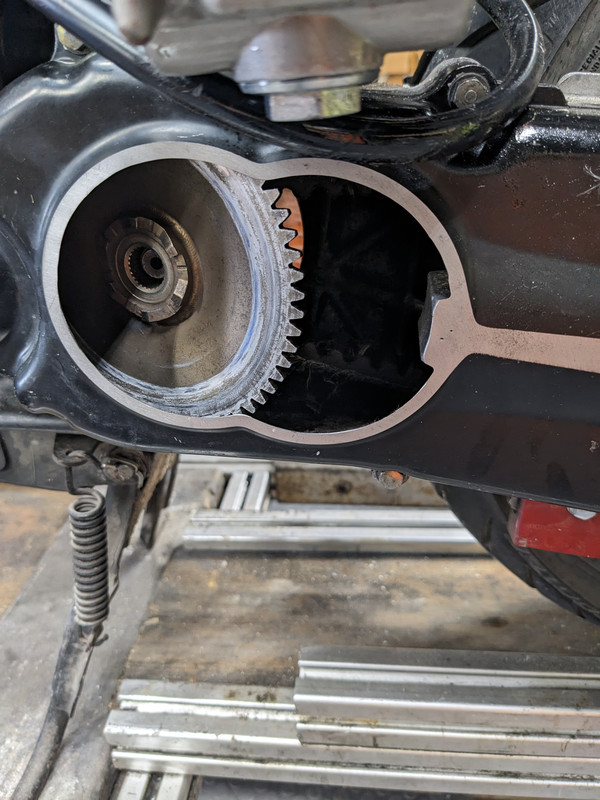 The new nut I am going to use is even bigger and has a flange. I dont use the kickstart so why not. Old nut size on the left, new one on the right. 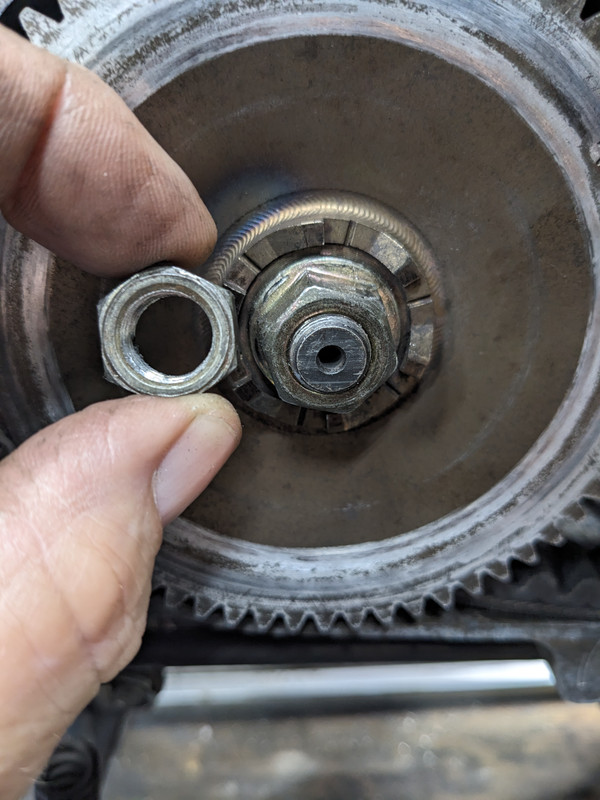 |
|
|
|
Post by oldgeek on Dec 3, 2023 20:00:37 GMT -5
So I need some ideas on setting up the CVT. I am currently using a yellow contra and dont really notice any belt slip. If I lighten up the rollers the top end suffers pretty bad and it revs just a tad too much I believe. Heavy rollers seem to bog me just a bit on launch and revs seem to take just a moment to get up where they should be and top end is faster.
Would a red contra spring and even heavier rollers help the situation? I have always resisted using a heavy contra spring but it may be necessary on this build I guess.
|
|
|
|
Post by 90GTVert on Dec 3, 2023 22:10:04 GMT -5
So I need some ideas on setting up the CVT. I am currently using a yellow contra and dont really notice any belt slip. If I lighten up the rollers the top end suffers pretty bad and it revs just a tad too much I believe. Heavy rollers seem to bog me just a bit on launch and revs seem to take just a moment to get up where they should be and top end is faster. Would a red contra spring and even heavier rollers help the situation? I have always resisted using a heavy contra spring but it may be necessary on this build I guess. How about using the heavier weights that seem to work best on the top end and see if you can get anything more from the clutch setup? Variator shimming adjustments? |
|
|
|
Post by oldgeek on Dec 4, 2023 7:19:44 GMT -5
So I need some ideas on setting up the CVT. I am currently using a yellow contra and dont really notice any belt slip. If I lighten up the rollers the top end suffers pretty bad and it revs just a tad too much I believe. Heavy rollers seem to bog me just a bit on launch and revs seem to take just a moment to get up where they should be and top end is faster. Would a red contra spring and even heavier rollers help the situation? I have always resisted using a heavy contra spring but it may be necessary on this build I guess. How about using the heavier weights that seem to work best on the top end and see if you can get anything more from the clutch setup? Variator shimming adjustments? I guess I was questioning whether or not I needed a stronger contra spring due to the increased output and torque, but since the belt does not seem to be slipping, I suppose that is a no. I will continue tweaking the CVT as you said, I have not yet really given the new belt or the new variator a complete tune yet. |
|
|
|
Post by 90GTVert on Dec 4, 2023 8:59:57 GMT -5
To me, if it’s not slipping and it’s not struggling when you slow down like the belt isn’t returning well enough (assuming lighter weights don’t fix that) then stiff contra springs are wasted energy and extra effort during CVT service.
|
|
|
|
Post by oldgeek on Dec 4, 2023 22:12:54 GMT -5
I made a few tuning runs today and discovered part of the problem. I had adjusted the Polini clutch springs 3 turns tighter and the butt dyno told me it was way worse off. So I moved the clutch springs 3 turns back to where they were + 2 more turns looser. The launch felt much better and was willing to lift the wheel again. I left the Dragy at home by accident so I dont have any data but I think I am on the right track. Apparently I was going the wrong way with the clutch. I also put in pretty heavy rollers, about 8.8g each. It certainly helped to bring the top end back up but how much I do not know yet as I was unable to go out on the longer test loop due to various reasons.
|
|


