Greg
Scoot Enthusiast
  
Posts: 218
|
Post by Greg on Jul 9, 2019 6:16:55 GMT -5
I have rebuilt several GY6 50cc motors and worked on plenty of scoots, but I am now working on my first GY6 150 swap.
I know the vacuum and fuel lines are different. does anybody have a pic of how they should go?
I know I am going to block off one vacuum inlet at the intake because I am not using a PAIR system. I cannot remember what needs a "T" and the extra port on the carb hooks up.
|
|
|
|
Post by jloi on Jul 9, 2019 11:21:03 GMT -5
|
|
|
|
Post by lilpinny on Jul 9, 2019 11:28:28 GMT -5
My vacuum line comes off my intake. It's not part of the engine or the carb.
|
|
Greg
Scoot Enthusiast
  
Posts: 218
|
Post by Greg on Jul 9, 2019 20:14:59 GMT -5
Thank you.
I have a vacuum operated petcock with PAIR removed.
The one that is new to me (NOT on a 50cc) is the extra inlet on the throttle cable side of the carb. I didn't know if I needed to give it vacuum or gas. I think a "T" is used if the PAIR system is being used.
I believe this inlet is to reduce backfiring when letting off of the gas.
The 50cc carbs use a little pedal that gets pushed down when you let off of the throttle.
|
|
|
|
Post by jloi on Jul 9, 2019 21:52:02 GMT -5
|
|
Greg
Scoot Enthusiast
  
Posts: 218
|
Post by Greg on Jul 10, 2019 5:16:19 GMT -5
LOL You are a man of few words. But the pictures are worth thousands. :-) |
|
Greg
Scoot Enthusiast
  
Posts: 218
|
Post by Greg on Sept 2, 2019 13:44:49 GMT -5
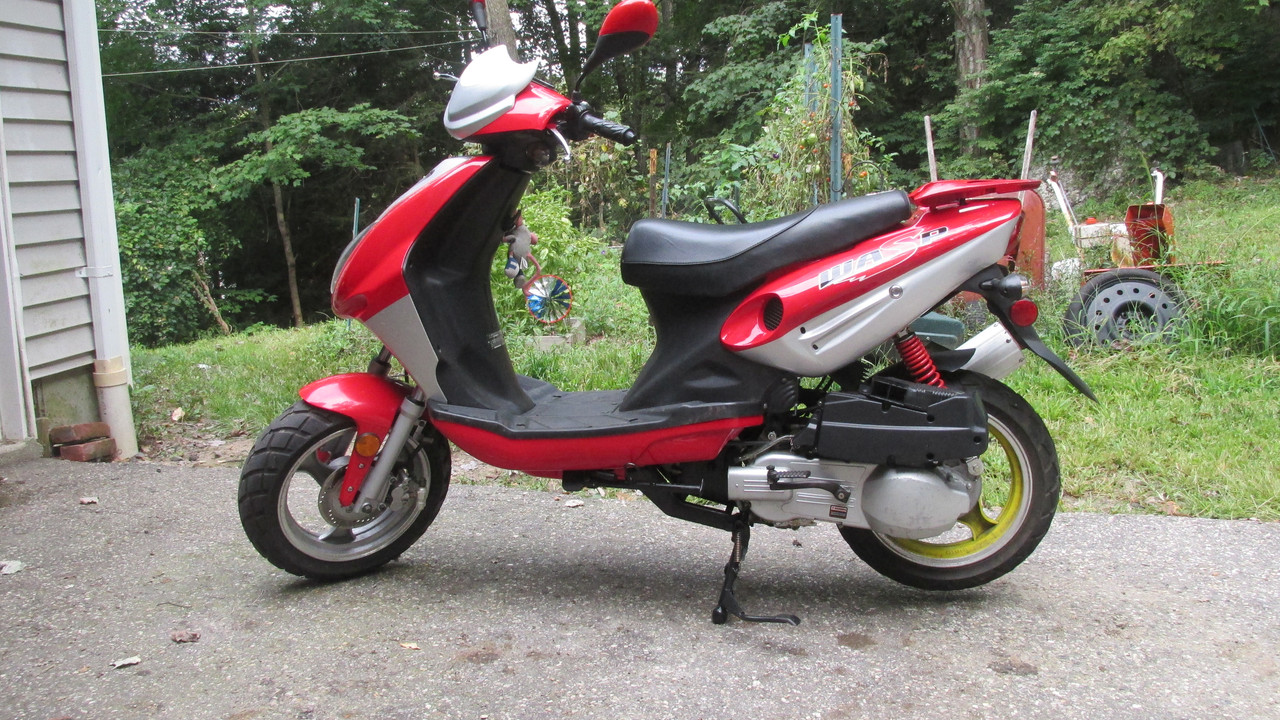
  I thought I would update this thread. The first picture, my build is about 90% done. The second picture, I'm at about 98% done. I just have some CVT work and paint for the CVT cover and I will be 100% done. It has been since April but I am nearly done working on my "5150" (50 to a 150) project. It started out as a 50cc two stroke Mina and is now a 150cc Gy6. I should have done a build thread, but about 1/4 and 1/2 the way through, I nearly scrapped the build because there was so much fabrication involved and I am a novice welder. I would never have attempted this build if it was my only Mina scoot. I just wanted my two scoots to be different and to see if I could accomplish the GY6 swap. The end results are that my welds are getting much better than when I started. Also, I pictured the final product in my head. It actually came out better than I had imagined it. I am very satisfied in my final product. |
|
|
|
Post by jloi on Sept 2, 2019 18:36:40 GMT -5
So , looks really great. what kind of fab/welding did you have to do? top speed? looks like my exact muffler. you got your airbox on so I'm guessing no engine/carb mods ? what about CVTand CLUTCH ETC. ?
|
|
Greg
Scoot Enthusiast
  
Posts: 218
|
Post by Greg on Sept 3, 2019 17:43:39 GMT -5
The two stroke 50cc engine and 150cc Gy6 are both top mounted.
I thought all I was going to have to do was take the old motor out and put in the new motor.
Uh uh. The 150cc engine mount was too big. The 50cc mount holes put the 150cc engine too high.
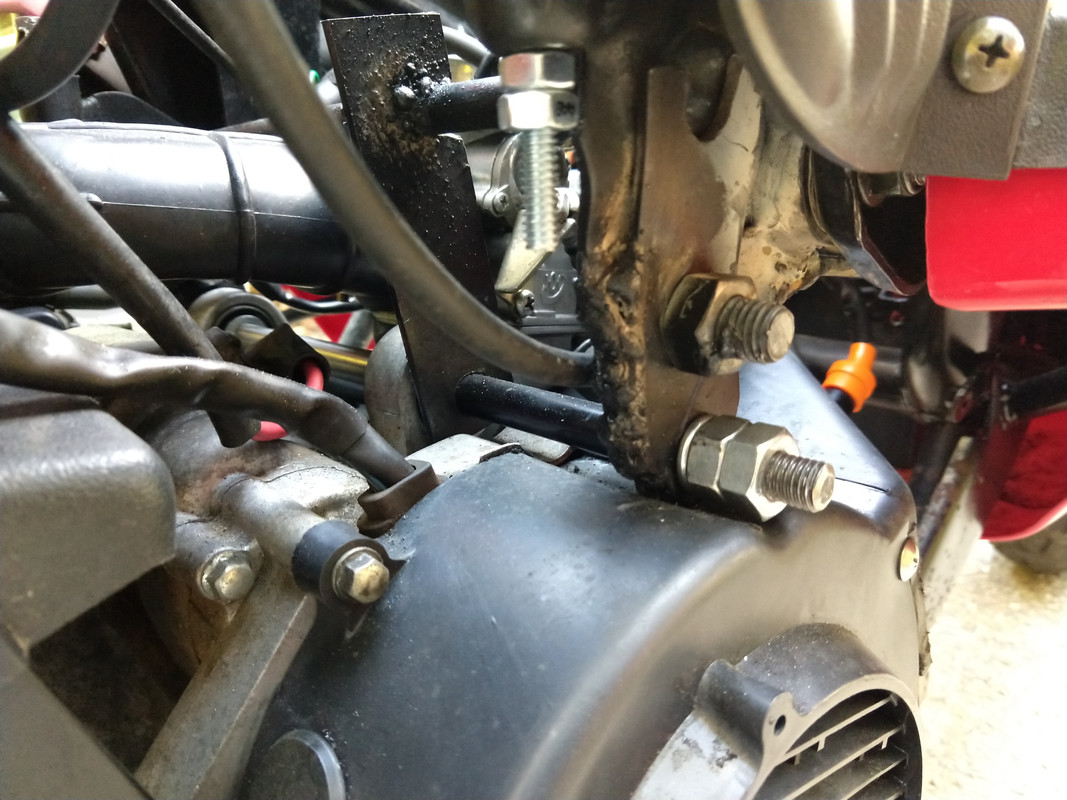
So I took the 50cc mount and welded 5 pieces of 1/8' x 1 1/4 steel stock to the original mount. 4 pieces to lower the mounting holes position and one near the middle for stability because the 150cc engine holes has the right one in far compared to the left.
I had to weld on a second shock mount.
My original center stand got caught in the 150cc kick starter so I took the 150cc center stand (which was over a 1/2" wider than mine) so I had to weld plates inside the stand in order for the center stand to hit its stops so it didn't bend all the way forward.
No engine mods. I rebuilt it, but 57mm is plenty big enough for me.
I don't know top speed. I know I did 45 going up a pretty substantial hill so the power is impressive.
CVT issue. On my first ride I had a horrible stutter off the line and from 0 to about 10 MPH.
Also I had a vibration.
On my second ride, I went to the top of a hill, turned off the motor and coasted about 3/4 of a mile. No vibration, so I knew it wasn't from my "new" donor rims / wheels (taken from the 150cc scoot).
I opened up the CVT and found a belt that wasn't in the greatest shape, but the biggest discovery was a greasy substance in the clutch bell.
I wiped out the bell put it back together and the low speed stutter is gone. The vibration is still there slightly. Also when coming to a stop I sometimes get a "thump" or "thump thump" forward like the clutch is having trouble disengaging or trying to engage again (its an awkward feeling). I ordered a belt and a new CVT gasket. I thought about the thump for a while and decided to outright replace the clutch. I am guessing that either the grease got soaked up by the clutch pads or I have a spring that is not up to par.
When the parts come in, I will also clean the inside of the CVT. I'm hoping I don't have a seal leak from the secondary but it's the only thing I can think of that can cause a clutch bell to get greased up.
It has been a sometimes frustrating mod but my goal was to make it so the engine looked like it was always there as stock as possible and not like the elongated ruckus mods.
|
|
|
|
Post by jloi on Sept 4, 2019 17:29:11 GMT -5
My GAWD man , I need pix, pix I tell you. you got me bitin my nails and chompin at the bit .
Holy sh$$t I have a shudder too. maybe you just fixed it for me. it's only at slow starting speed. started after I replaced rollers with sliders . only I used a cue tip to coat the surface of the case very lightly with lithium grease where the CVT cover goes. I did that so , hopefully I don't have to replace the gasket every time I remove the cover . I read where somebody else did that so I thought I'd try it too. No way I got too much . But , I did also decide I don't want rusted kick start gears inside the case/cover; so I remember rubbing oil or maybe lithium grease inside the case on gears etc. . I'm gettin ready to install a new coso ssp variator so I'll be disassembling clutch too to check it . I was careful but maybe that was a (duh) bad idea with the grease.
Have you ever done CVT tuning in conjunction with carb jets for a 150 ? I could use some input.
I'll look at the clutch,bell, etc. and maybe clean it with brakleen and alcohol.
|
|
Greg
Scoot Enthusiast
  
Posts: 218
|
Post by Greg on Sept 5, 2019 5:25:07 GMT -5
Yesh, the stutter felt like something that should be grabbing was not fully grabbing. Then it goes away at higher speed. I thought it was a worn belt until I found the mess in the clutch bell.
I will get more pics. I have not done any mods on a 150 but I am sure they are just as easy as the 50cc The rule of thumb is a 44mm kit uses an 80 jet, 47mm uses 88, 50mm uses a 90. 50mm with freeflow air filter uses a 95. That gets me close on every 50cc build. If you are only changing air filter it should only be a 5 to 10 jump in jets (then check the plug on every jet change).
It may help to sand the glaze off of your clutch pads too. I was going to do this but I don't know where the grease came from and decided to start over with a new clutch.
|
|
|
|
Post by jloi on Sept 5, 2019 13:31:03 GMT -5
yes, I was/am gonna sand the glaze off the pads.
|
|
|
|
Post by FrankenMech on Sept 5, 2019 21:40:11 GMT -5
Good job so far  I am replacing a bottom mount 50cc so new mounts will be required. |
|
Greg
Scoot Enthusiast
  
Posts: 218
|
Post by Greg on Sept 8, 2019 18:39:21 GMT -5
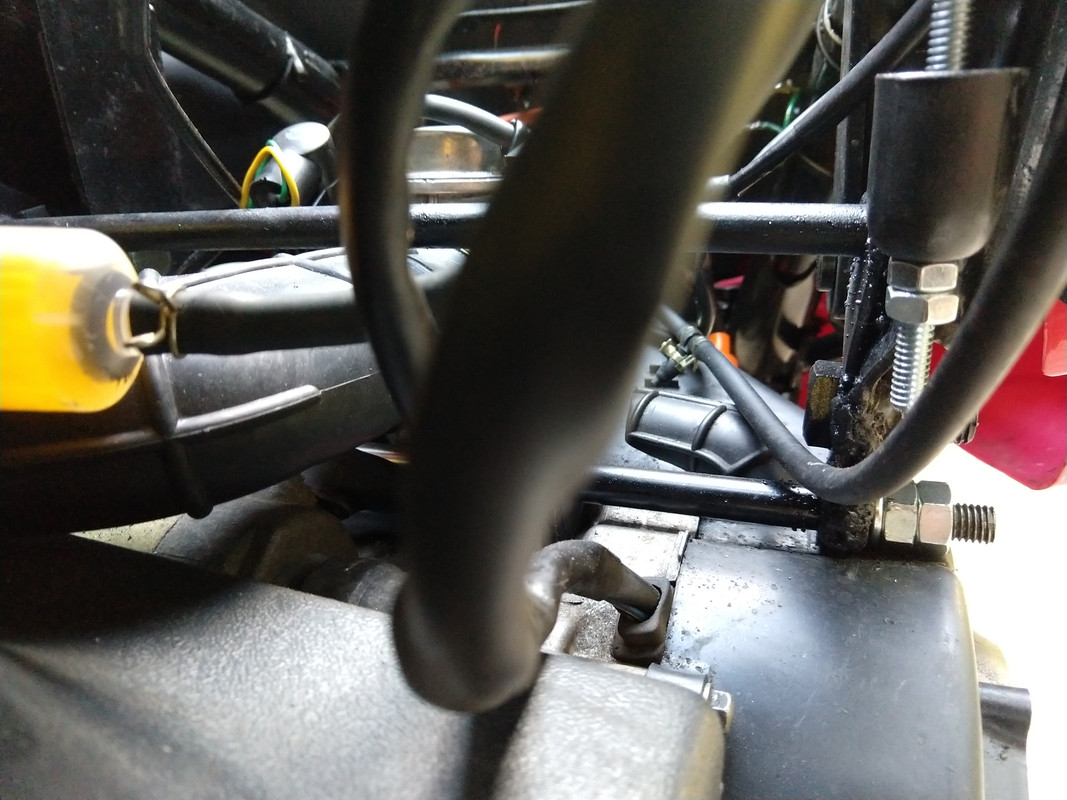
Thanks. I'm starting to like the extra power. Here are some pics of my engine mount modification.    If I used the original 12mm holes, the black cross bar was right in front of the carb so I couldn't get the airbox hose in place. The black cross bar is original to the mount. I used 10mm threaded rod through the engine. I used 10mm ID 12mm OD stainless tubing over the threaded rod for added strength. Since the right engine mount is in far from the end of the mount, I used a piece of steel and welded it to the top original bar and drilled the bottom so the stainless tubing goes right through it. It's not pretty (my welds are getting better) but it is solid. |
|
|
|
Post by jloi on Sept 8, 2019 20:25:02 GMT -5
I see, sorta. I think our frames must be quite a bit different . right behind my carb intake there's a really hefty part of the frame - kind of a half circle - where the air filter fits- and it goes right under this circular frame section . It doesn't quite show in any of my above pix .
all looks good , keep posting . so is that a long case or short case ?
|
|