|
|
Post by RH50Wisco on Nov 16, 2022 19:11:12 GMT -5
Roughhouse exhaust: Here is some more rusty goodness for your viewing pleasure. You can see the lovely hack brazing job someone did. Based on the added material here I would guess the exhaust was near detached when this repair was made. Also included here is a pic of my now derestricted Yasuni R. Used the Dremel with a small cutting wheel. Cut the 2 welds, then needle nose plier to twist and pull a little and the plug came right out. Very easy job. Sourced this from Scootertuning.ca and there was no restrictor on the silencer, so one less thing to worry about. I also wanted to mention that the stock exhaust weighs in at about 11 lbs. The new Yasuni R comes all-in with pipe, silencer, bracket, and hardware at just over 6 lbs. Huge weight differential! I just can't believe how heavy the stock is. 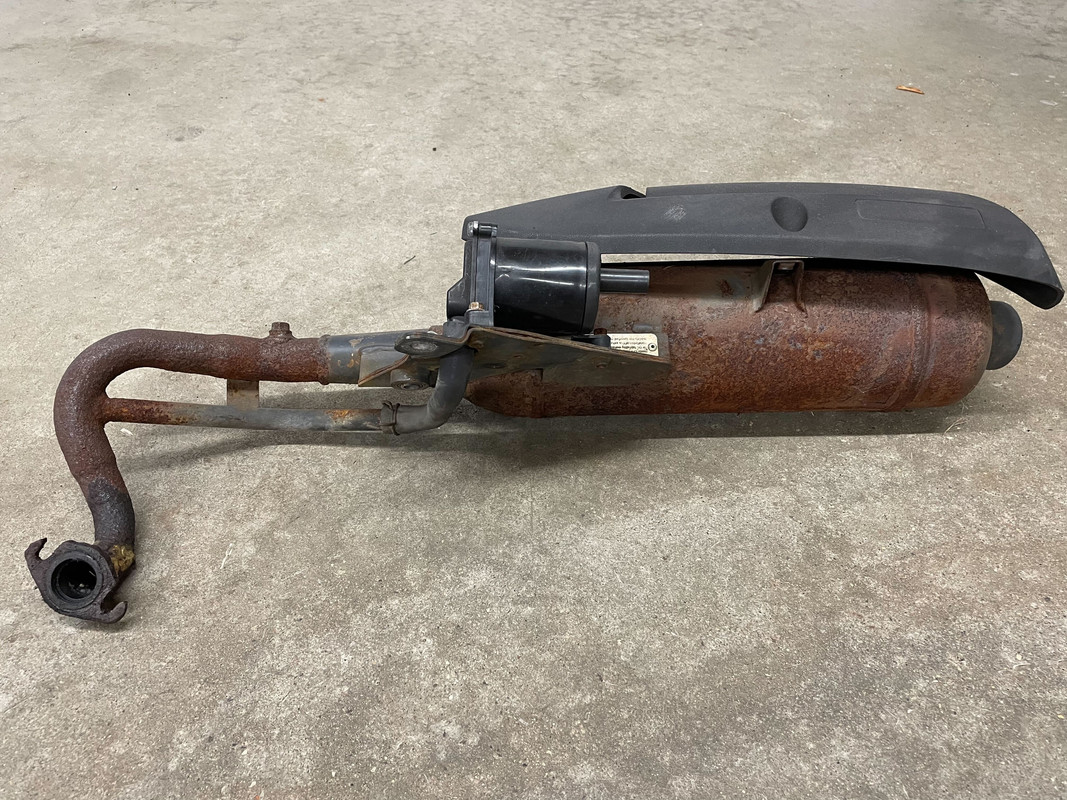 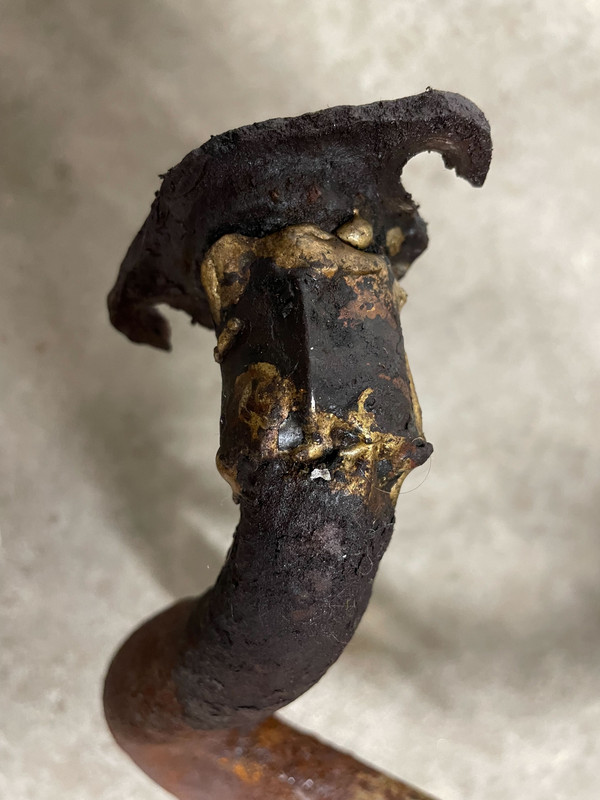  |
|
|
|
Post by Zino on Nov 16, 2022 19:40:37 GMT -5
Great pictures bringing this Roughie back
Yasuni R paired with a Streetrace 70 should be a blast to ride.
The stock throttle cable worked fine with the 17.5 dellorto it might be a little short for the 19mm
|
|
pili
Scoot Enthusiast
  
Posts: 278
|
Post by pili on Nov 16, 2022 21:33:59 GMT -5
Great story and pics. Scooter porn lol. Makes a guy want to spend quality time in the shop fixing and or cleaning  |
|
|
|
Post by RH50Wisco on Nov 18, 2022 8:59:05 GMT -5
Roughhouse Reed cage and reeds: Decided last night to take off another piece of plastic that sits over the gas tank and found some more yummy gunk. Just your typical greasy grimy road crud from 7 years of accumulation, but in need of another power wash. That was not a fun job to do now that it is 27 F with snow on the ground. I drug the frame out to the driveway, gave the back end a good douse of engine degrease, then hooked the power-washer up to my H/C faucet in the garage and had at it. And yes my wife is very understanding. Her comments on seeing me do this..."that should leave nice ice slick on the driveway." I guess I will find out how bad it is when I go shovel later this morning. Got some more parts delivered so was able to get the reed cage back in. I mocked up the intake/carb install just so I could take some good pics and document all that here. That is a very RH specific ordeal that I will go into next. I believe I have a working solution but won't know for sure until I can get it fired back up and road tested. New reeds & gaskets, original cage. 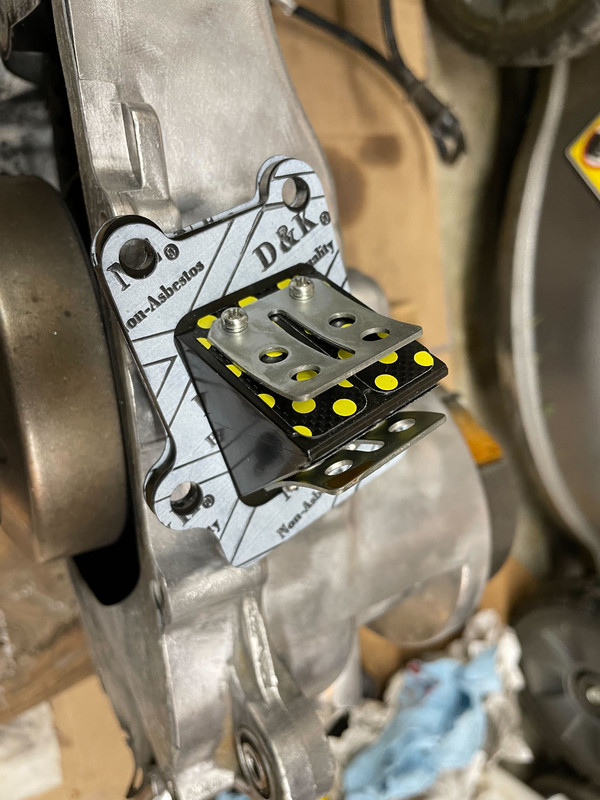 |
|
|
|
Post by RH50Wisco on Nov 18, 2022 9:21:39 GMT -5
Roughhouse Dellorto 19mm clone install: So here is the deal with the Roughhouse intake and carb. There is only one aftermarket intake that I know of available for the RH from NCY. Different sites have slightly different descriptions on parts so you have to piece together what info you can from various sources. From what I can tell that intake is only good for larger carbs and will not work for the 19mm Dellorto that I have, so I am stuck with the stock intake. I am not well versed on how other scoots are set up with attaching the carb to the intake, but here is how it is done on the RH. The carb is attached directly to the intake with 2 bolts that come in from behind the intake and screw into the carb. There is a plastic spacer that provides for the seal. The carb has an o-ring that seals to the spacer, then the spacer has an o-ring that seals to the intake.  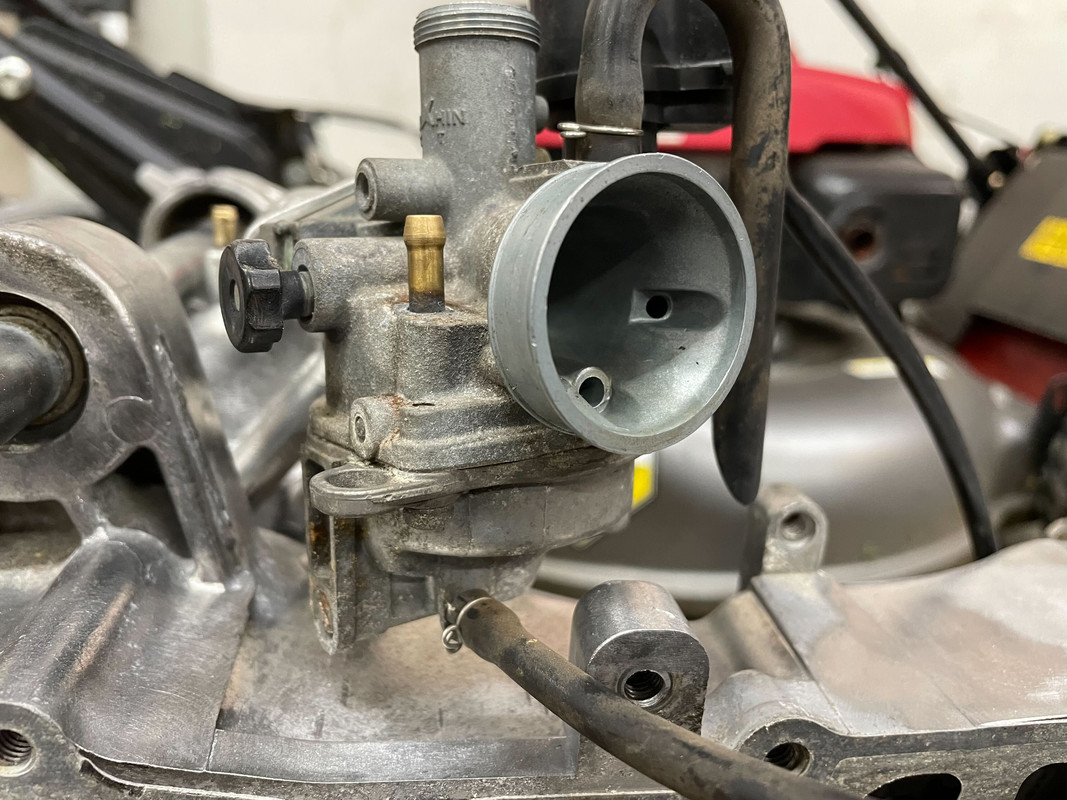   The carb I acquired does not have the same type of mount. It has a hose-type, not sure the proper technical term for it but I am sure there is one. Maybe I should have bought a different carb, not sure, but too late now so need to go with what I have. In order to attach the carb I have I needed to buy an intake adapter (Malossi). Once I found that I thought I was good. I then got some automotive hose from local shop and did a mock fit....no go. There is a mount tab on the engine case for the CVT cover that interferes with the location of where the carb now wants to sit. With the addition of the intake adapter and the mount point on the carb it extends the location of the carb quite a bit. The hose I had was just not bendy enough to really move it in any direction to avoid that tab on the case. Now comes Amazon to save the day. I was able to find some 45 degree bent hose that comes in various ID's. This was a life-saver of a find. I ordered up the 1" ID hose and it came in 2 days. I ended up chopping most of it off, but the bend is all I really needed. www.amazon.com/gp/product/B08RJ4YJJD/ref=ppx_yo_dt_b_asin_title_o08_s00?ie=UTF8&th=1It was a perfect fit and placed the carb very nicely. I don't know if extending the intake chamber or not having completely flush inner channel will have any effect on performance, but I will have to wait until I get it on the road to determine that. Here are pics of the new carb setup. The Dilema:   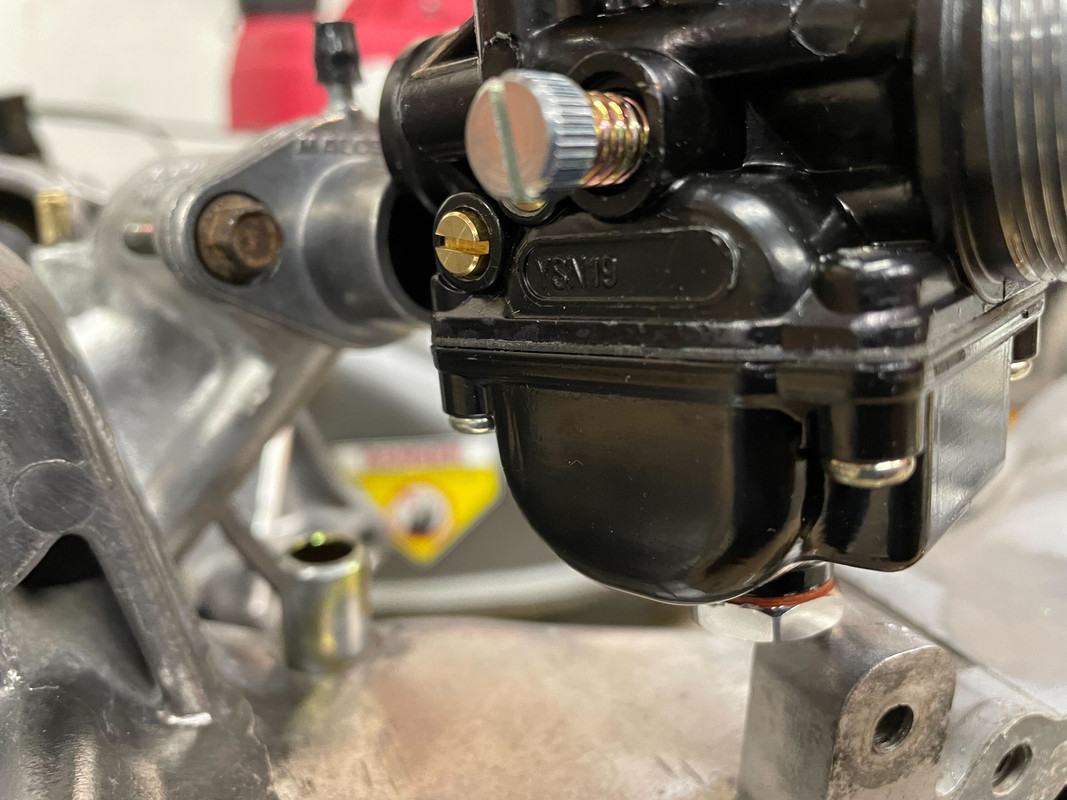  The Solution: 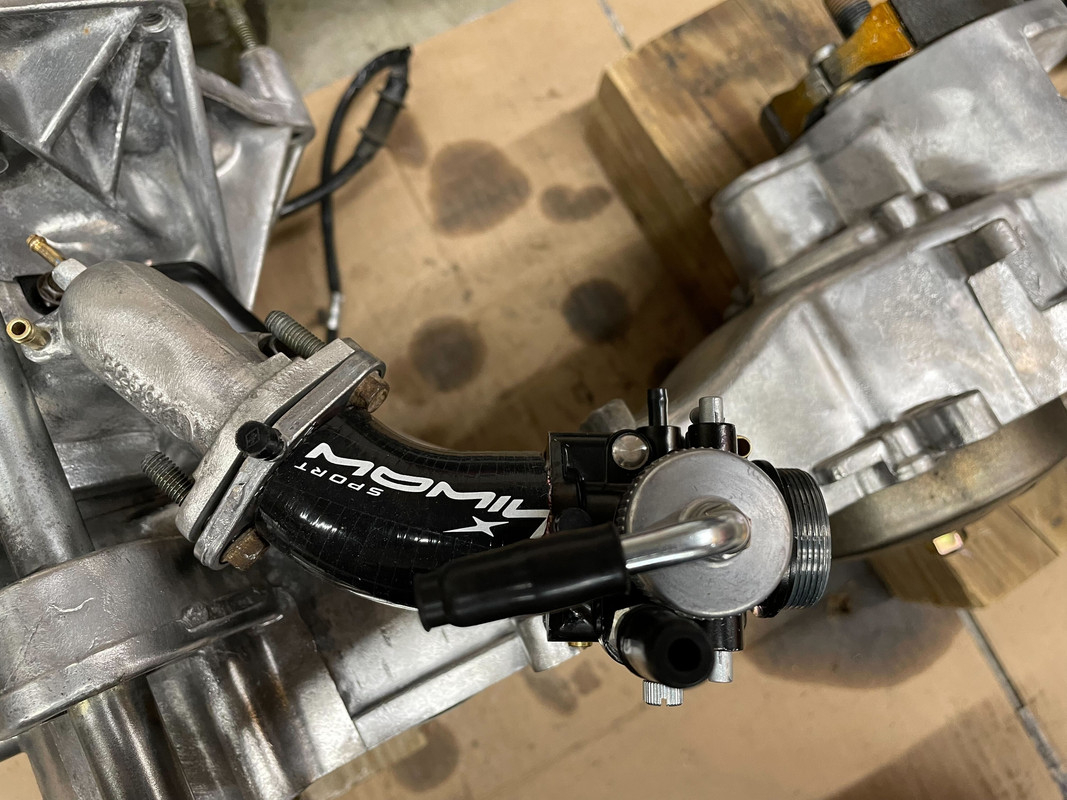   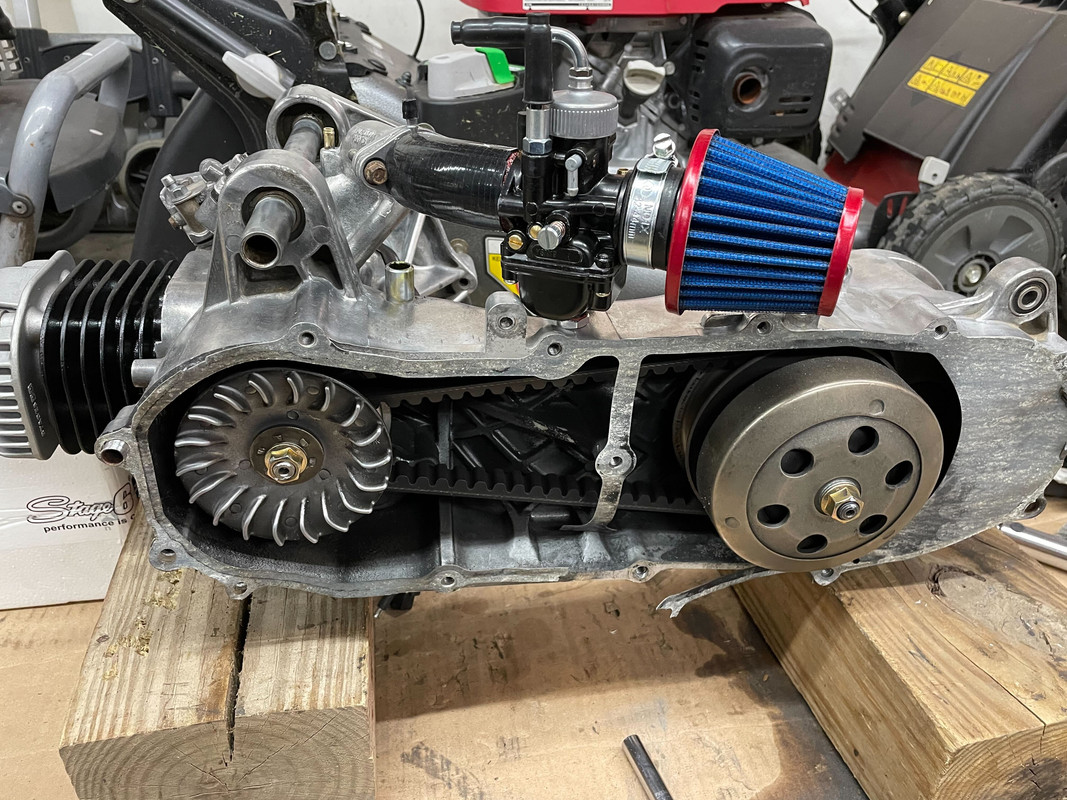 I think placement is really good and it look good too! |
|
|
|
Post by RH50Wisco on Nov 18, 2022 10:24:40 GMT -5
I got the carb from here: www.treatland.tv/19mm-race-carburetor-clone-p/19-race-clone.htmAlso bought 3 sets of jets - 80's, 90's, & 100's. W7 needle just based on various things I have read online. Hopefully I have what I need to get it properly tuned when that time comes. Based on this tear-down comparison and other things I have read this should be a good clone. It even comes with the correct atomizer for the 2T's. I have also read about some very not-so-good clones that are out there for much cheaper than this one. I figured this one should be more than sufficient for my needs. www.youtube.com/watch?v=ThjplCAfq0M |
|
|
|
Post by lordverminaard on Nov 18, 2022 10:57:41 GMT -5
I had the same clone on my Stage6 Sport Pro MKII, only in 21mm form. It was a good carb and very tunable. I had a lot of issues mainly because I didn't know what I was doing, lol. But once it was dialed, it ran really well.
Roughhouse's are nice scoots and I hardly ever see any for sale around here.
|
|
|
|
Post by RH50Wisco on Nov 18, 2022 11:53:05 GMT -5
|
|
|
|
Post by RH50Wisco on Nov 21, 2022 18:16:57 GMT -5
Spent some time this weekend taking the remaining plastics off the back. Every bolt that goes into the frame was rusted and seized which meant an eventual breaking off of the head, which then leads to PB Blast, torch, and then hopefully getting the bolt out. Was able to get them all out in this manner except 1 which required another drill and tap. All I know is that when I put everything back together there is going to be a whole lot of anti-seize in use. I will soon be able to start putting things back together.
|
|
|
|
Post by RH50Wisco on Nov 21, 2022 18:30:21 GMT -5
It is getting interesting. As I start to plan putting everything back together I am realizing there are a bunch of things no longer needed now that I have the aftermarket performance parts. In this pic I have circled 3 such things. Top Left - hose that hooks into something on the stock exhaust. Yasuni doesn't have that, so GONE.
Top Right - hose with spring thing on it. This is the vacuum that goes to the vacuum diaphragm petcock for the fuel valve under the tank. I will be replacing that with a non-vacuum version so that hose...GONE.
Bottom Right - Flex hose. This is empty but goes from the plastic shield around the cylinder up to the carb and just sits next to the carb, literally touching it. I can only guess that the function of this is to divert heat from cylinder to carb to get the carb warmed up quicker. Well, new racing carb will sit 3-4 inches further away so this hose is now useless...so GONE.
Also, somewhere in that mess is an electric plug for the stock automatic choke and that will now be gone as well.
I think there may have been some hoses attached to the original air box, but that was already gone when I got it.
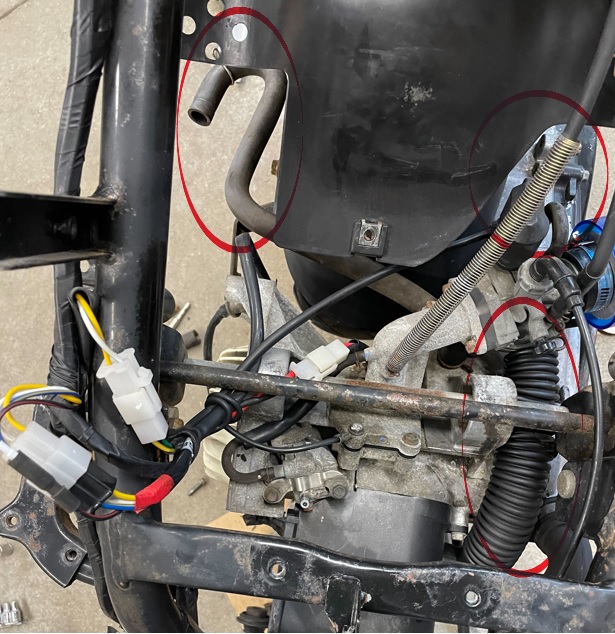 |
|
|
|
Post by RH50Wisco on Nov 21, 2022 18:36:52 GMT -5
Roughhouse Intake Manifold adapter install: Got the intake manifold adapter installed. Couldn't find a gasket for this so sourced some gasket material from local auto parts store (Fel-Pro 3157) and cut my own. My only words of advice here are in regards to the holes. When drilling through the gasket for these go very slow. Basically let the bit shave away the material. If you drill too fast with pressure you end up breaking through the back side which makes for a very messy gasket surface. 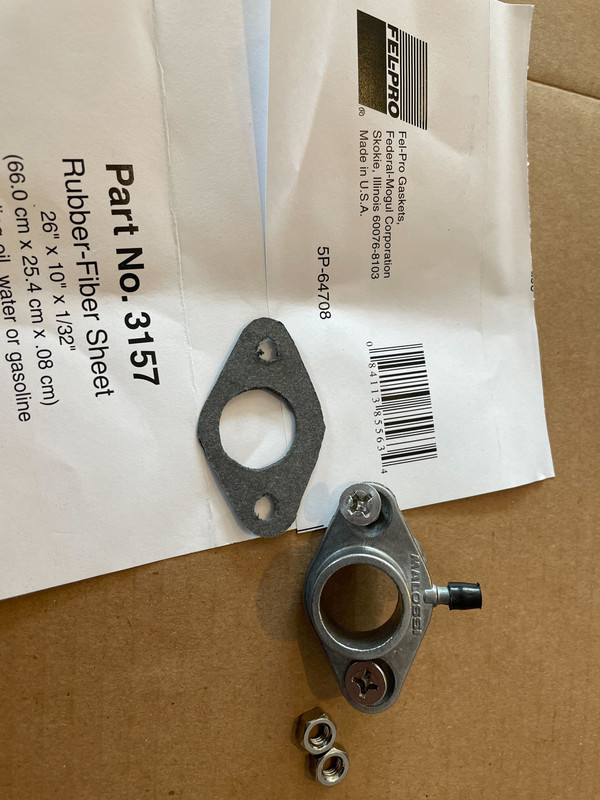 |
|
|
|
Post by RH50Wisco on Nov 21, 2022 19:16:29 GMT -5
|
|
|
|
Post by Zino on Nov 21, 2022 19:53:20 GMT -5
Got the intake manifold adapter installed. Couldn't find a gasket for this so sourced some gasket material from local auto parts store (Fel-Pro 3157) and cut my own. My only words of advice here are in regards to the holes. When drilling through the gasket for these go very slow. Basically let the bit shave away the material. If you drill too fast with pressure you end up breaking through the back side which makes for a very messy gasket surface.  another way to get holes without tearing up your gasket is to use a paper hole punch |
|
|
|
Post by RH50Wisco on Nov 22, 2022 9:08:24 GMT -5
|
|
|
|
Post by RH50Wisco on Dec 2, 2022 13:15:21 GMT -5
Roughhouse fuel valve / petcock / non-vacuum Ordered my new non-vacuum diaphragm petcock from Amazon. There are quite a few replacement petcocks listed on Amazon with the correct OEM part number of P6523000000 for various Genuine scooters that state the size of threads as "14 x 1.5". This is INCORRECT. The actual size is "14 x 1.0". The last part of this measurement refers to the thread pitch, either course or fine thread. More specifically this measures the distance between the threads in mm. If in doubt then do as I did and measure.  I decided to go with this one that has the fuel outlet straight out of the bottom. All others would have the outlet going out to the right if looking at the selection lever. I figured if I rotated this so the fuel line is pointed toward the front of the bike (ie. toward the carb), then the lever would be toward the inside of the bike and not easy to see or utilize. I'm not sure I like how far down it is hanging so I may just get the right-angle style and deal with it. www.amazon.com/gp/product/B071K6N84W/When I did this same mod on my Zuma I had to utilize a secondary in-line on/off valve because you can't even get to the petcock due to the location and the body panels. With the Roughhouse it is pretty accessible so you can get right up in there and not need the secondary valve. The Zuma also has a different mount flange. Here is what I ordered for the Zuma mod. www.amazon.com/gp/product/B01LN7WF24/ www.amazon.com/gp/product/B0018U234W/Why do this mod and get rid of the vacuum activated petcock? If you let these bikes sit for roughly more than 2 weeks the carb dries out and the vacuum generated from turning over the engine is not adequate to activate the diaphragm and get fuel flowing enough to get the bike started. Then you are taking off the air filter and giving it a shot of starting fluid to get her started. Since doing this mod to my Zuma it starts immediately all the time now. No more long starter engagement, pumping the throttle, or whatever other tricks to try and get started. It just starts immediately now and I have been super happy with this resolution. I only turn off the fuel line when I know I won't be riding again for a while, like longer than a couple of weeks. When I removed the old petcock the filter was stuck up in the gas tank. After using a pick to pluck it out of there I saw why it was stuck, a bunch of nastiness sludge built up on it as you can see here.  The new one I have, and I believe most all that are available out there, have a Reserve tank setting. These tanks are so small that I have no intention of ever using this so I used some Sharpies to mark the Off/On positions, leaving the Reserve non-marked. Since I have the tank off and apart this far I might as well pull out the fuel gauge sending unit/float and check it out. On my other RH the fuel gauge was not working, I simply pulled out the sending unit and saw that the lever mechanism was stiff/stuck. A little bit of bending and just working it back and forth was all it needed and has worked great ever since. With the sending unit out I can also have a better look in the tank. Good thing I did, because there were quite a few floaties in there. I jammed a rag in there to get the tiny bit of fuel left out, then vacuumed out the debris. I have an attachment that I can put on the shop vac that reduces the hose down to about 1/2" tube so I can vacuum into small areas like this. Some of that sludge that was on the filter is on the walls of the outlet hole so carb cleaner to that. Here is the final pic of it installed. Most likely going to change it out to right-angle style. Actually, my main concern with this petcock is how close the fuel line is to the shock. With the built-in angle the hose pretty much clears the shock and any danger of getting pinched in it. New petcock already ordered, they are cheap! www.amazon.com/Carbman-Petcock-Switch-CM185T-CM200T/dp/B07S3S57G5/ |
|