Post by 90GTVert on Mar 7, 2010 12:49:39 GMT -5
Chinese tail and brake lights are known for having problems. I've mentioned this before, and posted a fix involving a new socket from NAPA HERE. I posted another fix involving a large LED brake/tail light assembly HERE. This is yet another alternative. In my experience, the stock sockets often become damaged or for whatever reason only one of the two filaments of the bulb will work (tail or brake). Sometimes one will flicker or work occasionally, but not reliably. This fix is good for those situations where one light is reliable and the other is not. It's a very cheap fix rather than replacing a whole stock housing, and works well.
This was performed on a customer's scooter. Sorry, I didn't take pics during the installation process because I like to finish as quickly as possible when the work is for a customer.
The customer's brake light was reliable, but the tail light doesn't work at all most of the time or flickers if the bulb hits just the right spot. I suggested this as an affordable alternative to a new housing. Besides being affordable, I feel it is more reliable. I replaced a housing on one of my scooters only to have it malfunction as I've described weeks later. That gets costly quick... and frustrating.
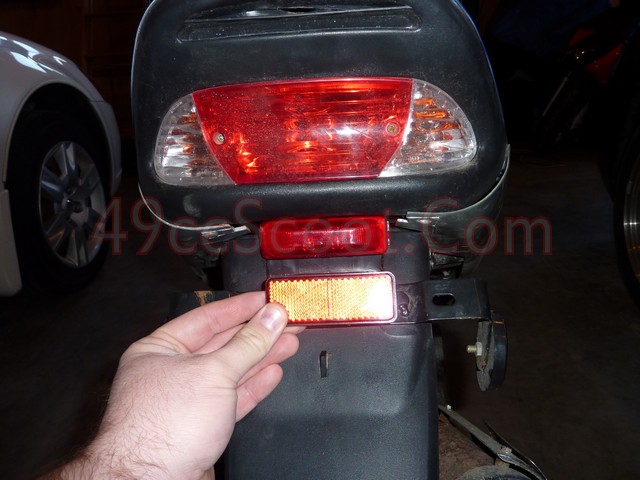
I measured the stock reflector and then went to an auto parts store and found a dual LED marker light close in size. I paid $8.00 for the marker light, but you should be able to find them even cheaper in different styles in Wal-Mart or other stores. I highly recommend using an LED style lamp because of their long life and low power requirements. Here you can see the stock reflector along with the new light.

I removed the rear fender and the reflector came off with just one nut. I installed the LED light to the fender using 3M double-sided mounting tape and clamped it (putting rags over the light so it didn't get scratched by the clamps) while I moved on to wiring. Some light assemblies can be bolted or screwed on.
This housing didn't come with wires, only 2 connections on the rear. I soldered wires to the connections before it was installed on the fender. Make sure to leave plenty of wire.
I used a multimeter to find the wires going to the tail/brake light that would provide power for the tail light and a ground. If you are looking for the tail light circuit, you should find a positive power source that is on only when the engine is running and/or when the headlight switch is on. In this case the headlights and tail lights are always on when the scooter is running. The solid brown wire going to the light assembly was the tail light power in this case. That seems to be the case on most scooters that I have worked on, but it's always best to verify this with a multimeter or test light. The ground was a solid green wire leading to the light assembly.
I used wire strippers to strip a section of the insulation in the centers of each of the wires I needed to tap power from. I stripped 2 wires and wrapped one around each of the stripped sections from the scooter's wiring. I soldered the connections to be sure they were secure. You can use electrical tape or heat shrink tubing to keep these connections safe from the elements. Another option is to use wire taps that can be crimped into place. They are sold at most auto parts stores.
I cut both wires tapped from the stock wiring to about 3-4" in length. I crimped a female quick connect terminal on one and a male quick connect terminal on the other, and used heat shrink to seal them. I use different connectors so the light can only be hooked up one way.
I removed the clamps from the light and fender and put it roughly into position. I cut the wires leaving a few inches of slack to make removal and installation easier. Then I attached the appropriate male and female connectors to correspond with the ones installed on the power supply wires and once again used heat shrink tubing to seal the connections. I connected the light and the power wires and reinstalled the fender to finish the job.
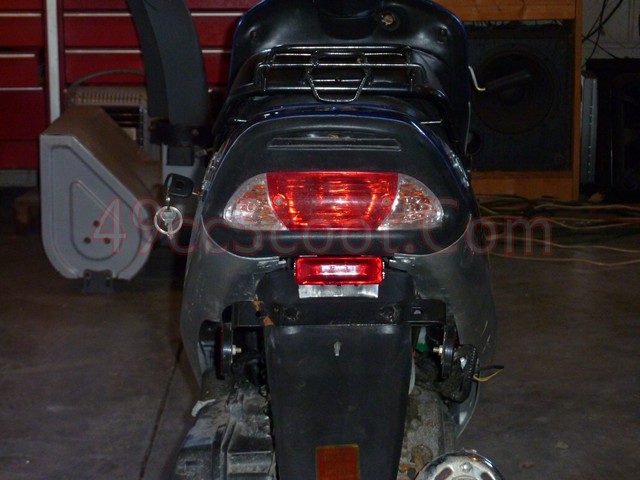
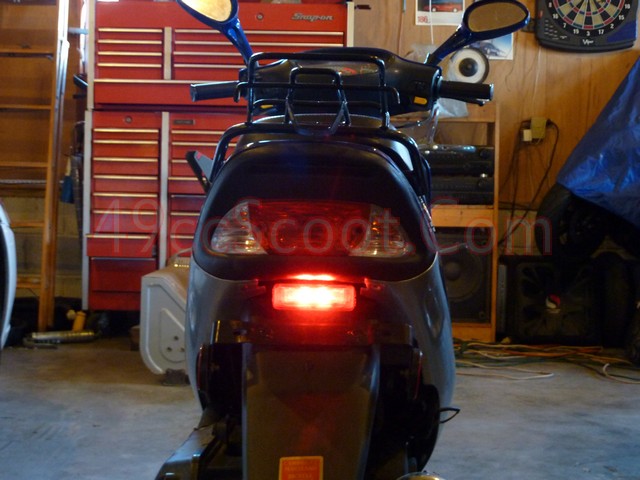
The new light looks as if it belongs there, and lights up as bright, if not brighter, than the stock tail lamp. Not bad for the price IMO.


This was performed on a customer's scooter. Sorry, I didn't take pics during the installation process because I like to finish as quickly as possible when the work is for a customer.
The customer's brake light was reliable, but the tail light doesn't work at all most of the time or flickers if the bulb hits just the right spot. I suggested this as an affordable alternative to a new housing. Besides being affordable, I feel it is more reliable. I replaced a housing on one of my scooters only to have it malfunction as I've described weeks later. That gets costly quick... and frustrating.
I measured the stock reflector and then went to an auto parts store and found a dual LED marker light close in size. I paid $8.00 for the marker light, but you should be able to find them even cheaper in different styles in Wal-Mart or other stores. I highly recommend using an LED style lamp because of their long life and low power requirements. Here you can see the stock reflector along with the new light.

I removed the rear fender and the reflector came off with just one nut. I installed the LED light to the fender using 3M double-sided mounting tape and clamped it (putting rags over the light so it didn't get scratched by the clamps) while I moved on to wiring. Some light assemblies can be bolted or screwed on.
This housing didn't come with wires, only 2 connections on the rear. I soldered wires to the connections before it was installed on the fender. Make sure to leave plenty of wire.
I used a multimeter to find the wires going to the tail/brake light that would provide power for the tail light and a ground. If you are looking for the tail light circuit, you should find a positive power source that is on only when the engine is running and/or when the headlight switch is on. In this case the headlights and tail lights are always on when the scooter is running. The solid brown wire going to the light assembly was the tail light power in this case. That seems to be the case on most scooters that I have worked on, but it's always best to verify this with a multimeter or test light. The ground was a solid green wire leading to the light assembly.
I used wire strippers to strip a section of the insulation in the centers of each of the wires I needed to tap power from. I stripped 2 wires and wrapped one around each of the stripped sections from the scooter's wiring. I soldered the connections to be sure they were secure. You can use electrical tape or heat shrink tubing to keep these connections safe from the elements. Another option is to use wire taps that can be crimped into place. They are sold at most auto parts stores.
I cut both wires tapped from the stock wiring to about 3-4" in length. I crimped a female quick connect terminal on one and a male quick connect terminal on the other, and used heat shrink to seal them. I use different connectors so the light can only be hooked up one way.
I removed the clamps from the light and fender and put it roughly into position. I cut the wires leaving a few inches of slack to make removal and installation easier. Then I attached the appropriate male and female connectors to correspond with the ones installed on the power supply wires and once again used heat shrink tubing to seal the connections. I connected the light and the power wires and reinstalled the fender to finish the job.
The new light looks as if it belongs there, and lights up as bright, if not brighter, than the stock tail lamp. Not bad for the price IMO.


