|
|
Post by dan50 on Nov 15, 2013 20:29:35 GMT -5
Update; I took the Sunny out for a good cruise today. Started real good, cranked for less than a second and fired up. Let it warm up for a couple minutes, took about 1 minute until it idled on it's own. Ran good. Nice comfortable feel, real stable, handles good and smooth ride. Throttle is fairly responsive, small twist and you feel the engine. No oil leaks (have to check the CVT - Sunday). Got used to the front disc brake quickly, great stopping power. No bogs, spits or sputters. Ran smooth.
Had the GPS on the scooter and did top speed of 42mph. Not bad for stock. Speedometer is off, reads faster than actually going, at 42mph the speedometer read 47mph. Oh well, the Chinese obviously can't do math well enough to get the right speedo gear. Will look into the CVT to see if I can get a few mph more.
I'll be hooking my trailer hitch and trailer light wiring on Sunday (supposed to rain hard and a lot of wind on Sunday 11/17/2013) so time to work on the scoot.
Definitely going to make this one my main ride!
|
|
|
|
Post by dan50 on Feb 12, 2014 1:03:41 GMT -5
Update: I bought a set of Fog Lights at an auction. I paid $12 for the pair. Hooked them up to a battery and these are bright. They are made by Federal Signal and are for mounting on a Fire Truck. They are amber, but if I can find clear lenses for them I will put the clear on. 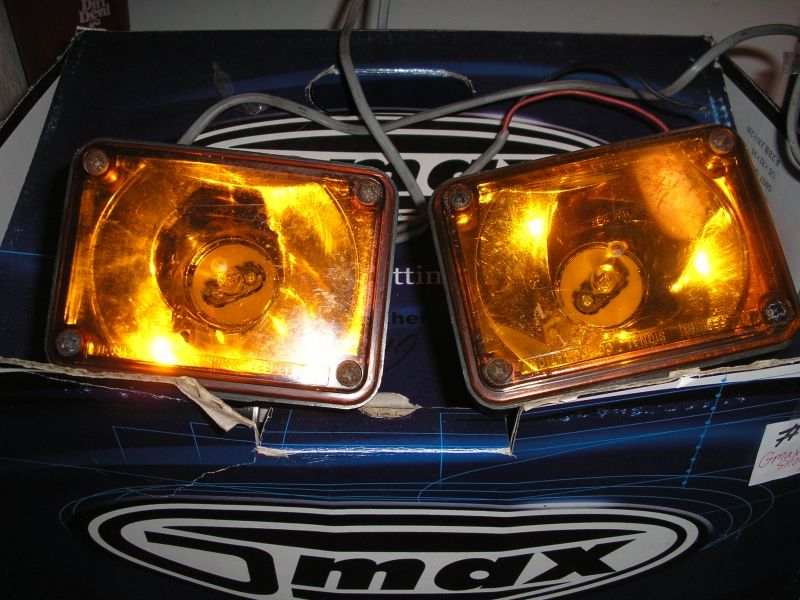 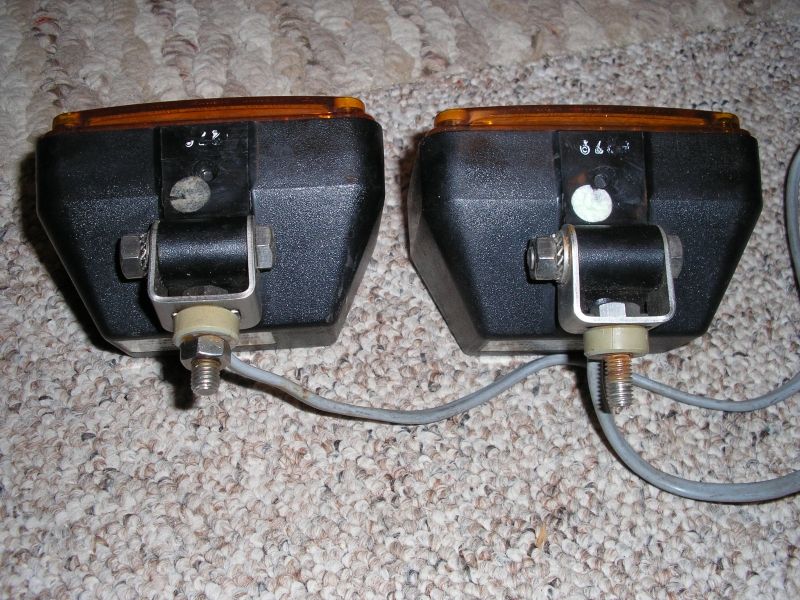 I don't know how many watts the lights are. How can I measure amps with a meter (been a long time and I forgot)? 12v X amps =watts I hope they are around 20 watts. I want to mount 1 on the front of the DongFang DF50STE. The headlight has a 18watt halogen that is very bright (brighter that the regular 36watt). On high-beam, there is a blank spot in front of the scooter that the fog light should fill in so I can see the pavement better. Here are pictures of the front fairing. There is a bracket that the cover mounts to using the top hole in the bracket. There are 2 threaded holes in the bottom piece of the bracket that are not used. The cover has 2 punch out holes cast into it that are directly over the bottom portion of the bracket. I am going to make a bracket for the light which mounts to the bottom bracket, make holes in the cover, and mount the fog light. 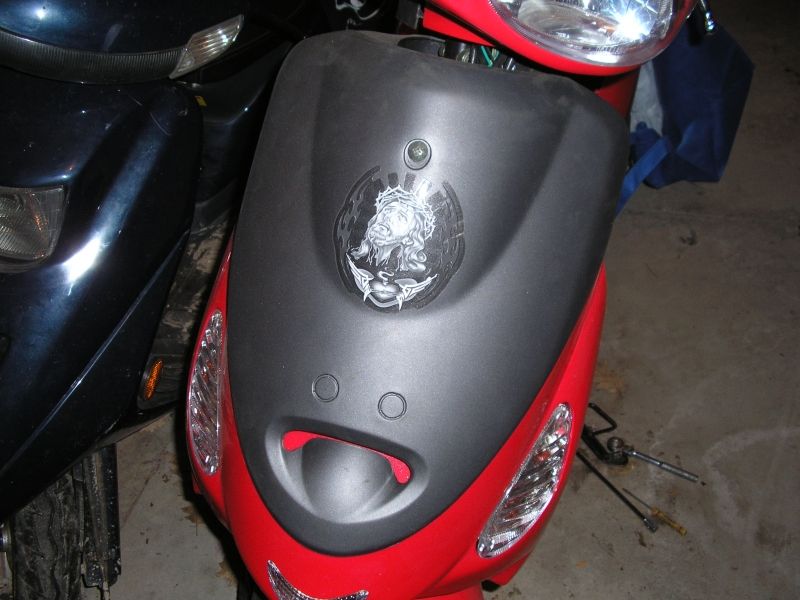 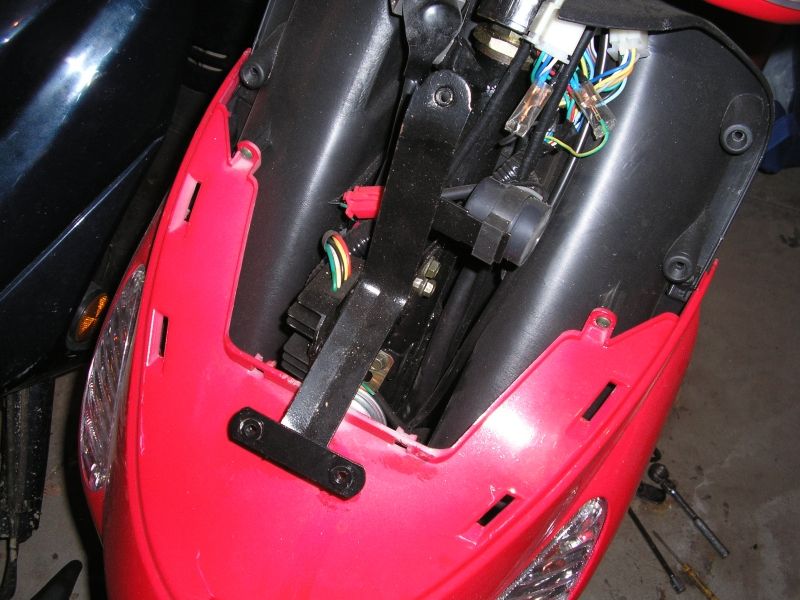 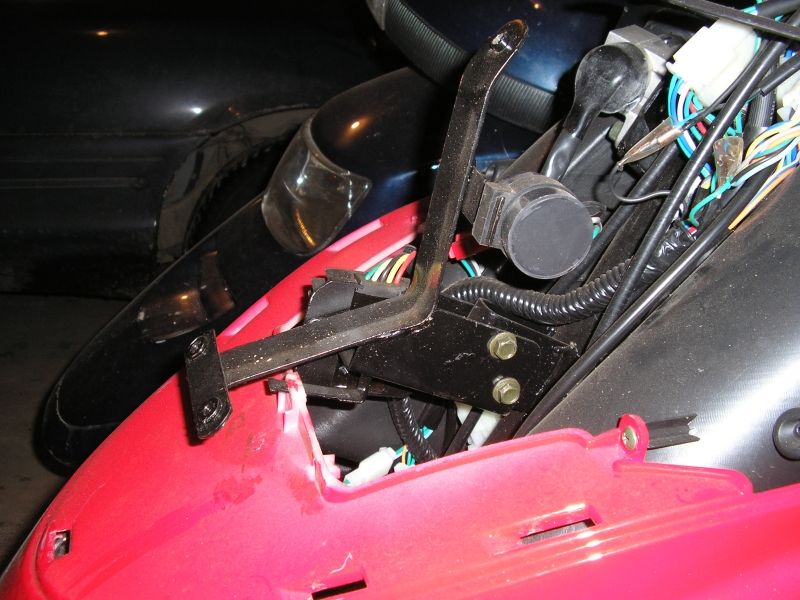  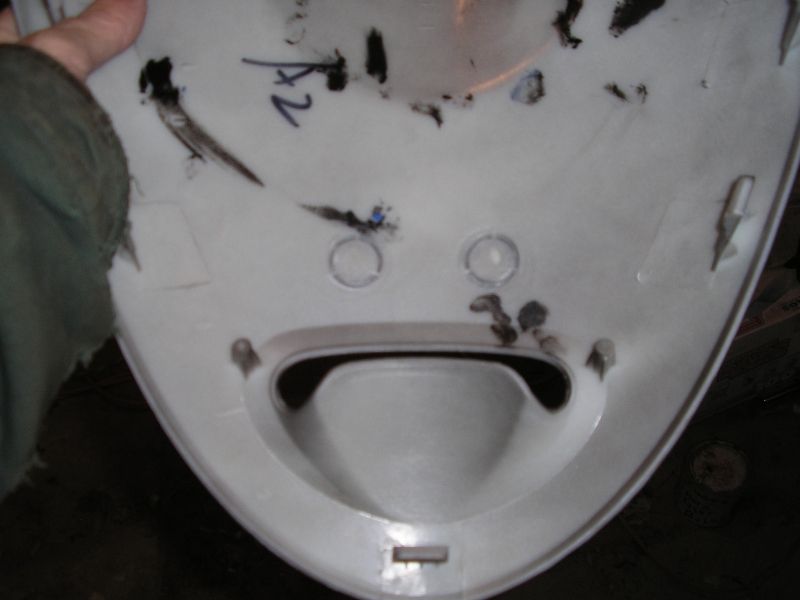 This should not be hard to come up with a bracket to mount the fog light. I am going to wire to the battery with an extra switch so they can be on with low and high beams. I only need the fog light for night riding. Any ideas on wiring would be appreciated. |
|
|
|
Post by 90GTVert on Feb 12, 2014 9:06:41 GMT -5
Here's how I figure out what power is being used... Before I installed anything, I wanted to see what kind of current draw these create. I didn't see specs online. I hooked up the kit and installed a 1ohm 10W resistor in line with the ground. 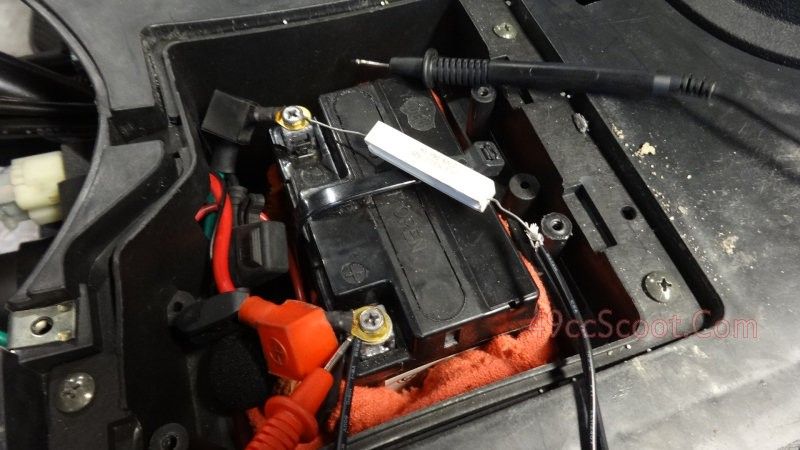 This way I could measure voltage drop across the resistor to find current. Using a 1ohm resistor makes it very simple, because voltage drop = current. Otherwise I = V/R, where I is current, V is volts (the difference in voltage before and after the resistor in this case), and R is resistance. So using a 1ohm resistance means you divide by 1 and simplifies the exercise. On low I measured 1.85A (12.18V before the resistor, 10.33V after). On high I got 2.64A (12.08V before, 9.44V after). Converted to watts that's about 22.5W on low and 32W on high. Once you know volts and amps you multiply them to get watts. |
|
|
|
Post by FrankenMech on Feb 12, 2014 10:13:48 GMT -5
When I mounted the two LED front lights on my scoot I used a couple diodes in the wiring. Both lights are on in HIGH and only one in LOW. Let me know if you want to see the circuit. I have a sketch somewhere along with construction notes. Remember, the online scoot prices you find on these units is without shipping. Shipping will add ~$250. There was $300 shipping on my scoot from CA to KC. The three wheels make it more expensive to ship and damn near double the base price. I have precision shunt bars to measure amps with: 100A shunt unit is 100A at 100mV. (0.00099629 Ohms according to the last calibration) 300A shunt unit is 300A at 50mV. I have decent meters for the little <20A stuff and clamp meters for AC etc. I gave my 0.1 Ohm wirewound shunt to my nephew along with my O-scope and most of my parts. Now I am looking for a scope meter... I miss my O-scope.  |
|
|
|
Post by dan50 on Feb 12, 2014 20:03:28 GMT -5
Brent, Thanks. I measured the light and it is 2 amps (just a tiny bit over). So they are 24watts to 25watts each. My scooter should handle 1 of them. The taillight/brake light is a LED bulb and the headlight is a 18watt halogen to save power.
FrankenMech, I would like to see a wiring diagram. Any ideas are very helpful.
The lights measure 3.6"h X 5"L. They are too big to mount 2 of them. I would like it to be on with both low & high beams.
|
|
|
|
Post by FrankenMech on Feb 12, 2014 22:26:56 GMT -5
I will see what I can come up with for you. My brain is kind of shut down tonight. It is hell getting old.
This circuit should do. I solder my connections and cover them with heat shrink to avoid shorts. Then cover the entire assembly with heat shrink to reduce vibration at the connections. Do not cover the body of the diodes with more than one layer of heat shrink tubing. Even though you are running only 2 amps use the 6 amp diodes.
HIGH BEAM CIRCUIT----|>|---@---(LAMP)---GROUND
LOW BEAM CIRCUIT---|>|----/
ANODE---|>|---CATHODE (STRIPE END)
2 EACH 6AMP 50V DIODES RADIO SHACK #276-1661 OR EQUIVALENT
-@- MEANS A CONNECTION
|
|
|
|
Post by dan50 on Aug 14, 2016 0:59:45 GMT -5
It's been awhile since I updated this thread. Earlier this year I bought a new taillight assembly and installed it with the LED taillight/brake light and new amber turn signal bulbs front & rear. The rear tire was an off brand and was bald at 3,000km, so I put a new set of Kenda K329 tires on. 3.5" x 10". The front tire was still good, but because it was a crap brand I changed it. I really like how the Kenda's handle in cornering and in braking. I bought them from Motorcycle Superstore. Link; www.motorcycle-superstore.com/15131/i/kenda-k329-front-rear-scooter-tire?quickView=true |
|
|
|
Post by dan50 on Aug 14, 2016 1:18:38 GMT -5
I bought a new instrument cluster and installed it (the gas gauge on the old one wouldn't work. Turns out the wires fron the harness didn't match the gauge! Even with the new one I had t swap wires around and now the gas gauge works!
I adjusted the float in the gas tank so the gauge reads correctly. It showed full even when I has 1/4 tank. I bent the float wire up and got it to read correctly.
The drive belt broke. I bought a Bando 669x18x30 and for the first time I pulled apart a CVT. I installed the belt and a new set of rollers. It took me 3 tries to get the right weight rollers,5 gram, now it has more acceleration at higher speeds. I can do 33mph to 35mph into a 10 to 15mph wind, before I was lucky to get 27mph into a wind. No wind I can get it to 42mph.
I put new clutch springs in, blue color. The clutch plates were really gunked up. I sprayed brake cleaner and wiped them clean. They worked really well after the cleaning.
I also installed a block-off plate for the PAIR system.
|
|
|
|
Post by dan50 on Aug 14, 2016 1:29:23 GMT -5
I ordered some LED lights and will install them when I get them.
Next is some wiring to do. I bought 10 watt LED headlight to install (1,500 lumen=bright). I bought different 1157 taillight/brake light to see which one is the brightest and lasts longer.
I bought a 6 LED driving light, 18 watts and 2,000 lumens. The driving light I am going to mount as shown earlier in this thread (I never got around to installing it before).
I also bought a set of PowerMadd hand protectors, a set of mirror extenders (raises the mirror 27mm and extends them out 40mm, I should be able to see something other than my arms).
I bought a mount for my GPS that mounts to the mirror (take the mirror off, put the GPS mount on the threads of the mirror and tighten the mirror up).
I bought an air scoop for the fan on the right side of the motor.
All of these items are in transit.
|
|
|
|
Post by FrankenMech on Aug 14, 2016 2:18:44 GMT -5
Welcome to DongFang! Some places seem to sell parts for the DongFang scoots now. I think the link below is to their main office: www.df-motor.com/Sounds like you got a good deal. |
|
|
|
Post by dan50 on Aug 14, 2016 2:41:40 GMT -5
My Dongfang is exactly like a Tao Tao ATM50-1. Uses the same body panels. Most body parts for mine are available at ScrappyDogs. Sunny style Type 1.
|
|
|
|
Post by dan50 on Aug 17, 2016 22:07:49 GMT -5
I installed a blue (1k) contra spring today. I've been shooting for a tune that keeps the variator from getting to full travel too quickly (poor acceleration because of low rpm's). I noticed a change in the engine sound when the variator opened fully. The scoot was relying in HP from the motor to accelerate. This is a problem in the wind (it is always windy in the Thumb of MI., 10-15mph wind is calm for us). With the blue spring I accelerate smoothly to 33-35mph straight on into a wind, and I get to that speed faster (it's using the gearing of the CVT more because the variator doesn't open as soon). I still need to do more testing to see if the 5g rollers will cause full belt travel. If not, I still have the set of 6g rollers. I will try 5.5g then 6g. But I am getting much happier with the CVT tune. I also installed a mount for my GPS that mounts off the mirror. I can't mount anything to my handlebar because it is completely covered (no naked bar here). It works good. it was easy to install & adjust. link; www.banggood.com/Motorcycle-Navigation-Phone-Holder-GPS-Navigation-Support-Bracket-p-927113.html |
|
|
|
Post by dan50 on Aug 17, 2016 23:26:03 GMT -5
Next is to stop my brakes from squeaking. They only squeak at gentle pressure and not at full pressure.
I'm going to get out the brake cleaner and some sandpaper and go for it. I read in another thread that this works.
|
|
|
|
Post by dan50 on Aug 18, 2016 21:29:42 GMT -5
|
|
|
|
Post by FrankenMech on Aug 19, 2016 2:17:03 GMT -5
For those of you looking for tail lights. 1157 type: www.amazon.com/dp/B01F6OJMGW?psc=13157 type: www.amazon.com/gp/product/B01E57I47E/LUYED 2016 Newest! 900 Lumens each 12-24v Red color Super Bright I have a pair of the 3157 type in the upper socket in my van tail light assy. They seriously outclass the standard incandescent 1157 bulbs used in a lower socket so much It looks like I will have to buy another pair of the 1157 type LED bulbs so my lights reasonably match. With just my tail lights ON the upper LED stop/tail bulbs are so much brighter it looks like my brake lights must be on, that is until I hit the actual brakes, then holy crapola! I only put them in yesterday so I don't know anything about longevity. I either got lucky with polarity when I installed them or they have a full wave rectifier circuit. I figure they might since they also have a high quality voltage regulator circuit that will take a wide input voltage. These are not your cheapo LED lights with a resistor for a current limiter circuit. |
|