|
|
Post by 190mech on May 1, 2015 18:49:48 GMT -5
2 part epoxy(clear) will do well..Thanks for reminding us corrosion!Cut edges of C-F will wick premix and loosen the bond..
|
|
|
|
Post by oldgeek on May 1, 2015 19:07:01 GMT -5
Now yall tell me! JK!
I love this place!
|
|
|
|
Post by 2TDave on May 1, 2015 20:22:58 GMT -5
Good to know.
|
|
|
|
Post by oldgeek on May 5, 2015 17:23:57 GMT -5
I had a little time today so I installed the new crank bearings in the case half's. I also cut out some CF reeds and got them installed in the reed cage, but I forgot to seal the edges of the CF reeds, so I gotta get that done at some point.
We are so busy at work this week, that it may be a while before I can get anything else done to the scooters.
|
|
|
|
Post by oldgeek on May 8, 2015 22:02:17 GMT -5
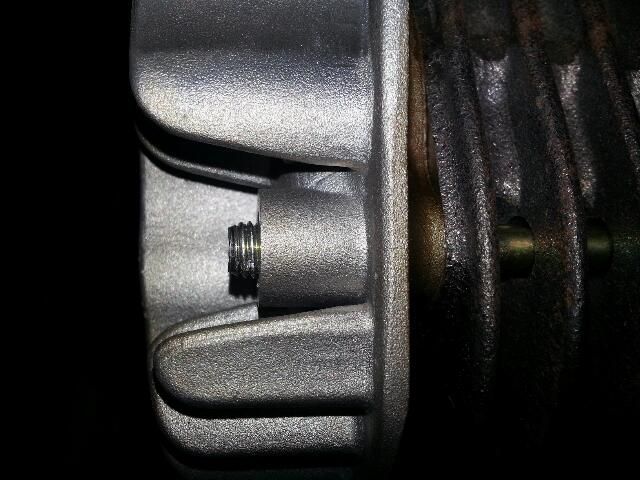
It rained a good bit today, so I spent some more time working on the scoots. I sealed up the edges of the CF reeds with some super type glue. I found glue at the hobby store made for foam, that would not haze up, and it was super thin like water. I put a very small amount of the glue on a flat surface, and drug the edge of the reeds through the puddle of glue. The glue seemed to wick into the edge of the CF pretty well, so we will see how they hold up this time around. I also am looking for a solution to another problem I noticed. I will try to explain what I have observed. The cylinder studs I am using have lots of thread on both ends, so there is no shoulder to stop how far you thread them into the case. On a trenched case the studs extend into the trenched area if you tighten them up too far, they actually get pushed out of alignment when they bottom out on the open hole in the trenched area of the cases. They also have the potential to strip or screw up the hole due to the misalignment. I have also noticed when torquing the head bolts that the studs themselves turn in further during the process, which has to be stressing the case and may be what is causing some of the stud holes in the cases to strip out recently for some of the people here. If I cut part of the threaded stud off so the actual shoulder of the stud will stop at the case there is not enough thread left on the other end to torque the head on. I am looking for some cyl studs that are long enough, and have shoulders so they eventually stop threading into the case. Treatland has lots of different cyl studs, I think I found some there that will work.   |
|
|
|
Post by oldgeek on May 9, 2015 22:32:16 GMT -5
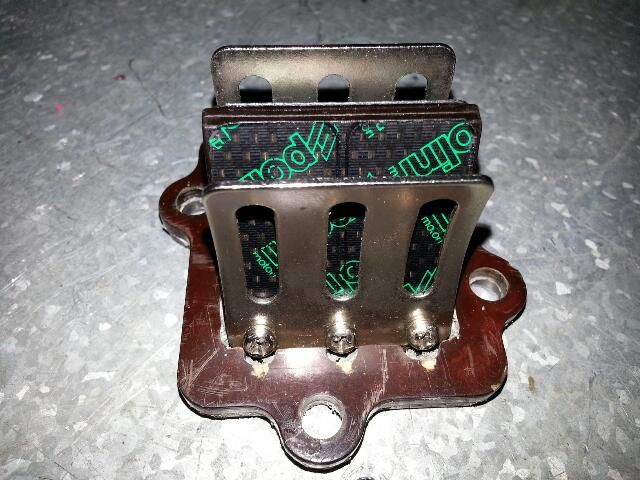
Here is the picture of the CF reeds I cut. If you look close you can see the superglue on the edge of the reeds.  |
|
|
|
Post by oldgeek on May 11, 2015 22:15:12 GMT -5
I abandoned the idea of shouldered cylinder stud bolts for now, and just put the others back in with some red locker.
I ended up doing some piston ring groove filing to fix where the metal reed backer went through the motor. I didn't notice the grooves were tight until I put the rings back on the piston. I got that all straightened out and managed to get the piston installed. Hopefully tomorrow I can get the cylinder installed, and more. I want to ride with the Harleys sometime this week if I have time to finish this thing.
|
|
|
|
Post by oldgeek on May 13, 2015 21:09:20 GMT -5
 I dont know what it is about me and seals. Seems no matter how careful I am, I still screw it up. Looks like no riding with the Harleys for me this weekend, that was the last big seal I had.  |
|
|
|
Post by iwiketuddlz on May 13, 2015 21:28:47 GMT -5
Dang that sux... Your not the only one lol..... I have a pile of new skrewed up seals as well... Damn rubbers not good for nutin
|
|
|
|
Post by oldgeek on Aug 30, 2015 21:29:32 GMT -5
After over 3 months I finally spent some time on this scoot today. I removed the new seal I screwed up while putting it in, using a drywall screw. Then I proceeded to install the 2nd new seal and kankered it up too. Got the 2nd seal out and put in a 3rd seal...Finally got it seated great and noticed the lip was twisted. I just used the edge of a blunt screwdriver to gently push the lip in. It should be ok if the spring did not come off. I also put everything back on the motor except the intake, carb, and mount. I cant seem to find the reed-block I was working on for this rebuild. This is a picture of the second messed up seal.  |
|
|
|
Post by oldgeek on Aug 30, 2015 22:21:51 GMT -5
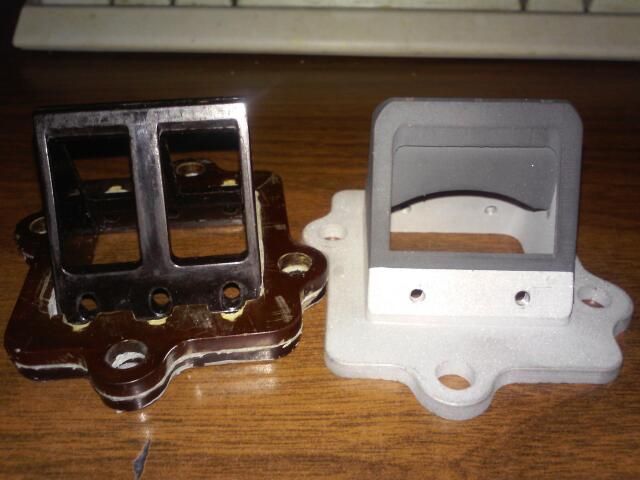
I found the box with all the reedblock parts I was looking for at my house. The one on the left is the reed cage and spacer I had in it when the tip of CF reed shattered because the stainless steel finger that holds pressure on the reed broke. The one on the right is the cage that will be going back in, along with some CF reeds. I found that rubberized reed cage from an ebay seller across the water. They were part of an intake kit. I asked the seller to sell me 2 of the reed blocks without all of the other intake stuff, and he said ok. I felt the price was ok so I ordered 2 of them. Well you gotta watch what you ask for , the cages came without anything, no reeds, no stops, no screws. The overall quality is very good IMO, and I have some CF sheet to cut my own reeds from. I should be able to make the reed stops and screws from a the old reed-block fit the new one with a little work. I have a theory about CF reeds, that they should be used with rubberized type cages. Possibly the rubber will dampen the shock of opening and closing the reeds much better than a hard mica cage will, but it is only a guess.  |
|
|
|
Post by oldgeek on Aug 31, 2015 14:02:40 GMT -5
It is raining here today, again. We cant work much in the rain, so I got some good scooter time in. I put the reed block together, and I am quite proud of it. It took a while, and I forgot to take pictures of the finished product, but it looks nice. I got the motor installed and the electrical done. The only thing left to do is put the plastics back on and get it started.
Have I mentioned what a PITA it is to mess with one of these short case, rear facing intake, double wishbone mounted motors? Even with my lift it is tough IMO.
|
|
|
|
Post by oldgeek on Aug 31, 2015 22:15:50 GMT -5
Well I pulled all the loose ends together tonight and fired it up. I fiddled with the carb for just a bit then took it for a ride. I have to shift my weight forward to keep the front wheel on the ground. I had forgotten how much torque these 90+cc builds have, it is addicting!
I soon noticed some significant knock on deceleration. I just filled the gas tank with 93 octane, so I don't really know what is going on. I did a compression check and it is 181. I don't remember it being that high. Then after searching this thread high and low, I found that the last time I checked it compression was 160. When I reassembled the cylinder a couple months back, I cant remember if I used a base gasket or not? I will have to take a look at it to try and see if there is a gasket there or not. More research on this thread tells me I previously used a thin gasket at the base.
Man I hope I don't have to pull this motor to add a base gasket! I guess a head gasket would help the situation, I may be able to add that without pulling the motor. I wonder how much squish is affected by the lack of a base gasket? Squish was around .95 previously. I will have to check and see what it is now.
What are good #'s for compression and squish for a 90cc?
I think duration's were 183/132 on this motor previously. I have no idea what they are without the base gasket.
|
|
|
|
Post by 90GTVert on Sept 1, 2015 11:08:10 GMT -5
I usually try to stop somewhere around 0.75-0.8mm for squish. You can go tighter, I just prefer to have a little room if it's something I hope to not be pulling apart regularly. 150-180psi. Some do alright with 180psi or a little more and some don't. Might wanna make sure the main jet and needle settings are rich enough. If you've advanced ignition timing somehow, that may not be helping the situation.
|
|
|
|
Post by oldgeek on Sept 1, 2015 11:25:11 GMT -5
I usually try to stop somewhere around 0.75-0.8mm for squish. You can go tighter, I just prefer to have a little room if it's something I hope to not be pulling apart regularly. 150-180psi. Some do alright with 180psi or a little more and some don't. Might wanna make sure the main jet and needle settings are rich enough. If you've advanced ignition timing somehow, that may not be helping the situation. Brent, you are the man! By reading your post I realized I likely did advance the iggy timing. I just sort of eyeballed it dead center of my slots, and I am sure that is more than I used last time. Somewhere in my pea-brain I know excess advance can cause knock, but I simply forgot. It will be immensely easier to move the timing than to pull the cylinder, Thanks. |
|