|
|
Post by 90GTVert on Apr 11, 2012 7:02:05 GMT -5
I got the new tail light in a few days ago and installed it last night. It's made by Lockhart Phillips for a 2007-2008 Kawasaki Ninja ZX-6R. It's all LED with integrated turn signals. You can get it on eBay, Amazon, and D2Moto to name a few. It ended up being just the right size, just slightly smaller than my previous tail light. 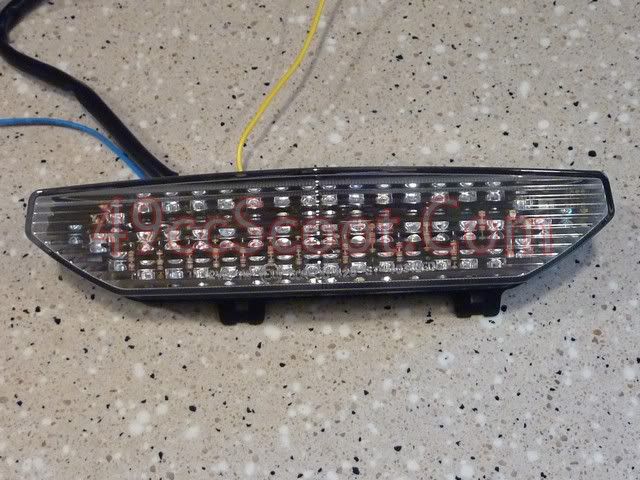 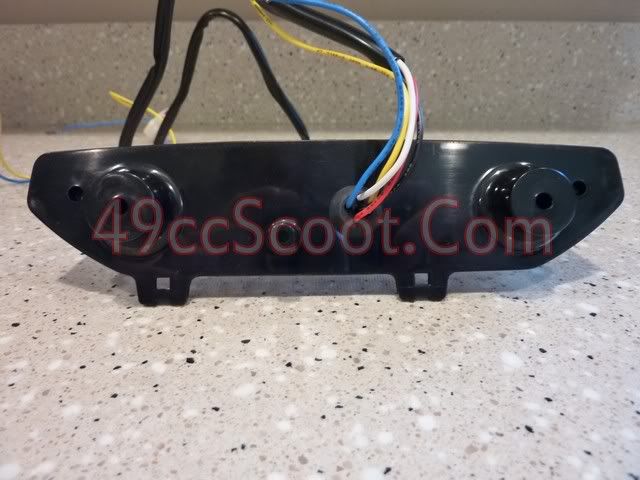 It's got a lot longer wiring than any of the ATV / universal LED assemblies I've bought, so it's no trouble to get it plugged in. I ended up cutting off half the length of the wires so I wouldn't have to tie up all the excess. 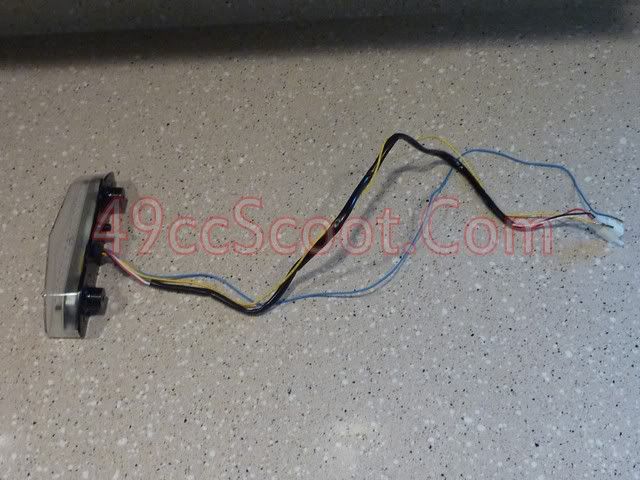 The tail/brake harness is the same 3 prong my scooter and the other LED assemblies used stock. I just plugged it in and that all worked as wired. The turn signal wires had to be spliced in.  Here's a rundown of what the wiring does. Keep in mind with the turn signals L and R these notes are if it's mounted right side up as it would be on the Ninja. If you mount it upside down, as I did, reverse the turn signal sides. Black : Ground White : Tail Red : Brake Yellow : Left Turn Blue : Right Turn Mounting was a little more difficult than the other assemblies I've used, but not bad. It was only more difficult because this light has no studs or threads to make mounting faster.  I used Time-Sert inserts to create threads. I could have just tapped the plastic, but I thought having steel inserts might hold up longer.  I've mentioned Time-Serts a few times on the forum, so I thought I'd show you the process of installing one while I was at it. Normally it would be used to repair damaged threads in metal, sort of like a heli-coil. Here's a look at what the M6 x 1.0 Time-Sert kit consists of. A drill bit, counter-bore bit, tap, and a tool to install the inserts. You can get inserts in different lengths as well, and of course the kits are available in a lot of metric and standard sizes and they are even more popular for their spark plug thread repair kits. 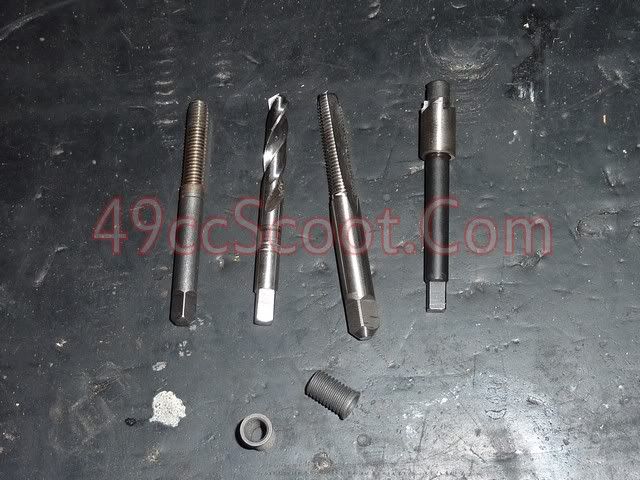 Start off by drilling with the supplied bit. For something like this tail light, don't go all the way through so the light can remain sealed. 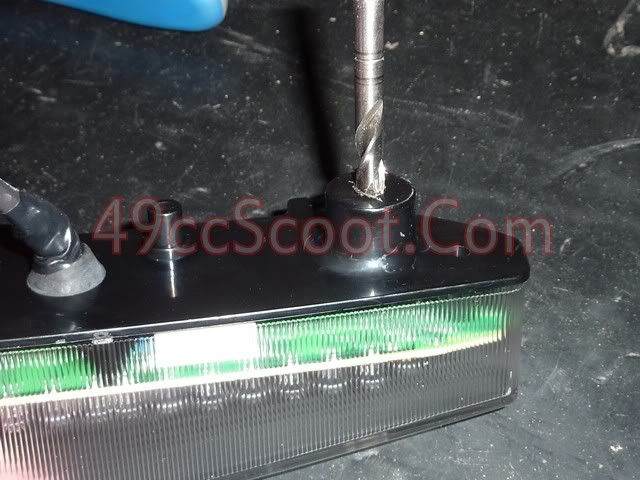 Then use the counter-bore bit to create a counter-bore that helps to seat the insert and keep it flush when installed.  Next, use the supplied tap to cut threads and then blow the shavings and such out.   Now you've just got to install the insert. I added a little Plastic Welder to the threads of the inserts for this job since it's only plastic fighting against something stripping if over-torqued. Start the insert by hand, and then use the supplied tool to thread it in until it seats in the counter-bore.  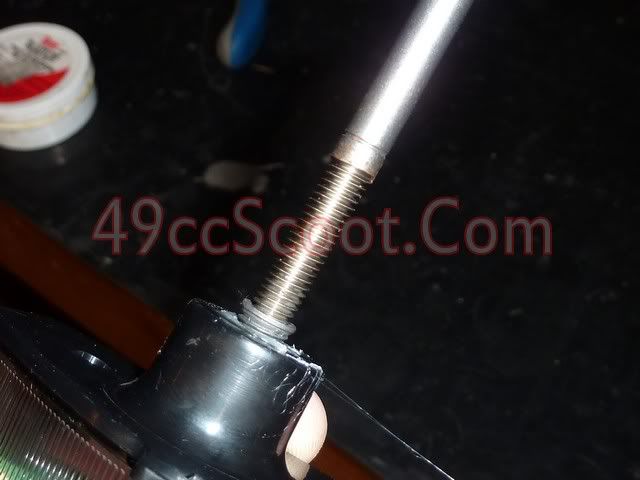  Once the Plastic Welder cured, I chipped and sanded it away from the surface and it was done, ready for bolts.   With that done, the rest of the install was just bolting it on. Not a big deal. Of course I have no fairings to contend with. As you may notice, I left my existing turn signals in place to make the scoot more visible when turning.  Pics of the lights turned on didn't work out too well for me. This thing is BRIGHT. Far brighter than any ATV / universal unit I've used (and all of my scoots use them). If I'm looking straight at it, it hurts my eyes. My only safety concern now is making the people behind me blind/angry. So yeah, the pic just looks like a glow.  Just so you know I'm not kidding when I say it's way brighter than the others I've used, here's T1's LED setup next to this one. Again, bad pic, but I think it gets the point across.  Here's a quick vid of the turn signal working. I'm very pleased with this light and would not hesitate to use another in the future from my experience so far. |
|
|
|
Post by 2strokd on Apr 11, 2012 7:24:32 GMT -5
Cool man! I like it! Might be TOO bright though? Maybe a resistor inline? Better too bright than not bright enough! Its very nice! Looks custom sweet! Lol, even came wired for a china scooter  . Whats next? |
|
|
|
Post by 90GTVert on Apr 11, 2012 15:37:40 GMT -5
If it really did seem to be a problem, I'd probably spray tint the lens. It would look cooler anyway. I think these were available in smoke, but I found clear at the lowest price. Next is still trying to get a good test ride and see if I can finish up the baseline tune for the next bit of the project. Between cold and windy nights, the previous lack of lights, and dealing with granny the rest of the time, it just hasn't worked out too well. Sucks. This will prob be a lot more long and drawn out process than I would like. I can get stuff done in the house fine, but I can't really be outside or in the garage too much in case she needs something. I don't think anyone would appreciate me trying to ride around inside the house or work on it in here. lol EDIT : Thread modified to put wheelchair ramp discussion HERE and keep this thread on topic better. |
|
|
|
Post by 90GTVert on Apr 21, 2012 6:37:19 GMT -5
Project 90 : Phase 4Project 90 is back for another phase. This will be yet another exhaust test phase. In Phase 1 I tested a few pipes on a stock setup. Each aftermarket pipe gained about 2MPH top speed and showed an increase in power and acceleration. In Phase 2 I tested pipes with cylinder tuning and an aftermarket variator. Once again the results were disappointing to me. Very little max speed increase, although some showed a very nice improvement in acceleration and made cruising faster easier. For this phase of Project 90 I plan to test the pipes with the afore mentioned modifications, as well as with a larger carburetor and intake setup to see if that allows the pipes to perform better than before. I'll be using the 21mm DellOrto PHBG Racing Edition carburetor, stock intake modified to match the larger carb, and the airbox has been slightly modified as well. All of this was discussed in great detail in Phase 3 with plenty of pictures as well. Refer to that for farther info on the components. I did spend time tuning the carb beyond what I did for the test in Phase 3. I'm using a 95 main jet, 40 pilot jet, and a W9 needle in the next to leanest position for the baseline tune.  If you recall, I had a lot of problems with consistency regarding the transmission, most specifically the torque driver, in Phase 3. I wanted to settle that before continuing the project, so I replaced the whole rear pulley with a new one from Parts For Scooters . I used a Koso 1,000RPM contra spring and a Malossi Torsion Controller in the rear pulley this time around. All the CVT specs are listed near the bottom of this post. The new torque driver and tune seems to have cleared up the major inconsistencies I was experiencing with speeds.   For the baseline of this phase, I'm using the stock exhaust once again. I did want to note that it appears to be having some issues. I have noticed that it begins to glow near the outlet at night and the paint is turning white there. Then I noticed that it sounds as if it's coming apart on the inside. I notice no difference in performance with all of this happening, but I'm quite glad the pipe is only being used for the baseline of this phase. I don't believe anything is clogged at this point, but who knows when something could clog and cause real problems, like overheating and ultimately engine damage. I'd suggest replacing the pipe if yours ever does what this one is doing.  www.youtube.com/watch?v=6VqFLJ_8RN8 www.youtube.com/watch?v=6VqFLJ_8RN8On top of what's mentioned, I also went over compression, changed the belt, changed the gear oil, etc... as I do on all baselines to try and keep results as fair as possible. With everything tuned, I took the scooter for a 39 mile test ride. Not much change on the baseline compared to some past tests. 40MPH cruising required very little throttle and RPM was around 7,300. Wide open throttle and sitting up provided cruise speeds that stayed mostly between 48-50MPH at roughly 8,300RPM. Max speed, WOT and tucked, was 57MPH at 8,450RPM. WOT max and cruise speeds are just slightly lower than some past tests, but not far off. I'm not terribly concerned with max performance for Project 90, but more finding out what works and what doesn't. I think the torque driver could probably be worked on a little to get the slight extra max speed back, but it seems to be consistent so I'm going to leave it alone. The other issue is that I am a little heavier than when I was last doing tests. I don't think it has a big effect on anything, but obviously the more weight you add the more the harder it is on such small engines.  Outside temperature for my test ride was 60°. 40MPH cruising cylinder head temp was around 270 - 280°F. This is warmer than past results even though I used a richer needle. I'm not exactly sure what the deal is with the cruise temps. Being heavier is likely part of it, increasing load on the engine. Setting the needle richer doesn't provide any great results before it becomes too rich. It seems almost as if something changed with the airbox, though I have no idea how or why. Along with elevated temps at cruise it appears to be a little louder than before, but everything is in place and undamaged.  WOT cruise temps were about 285 - 300°F, on par with past results. Fuel economy decreased slightly from the past test with this carburetor. I believe because I am now using a richer needle to deliver more fuel at part throttle as well as the afore mentioned additional weight. In the past test in Phase 3 with the DellOrto 21mm I saw 62MPG. For this test I got 52.75MPG. Project 90 : Phase 4 : Baseline SpecificationsBore : 52mm Stroke : 45mm Displacement : 96cc (95.56747199999998cc) Cylinder : Stock Ported w/1.2mm Base Spacer Exhaust Duration : 188° Boost/Transfer Duration : 130° Cranking Compression : 175psi Squish Clearance : 1.1mm Cylinder : Stock Ported w/1.2mm Base Spacer Cases : Port Matched & Mildly Trenched Carburetor : DellOrto 21mm PHBG Racing Edition Main Jet : 95 Pilot Jet : 40 Needle : W9. Clip next to leanest position. Air Filter : Stock Airbox w/o snorkel. Inlet enlarged and UNI filter vents added. Fuel System : Stock tank, 1/4" hose, 1/4" fuel filter, manual petcock. Oil Delivery : Pre-mix. I removed the stock oil injection system in favor of pre-mix in order to provide consistent oiling with any modification. I am using AMSOil Sabre Professional 100:1 Premix, mixed at 50:1. Intake : Stock, Enlarged To 22mm Reed Block & Reeds : Stage 6 VForce3 w/5mm Reed Spacer Exhaust : Stock 49cc Ignition System : Stock CDI, stock stator/flywheel, Bando coil, NGK BR8HS spark plug. CVT Belt : 788 17 28 Bando Variator : Hoca Performance Variator w/Modified Fixed Drive Face Roller Weights : Dr Pulley 7g Sliders Clutch & Bell : Stock Contra Spring : Koso 1,000RPM + Malossi Torsion Control Clutch Springs : 2,000RPM Final Drive Ratio : Approximately 10.125:1 Max Speed : 57MPH Cruise Speed : 48-50MPH Fuel Economy : 56.15MPG CHT @ 40MPH Cruise : 270 - 280°F CHT @ WOT Cruise : 285 - 300°F Ambient Temperature : 60°F Other Info For ReferenceElevation : ~40ft Above Sea Level Rider Weight : 300lbs Fuel : 91-93 Octane (Premium) |
|
|
|
Post by 190mech on Apr 21, 2012 17:06:56 GMT -5
As always,Super good documentation!! :thumb: :cheers:
|
|
Aaron420e
Scoot Enthusiast
   2008 Keeway F-ACT Racing
Posts: 430
|
Post by Aaron420e on Apr 21, 2012 21:27:26 GMT -5
You should test the Stage6 Pro Replica. It has really brought my bike up to speed.
My stock pipe was also rattling like yours 90GTVert.
|
|
|
|
Post by 90GTVert on Apr 22, 2012 5:36:19 GMT -5
Money is the issue. I just can't afford the pipes I'd like. Remember, I'm not sponsored on this project. 190mech is the only "manufacturer" helping me out with a pipe to test, luckily he happens to make an incredible pipe that puts the others to shame. All the other pipes, carbs, etc.. I'm buying, so I'll have to test how to go fast cheap. lol Luckily I have been collecting parts for a while so I did have a bit around already. I hope to one day do a Project 49, perhaps by then I can have more pipes around. Not sure.
|
|
|
|
Post by 90GTVert on Apr 22, 2012 7:45:50 GMT -5
Phase 4 : Leo Vince SP3 50-70ccThe first pipe tested in Phase 4 is the Leo Vince SP3 50-70cc. It has been tested two times prior. Links to both are below. For pics, sounds, and fit info please refer to the Phase 1 test. Phase 1 TestPhase 2 TestTuning for the SP3 required swapping up to a 100 main jet and adjusting the mixture screw a bit. Otherwise I used the same carburetor and CVT settings as the baseline. I did a 36 mile test ride, observing 51.88MPG. Max speed increased by 2MPH over the baseline to 59MPH at just over 8,500RPM. WOT cruising speeds increased to 50-53MPH sitting up on flat ground with engine speed around 8,300-8,400RPM. These results are very similar to what I saw in Phase 2, with essentially the same setup minus the carb and intake changes. I do feel like this is a stronger setup than without the larger carburetor though for two reasons. I am a good bit heavier than a I was for the other phases. The transmission, while more consistent, does seem to be off perhaps 1-2MPH under what I believe the previous one would have achieved. The baseline shows a 1MPH drop.  In past tests I noted the RPM that this pipe worked best up to roughly 8,200RPM. With the addition of the carb for this Phase, it feels like the pipe works well up around 8,500RPM. Power felt good throughout the revs. Ambient temp for the test ride was 70°F. CHT cruising at 40MPH was 285 - 300°. WOT cruising showed 300 - 315°. I'm not sure if the increase in temperature at WOT is due to pipe design or perhaps it could have used just a step larger main jet, like a 102 to drop the temp? At any rate, temps were not a big concern, which is good to see with a pipe intended for a 50-70cc used on a 96cc engine. I was pleased with the Leo Vince SP3. I'm quite sure it won't be the best result in the bunch, but it's not bad. It's a good improvement over the stock pipe that wasn't hard to tune for. Not what I think I'd buy specifically for a 90-100cc engine, but I'd use it if I had one around over stock. Improved acceleration, improved speed, quiet like stock, and doesn't draw much attention with it's looks. |
|
Aaron420e
Scoot Enthusiast
   2008 Keeway F-ACT Racing
Posts: 430
|
Post by Aaron420e on Apr 22, 2012 22:57:17 GMT -5
Money is the issue. I just can't afford the pipes I'd like. Remember, I'm not sponsored on this project. 190mech is the only "manufacturer" helping me out with a pipe to test, luckily he happens to make an incredible pipe that puts the others to shame. All the other pipes, carbs, etc.. I'm buying, so I'll have to test how to go fast cheap. lol Luckily I have been collecting parts for a while so I did have a bit around already. I hope to one day do a Project 49, perhaps by then I can have more pipes around. Not sure. You should check out www.scooter-attack.com they have the Stage6 Pro Replica for $150. That's as much as you paid for those 25 & 28mm Dellorto carbs. I am also thinking about getting the new Stage6 Sport Pro MKII 70cc BBK. I could use an extra 2 hp. |
|
|
|
Post by 90GTVert on Apr 23, 2012 6:44:54 GMT -5
I'll look into it for future projects. I've destroyed one piston on request testing a 50-70cc MRP exhaust already. Don't really wanna do that again, so I wouldn't plan on testing any 50-70cc tuned pipes here unless I knew how they were made. No small stingers on the 96cc for sure.
|
|
|
|
Post by lshigham on Apr 23, 2012 10:47:19 GMT -5
The stage6 pipe has a very small (20mm) stinger. John think's it's a bodge to increase performance on a poorly designed pipe at the expense of piston crown temps. I certainly wouldn't want one on a 100cc cylinder.
|
|
|
|
Post by 90GTVert on Apr 23, 2012 11:03:53 GMT -5
The ZX 50 and 100 both have 20mm stingers. I know the 100 works fine....
|
|
|
|
Post by 90GTVert on Apr 23, 2012 11:04:40 GMT -5
Phase 4 : Leo Vince ZX 100ccNext up is the Leo Vince ZX for a 100cc Aerox. It has been tested two times previously. Links to both are below. For pics, sounds, and fit info please refer to the Phase 1 test. This pipe has been de-restricted, and there's a link to that information below as well. Phase 1 TestPhase 2 TestDe-restriction InfoI swapped up to a 100 main jet and otherwise made no changes to the carburetor for the ZX. I later realized a richer needle setting would have likely been beneficial. I went with 1 gram lighter, 6g, sliders to keep the revs a bit higher for best results with this pipe. I noted 51.7MPG on a 39 mile test ride. WOT cruising speeds increased to 52-54MPH at around 8,700RPM. Max speed was 61MPH, a 4MPH gain over the stock pipe, just shy of 9,000RPM. The addition of the carb, even with a heavier rider, allowed for a 1MPH gain over the test in Phase 2. It seems as if the larger carburetor shows it's benefit when RPM gets much beyond 8,000RPM. Since the ZX prefers to stay at a little higher revs most of the time, acceleration also feels stronger than in past tests. 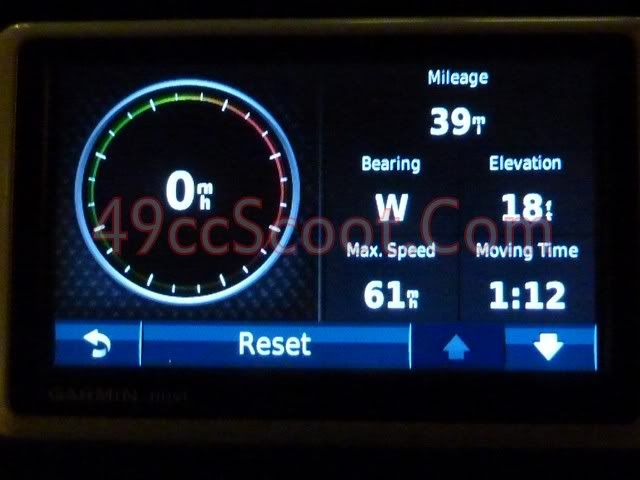 Outside temperature was 65°F. Cruising at 40MPH, cylinder head temps were 295 - 310°. That's higher than other results since the larger carburetor was added. For one thing, I know it was a little bit lean at part throttle. I even heard a little bit of spark knock at times. I think a needle adjustment or swap could have helped the part throttle temps and knocking. I believe the other factor in the increased heat was increased RPM. With lighter roller weights to keep in the ZX's higher powerband, cruising at 40MPH required 300-400RPM more than the setups that could use heavier sliders. WOT cruising CHT stayed pretty much right on target, just a slight increase over some results, at 295 - 305°F. Overall I was pleased with the Leo Vince ZX 100cc exhaust. The 4MPH increase is much more like what I hoped to see. This pipe improved all around performance as long as you keep it in the proper rev range with CVT tuning. Looking back at the results from Phase 2 with this pipe, the larger carburetor seems necessary to get this pipe, or likely any pipe, to work at a bit higher revs. One thing that I have been a bit surprised by during Project 90 is the failure of this pipe to rev even higher. I used this exact pipe in the past with a similar setup and saw revs approaching 10,000RPM on a regular basis. It's just not wanting to do that for any of my tests here to date. Perhaps a larger carb is in order? I'm not quite sure yet. Regardless of that, the ZX worked well in this test. |
|
byte
Scoot Member
 
Posts: 51
|
Post by byte on Apr 23, 2012 15:26:34 GMT -5
Hey where are the videos? We've missed to watch and hear the sound of your 2t music. Hope your neighbors appreciates the same.
|
|
|
|
Post by 90GTVert on Apr 23, 2012 15:53:57 GMT -5
I just haven't got vids because the pipes sound the same as they did when I made vids of each. I also do my rides at night so vids don't really work. I'm sure I'll end up with more vids somewhere along the project.
I doubt the neighbors appreciate the sounds. They're prob quite tired of me going back and forth tuning. lol
|
|


 .
. 


 WOT cruise temps were about 285 - 300°F, on par with past results.


