|
|
Post by 90GTVert on Apr 14, 2021 19:39:37 GMT -5
I took the exhaust cam and lifters out today so I could measure the adjustment pads. I found it interesting that I had 1 valve 0.002" or 0.05mm tighter than all others. That valve had a pad 0.05mm thicker than any other valve. They were 1.8 and 1.81 and that one was 1.86mm. I ended up needing all pads the same 1.75mm (only available in 0.05mm increments unless you work on a Yamaha assembly line I guess) to get to my desired specs. So... is it a coincidence that the clearance on that cylinder happens to be off more, or was the 1.86mm valve pad a mistake?
At this point, it struck me that I'm out here changing pads on my maxi-scoot.
Anyway, the pads and other gaskets and o-rings that I need are ordered. Then I realized that these adjustment pads are pretty brilliant. Instead of turning an adjuster of some sort, I run to a Yamaha dealer and pay ~$35 to adjust 4 valves.. ~$70 if the intakes had been off too. Actually, there are advantages in valvetrain weight reduction and reduced frequency of adjustment. I definitely wouldn't want to do this any more often.
Partzilla has red flags on their site about high demand and delays, so I'm guessing it'll be apart for a week at least before I have the stuff to get the cam back in.
|
|
|
|
Post by 190mech on Apr 14, 2021 22:38:04 GMT -5
Always thought if one couldnt hone/lap a too thick valve shim to the proper thickness and not pay the big costs of those little gems,, PS,Ive never done that before as those dealers with their polished floors need the cash to pay their high overhead!!  |
|
|
|
Post by 90GTVert on Apr 14, 2021 23:53:48 GMT -5
Always thought if one couldnt hone/lap a too thick valve shim to the proper thickness and not pay the big costs of those little gems,, PS,Ive never done that before as those dealers with their polished floors need the cash to pay their high overhead!! The thought occurred to me to find a way to thin them out. Then I thought, what if I find out that there's some magic coating or treating process that I ruin and then they wear or otherwise fail? It takes so long to get to the valves that I'll gladly pay ~$35 to increase the chances that I won't have it apart again next week or have half a valve pad disappear into the engine. Maybe even ruin something else with uneven contact if the shim wasn't totally flat. I think that's unlikely, but I don't trust my luck very much. |
|
|
|
Post by Lucass2T on Apr 15, 2021 1:53:21 GMT -5
Now you know why you like 2t's so much. No cams, no valves, no headaches.
|
|
|
|
Post by aeroxbud on Apr 15, 2021 3:18:30 GMT -5
I'm old enough to remember when motorcycles first went to bucket and shim type adjustment. The old boys didn't like the fact that it went from an easy job with adjustable tappets. To this more expensive option.
Geez I'm old.
|
|
|
|
Post by 90GTVert on Apr 19, 2021 22:33:11 GMT -5
I checked the brakes today. I need a rear disc, because it's 3.5mm and the service limit is 3.5mm. I'll replace the pads too, even though they have lots of life left, because I don't like to put new rotors on and use old pads.
The front is at 3.8mm on both sides with a 3.5mm limit. Looks like it was 4.5mm initially. I'd like to get it over and do them now, but I don't think I will. Not sure yet. Just not good timing $. I didn't even plan to do any service for at least another 2,000 miles and definitely not fuel pump, valve pads, gaskets & seals, 3 air filters, spark plugs, rear brake pads & rotor, front fender...
I couldn't turn the front wheel bearings by hand. The axle isn't worn, so they turn vs spinning on the axle. I put it on the balancer to check brake deflection and be sure I didn't have to replace the front rotors and it rotates OK, but it seems a little tight to me. When spun with much speed, I can feel a bump bump bump a bit as it rotates. Fine, new wheel bearings and seal. I think the center spacer is actually too long and binding the bearings a little. There's damage on one side and I measured and it's longer than the gap between the bearings. They just use an aluminum tube for a spacer. There's no donut or anything, so it has to rely on some squeeze fit, but I still think it may be excessive. I shaved off about 0.001". Don't want to do too much in case I underestimate the squeeze needed, but maybe it'll help to some small degree.
The brake hoses look fine. They say to replace every 4 years. I think it's a CYA move, but I'm kind of tempted to do those now at 10 years. Possibly with a Malossi stainless kit. It's not all that far off of stock prices, and stainless should mean I don't worry about it anymore... though I'd be surprised to own the TMAX in 2031 to consider replacement again anyway.
I'm not ordering anything till I check the CVT, just in case something is bad in there.
Someone told me I should do the clutch now, as it's about time. I'm not really sure what the clutch life is supposed to be. I'm going to see if any info comes up with a little searching. If it seems like a good idea, I'd probably go with Malossi plates and racing springs. The low RPM clutch engagement makes it slow 0-30, so if I could get a boost without making it annoying to ride, that would be nice. Again, not a big difference in stock vs Malossi.
|
|
|
|
Post by 90GTVert on Apr 19, 2021 22:43:42 GMT -5
On MajestyUSA, one guy posted about clutch slip at 23,000 miles. Another said a mechanic said some suffer from early clutch failure from 7k-28k, but it should last twice as long.
|
|
df41590
Scoot Enthusiast

Posts: 285
|
Post by df41590 on Apr 19, 2021 23:53:28 GMT -5
Service limits are a guideline, if they don't pulsate when you apply the brakes you still have time. That'd be the main worry with non-ventilated rotors. Nuts that the rotors are wearing faster than the pads, though.
Scooter brake hoses look the same as what you'd find on a car which can last a long time. Good way to check is compress the caliper if it doesn't slide like butter, than pump the brake crack the bleeder, if it goes in easily the hose is partially collapsed, if its just as hard = caliper.
What fails on the clutch? Thought they had a similar centrifugal clutch as our smaller scoots.
|
|
|
|
Post by 90GTVert on Apr 20, 2021 4:20:47 GMT -5
Nuts that the rotors are wearing faster than the pads, though. I put sintered pads on it 10,000 miles ago. What fails on the clutch? Thought they had a similar centrifugal clutch as our smaller scoots. Plates. It has a wet clutch. |
|
|
|
Post by 90GTVert on Apr 20, 2021 23:03:56 GMT -5
I took the CVT apart today. All but the rear pulley. I decided to make a steel version of the PVC pipe cap spring compressor tool. The PVC version works, but it's an excuse to practice TIG. I was using all-thread and nuts, so I welded a nut to one end as well as a couple of washers and then a big nut to have something easy to hold with a wrench. 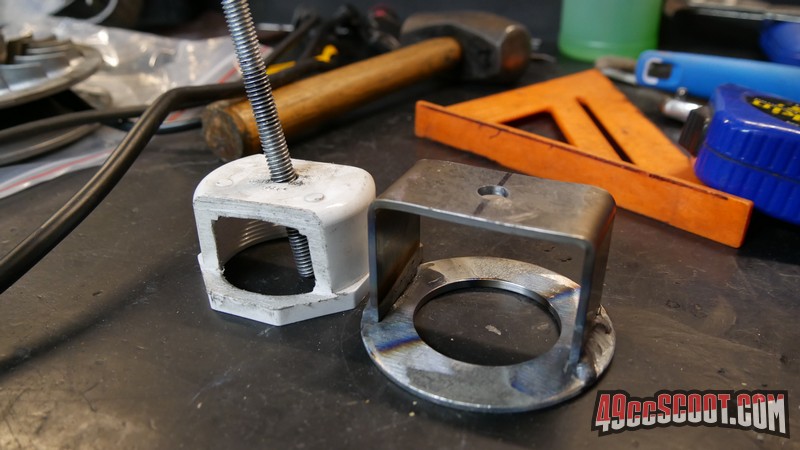 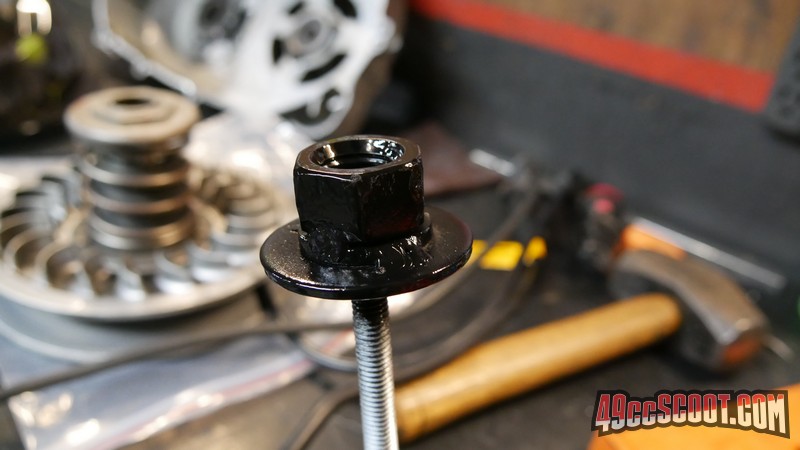 The CVT stuff all looks fine so far. I don't expect any trouble with the rear pulley. The belt on this thing is wild. It's at 31-31.2mm wide and looks nearly new. AFAIK it has almost 28,000 miles on it (18,000 I'm certain of). Original spec was 32mm. Service limit is 30.5mm. At 12,000 miles, I measured it at 31.35-31.55mm. T2 wears a belt as much in 2.8 miles as this thing does in 28,000 miles. I've got a belt around from when I expected to need it at the 12,000 mile service, so I'll replace it anyway. |
|
|
|
Post by 90GTVert on Apr 21, 2021 12:15:18 GMT -5
The torque driver grooves have some mild wear and sharp edges. I came in to check the price. $150 for the torque driver. Yamaha says replace as a pair. That would be ~$360. No way. Malossi sells just a torque driver, but in the description it says for boosted motors (quote below), so I wouldn't want to try that. They do have an OR kit for the TMAX, but I'd rather not go there for both budget and reliability concerns.
"It was expressly created to complete the development of boosted motors withour cylinders, variators and the special Malossi K Belts, allowing to fully exploit your vehicle's notable torque and power. The new Malossi mobile driven split pulley ensures, on boosted vehicles,extraordinary acceleration and an extremely progressive and fluid torque output to the wheel."
I'm going to try to just clean it up, the same as I've done on small scoots many times, and hope that works. It doesn't have any symptoms that I've noticed and the wear isn't terrible.
I had decided that I was just going to go ahead and do the front brakes while I was at it, but now I'm not sure again. It's $140 per disc, plus pads. Yamaha wants $40/pair for pads, so $360. I asked ScooterTuning about Malossi's front brake discs, but they said they are not being made now. ScooterPartsCo lists them $10 cheaper than stock with free shipping so I asked them if they have them, but I expect the same answer. The only place I see them is Italy from sellers that don't ship to the US and would end up expensive if they did. Bikes suck sometimes. I could put the comparatively gigantic pads and rotors on the F-150 for $100 less. I could go with AliExpress brakes, but I'm too afraid that they'd be like the RPM and Adelin rotors on T2 where they warp on the first hard stop.
I was planning to do the stainless hoses, all brake pads and rotors, and Malossi clutch kit so it was good to go for a long time hopefully. Now I'm contemplating just doing the rear brake and nothing else. It's like a ping pong match in my head ATM.
|
|
|
|
Post by aeroxbud on Apr 21, 2021 15:52:46 GMT -5
I once queried the price of motorcycle discs versus cars at my Yamaha dealer once. He said "the difference in price between motorcycles and cars is because, car discs don't need to look pretty!"
Brakes are something you don't skimp on, but the last set I brought for a motorcycle were £300! So I can sympathise with you.
|
|
|
|
Post by 90GTVert on Apr 21, 2021 19:03:27 GMT -5
I once queried the price of motorcycle discs versus cars at my Yamaha dealer once. He said "the difference in price between motorcycles and cars is because, car discs don't need to look pretty!" Brakes are something you don't skimp on, but the last set I brought for a motorcycle were £300! So I can sympathise with you. My thought is a little different, but maybe totally wrong. Competition and production. There are millions of F-150s on the road. I can get rotors from Ford and then any number of auto parts chains from their brands and other brands. I have 2 options for the TMAX. Yamaha and Malossi... well, then AliExpress, but that's really unknown quality. Plus, the units produced for an F-150 are off the charts vs the TMAX or any motorcycle... though I think the TMAX would be on the losing end for popularity vs most bikes. I have a feeling F-150 rotors drain your pockets pretty well if you go to a dealer, but I don't really know anyone that goes to a dealer for automotive brake pads and rotors. The bike world does a great job overall of getting us in their parts departments. Floating discs don't help the cost, though the rear rotor is a plain old one piece and it's still more than some F-150 rotors. I just came in from working on the torque driver. I got the whole pulley back together after cleaning, working on the grooves, new seals and then re-greasing with BelRay Assembly lube. It moves so much easier than before. I checked my email immediately to see if ScooterPartsCo replied about the Malossi front rotors. Yeah, I'm still in the dark ages without a smartphone to know the second anything happens. They replied simply "Yes." after being asked if the item was in stock. I went to the site and checked out faster than a 4T owner turns down a race. |
|
|
|
Post by 90GTVert on Apr 27, 2021 8:15:51 GMT -5
I've done the cams in this thing multiple times now. The way the service manual lays it out doesn't work. The chain will pop off of the cam sprockets when trying to tighten them down, because the valves on the #2 side are open enough to push against the cam caps tightening all the way down. The basic process from the manual is :
- Exhaust & intake cams positioned in chain, keeping tension on the exhaust/bottom side
- Exhaust cam cap installed
- Intake cam cap installed
- Cam caps torqued
- Tensioner installed
How it really goes while following the manual :
- Exhaust & intake cams positioned in chain, keeping tension on the exhaust/bottom side
- Exhaust cam cap installed (loose)
- Intake cam cap installed (loose)
- Chain jumps a tooth or more on the ex or maybe ex & in when the exhaust cap is torqued
I found that there's a hole on the exhaust cam that aligns with a flat surface on it's cap. It happens to keep the cam right where you need it if you put something through there. Seems like it was meant for this, but is never mentioned in the manual. OK, let's try this again :
- Exhaust & intake cams positioned in chain, keeping tension on the exhaust/bottom side
- Exhaust cam cap installed (loose)
- Intake cam cap installed (loose)
- Awl placed through hole in exhaust cam to keep it from jumping teeth
- Exhaust cam cap torqued
- Chain jumps a tooth or teeth on the intake cam when the cap is tightened
Also, they tell you to rotate the engine over a few times when done to make sure everything stays where it should and to seat everything. On at least one occasion (it's all a blur at this point) I got it done and then the chain popped off when rotated because it was already trying to creep off of one or both cam caps.
What finally worked :
- Exhaust & intake cams positioned in chain, keeping tension on the exhaust/bottom side
- Exhaust cam cap installed (loose)
- Intake cam cap installed (loose)
- Awl placed through hole in exhaust cam to keep it from jumping teeth
- Exhaust cam cap torqued
- Tensioner installed to put enough tension on the chain that the now locked exhaust cam holds the intake still as well
- Intake cap torqued
OK, great! Cams are done.
Then I go to check the valve clearances on the exhaust side again, to see if they are 0.012" as I hoped with the shims. They're 0.012", 0.012", 0.012" and 0 (no feeler down to 0.0015" fits).
I figured a valve adjustment pad (shim) must have moved out of place on that valve's lifter. I took the cams back out and sure enough it had. No big deal. Didn't want to go through the cams ever again by that point, but easy enough fix.
I got it back together and checked again. Now 3 are at 0.012" and one is at 0.023". WTF? I pulled the exhaust cam out and the lifter is sitting lower on that one. Not the same one that just have the valve pad out of place BTW. I pulled the lifter off and the valve pad was where it should be. The pads are ~0.070" thick so I didn't suspect that as a reason to be
0.011" off anyway. I noticed that the top of the valve assembly (stem, retainer) sit a little lower than the other valve.
The only 2 things that I can think of that would cause the valve to sit lower would be; something stuck between the valve and seat or a bent valve. I don't really see why anything should get in between the valve and seat, since it's closed most of the time. I pushed the valve down a few times to see if anything changed, but it didn't. So now my best guess is that the valve is bent.
How did it get bent though? Well, this is where I kick myself for doing something that I know better than to do. Again because there were multiple attempts at the cam install, I'm not totally sure what I was doing when it happened. It would have either been when I was rotating the engine around for a final check and the chain popped off or at one point I tried to leave the engine a little before TDC to see if it would take some of the pressure off of the intake cam and make it easier to get it all torqued down without anything popping off so I was rotating it then too. Whatever time it was, I got to a point where the engine stopped. I backed it off and saw slack in the cam chain between the 2 cams and then it stopped again within a 1/4 turn or so. Now I know it didn't just stop there before, and when turned back in the normal direction it stops again after all of the slack is taken up in the chain. I did this a few times. I thought the chain must be hanging up because it's not on a sprocket right or something. Can't move forward, can't go back now. Let's see if it pops off without much effort. Ah, there we go.
It's never smart to force anything. I know that. Apparently not well enough. I'm now pretty sure that the resistance was a valve. It didn't feel like all that much resistance to me or I wouldn't have pushed it through, but then again I've got a 2ft long ratchet on there and these are valve stems about the same size as a 139QMB. Guessing the slack and tension on the chain were due to one cam not wanting to move while the other could.
It's bad enough to feel like an idiot on your own, but now I'll be telling the internet about it. I get criticized when I'm doing things right often enough, so yeah. I could do what I think the majority of YouTube and TV repair guys would do... fix the valve that I'm assuming is bent and pretend it never happened. Not my style though. I'll own it and teach another lesson the hard way. I think this one may be my new high, sitting above ruining gears without gear oil. At least the gear oil was an honest mistake from forgetfulness. I was tired and hurting from being bent over sitting in the floor and being up and down constantly, up since 4AM, trying to get done before I had to cook dinner and so on... but there's no real excuse for someone that has worked on enough engines to know better to do this. Not happy with myself right now.
On a brighter note, I guess at least now I get to see what the head's all about. How the ports look and such.
|
|
|
|
Post by aeroxbud on Apr 27, 2021 8:28:37 GMT -5
You really don't have any luck. I can't believe Yamaha don't have a special tool to hold the cams in place.
|
|


