|
|
Post by oldgeek on Oct 7, 2018 16:19:05 GMT -5
1 step forward 1 step back lol! I wanted to see how much could be removed, now I know! This is the second time working on scooters that I had a face appear in the work, Strange.............    Looking for my JB weld now Lol! |
|
|
|
Post by 190mech on Oct 7, 2018 17:43:01 GMT -5
Look out,its the grinding ghost saying BOO!!  |
|
|
|
Post by gsx600racer on Oct 7, 2018 17:49:00 GMT -5
It should of been a sad face, not a smiley one. It's just mocking you.  |
|
|
|
Post by oldgeek on Oct 8, 2018 21:01:37 GMT -5
Found the JB weld. Foil tape works great to dam things up.  |
|
|
|
Post by gsx600racer on Oct 9, 2018 0:10:48 GMT -5
I think there are other forces at work here. In the picture with the "smiley face" did anyone notice the numbers casted in the connecting rod are "665" ?
|
|
|
|
Post by oldgeek on Oct 9, 2018 14:39:36 GMT -5
Epoxy seems to have cured well. Despite the large amount i used, I don't think it will interfere with the CVT components. If it does I will just trim it out a bit.   I can cut deeper now! But how much is really needed?  I am thinking about adding an epoxy ramp at the bottom just before the crank wheel to help direct the flow, but may be more work than benefit.  Also wonder if the pockets above the oil passages are really necessary? I think I have heard of others filling them in and just leaving a nice chamfer at the top of the hole.  |
|
|
|
Post by 190mech on Oct 9, 2018 17:03:27 GMT -5
The reed duct shouldnt have any abrupt changes,the crank wheel looks like one to me...Most side rotary valve engines have the crank wheel heavily chamfered to better direct the flow and angle it toward the transfer ducts..OR your epoxied ramp idea especially at the crank wheel intersection would be a great plan also..  |
|
|
|
Post by 90GTVert on Oct 9, 2018 18:34:28 GMT -5
Despite the large amount i used, I don't think it will interfere with the CVT components. If it does I will just trim it out a bit.  Maybe it's the angle of the photo, but it looks like you'll need to take down the rear section of the filler for belt clearance. |
|
|
|
Post by oldgeek on Oct 9, 2018 19:20:26 GMT -5
Despite the large amount i used, I don't think it will interfere with the CVT components. If it does I will just trim it out a bit.  Maybe it's the angle of the photo, but it looks like you'll need to take down the rear section of the filler for belt clearance. Its definitely close, gonna round that area as needed for sure. |
|
|
|
Post by oldgeek on Oct 9, 2018 21:38:02 GMT -5
Jumped over to working on the cylinder a bit. Apparently I already did some work on the exhaust port that I don't remember doing, one of the benefits of getting older I guess. Currently the duration's for this cylinder are 184/130,chord width 31mm/62%.   190mech re-designed the pipe I have, to be used with a cylinder at 190/130, chord width 65-68%. If I trim about .4mm from the roof and 1mm from each side of the exhaust port I think i will be in the ballpark. Gotta trim the skirt up a bit too. |
|
|
|
Post by Lucass2T on Oct 9, 2018 22:24:50 GMT -5
Jumped over to working on the cylinder a bit. Apparently I already did some work on the exhaust port that I don't remember doing, one of the benefits of getting older I guess. Currently the duration's for this cylinder are 184/130,chord width 31mm/62%.   190mech re-designed the pipe I have, to be used with a cylinder at 190/130, chord width 65-68%. If I trim about .4mm from the roof and 1mm from each side of the exhaust port I think i will be in the ballpark. Gotta trim the skirt up a bit too. 190/130 sounds legit, same timings as the athena evo/stage 6 racing. Think it works great in the 10-11k range. 68% chord width is as wide as you wanna go. |
|
|
|
Post by oldgeek on Oct 10, 2018 22:12:59 GMT -5
Its 11:00 PM I just finished up the exhaust port. Durations are at 190/130 chord width close 66% Its a bit exhausting doing port work. 2 hours of tedious work feels more like 4 hours to me, my sitting bones hurt.   |
|
|
|
Post by oldgeek on Oct 11, 2018 21:23:35 GMT -5
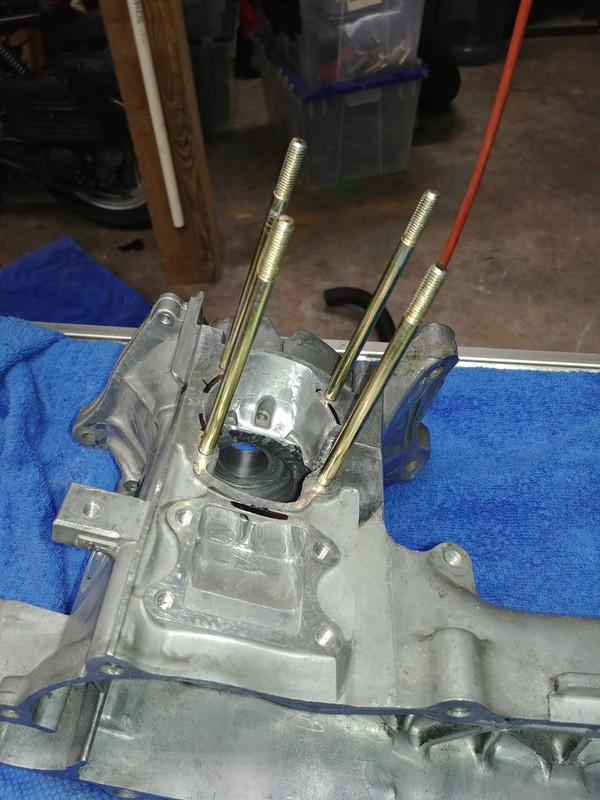
I only made a little progress on the build today, due to job related work and some debris cleanup around the house from the passing wind storm. I got the 6mm cylinder stud holes in the cases deepened by 8mm, and tapped them so the longer cylinder studs I am using would thread all the way in.  |
|
|
|
Post by Lucass2T on Oct 11, 2018 21:35:36 GMT -5
Exhaust port looks great OG!
|
|
|
|
Post by oldgeek on Oct 11, 2018 21:56:48 GMT -5
Exhaust port looks great OG! Thanks! 190mech had told me to make it oval, and I forgot to do it. I am thinking I will flatten the roof out a bit. |
|