|
|
Post by 90GTVert on Dec 26, 2011 12:33:27 GMT -5
I got a Drill Doctor 350X for Christmas, and just used it the first time on a few drill bits. Thought I'd share the results.... It's the Drill Doctor 350X. This is the lowest model in their series, but I think it will come in handy. The link below shows the various models and their features. www.drilldoctor.com/index.php?option=com_content&view=article&id=159&Itemid=15&tmpl=component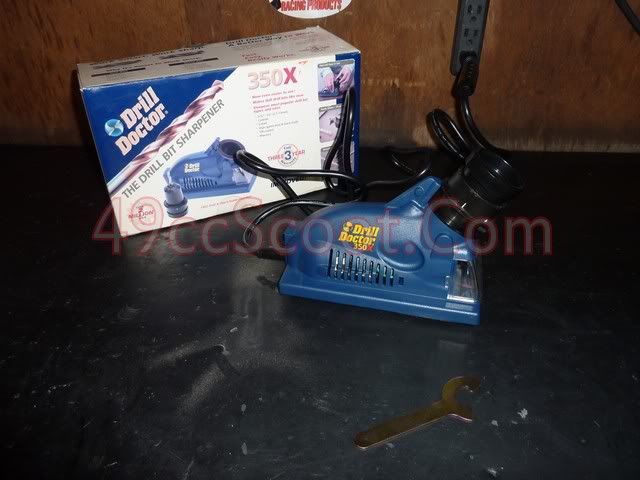 Here are two bits pre-sharpening. Pretty rough. 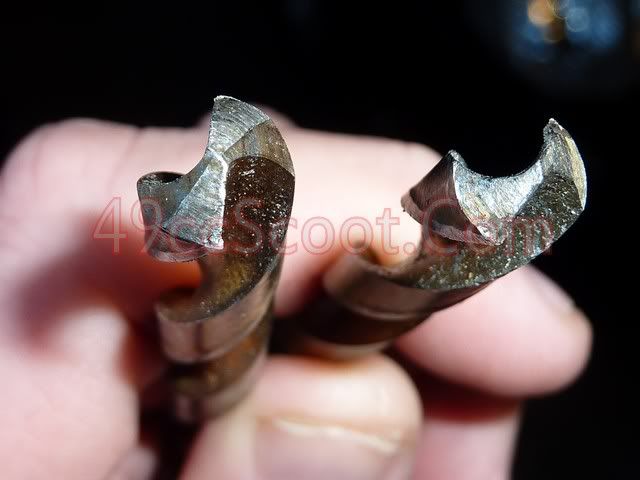 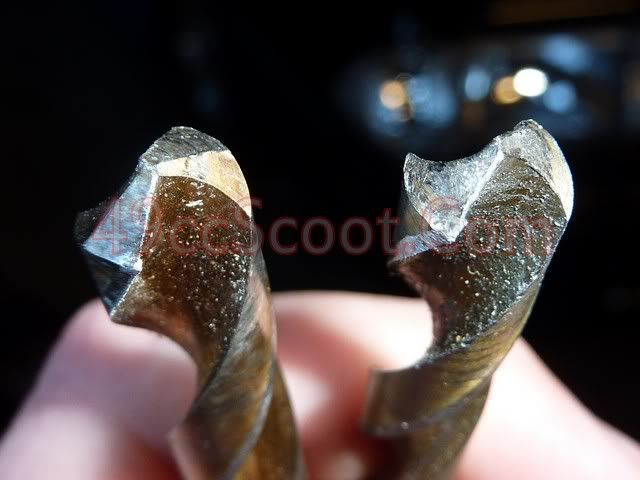 Here are the same two bits post-sharpening. 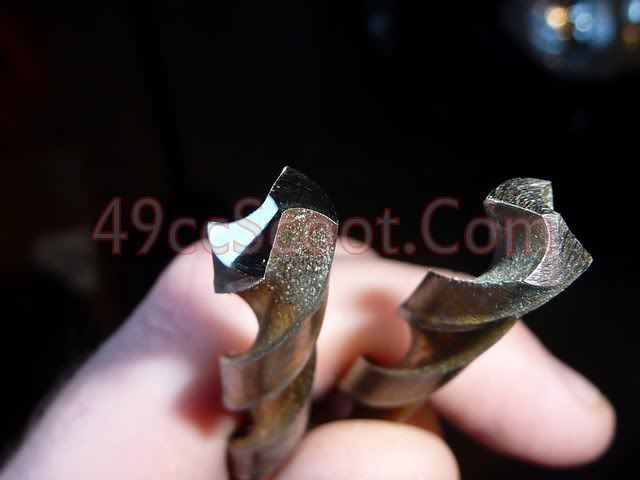 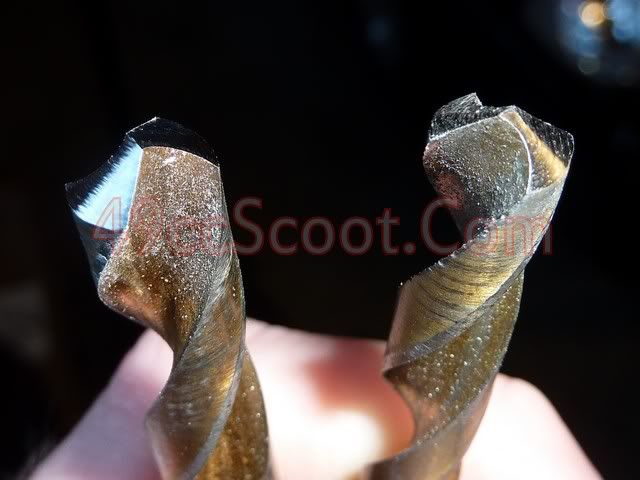 The first bit took me about 5 minutes. I unpacked the Drill Doctor, read enough instructions to be sure I was on the right track, and sharpened the bit. The next 2 took about 1 minute each. It's really simple and the bits come out quite sharp. It comes with DVD instructions too, I just haven't checked that out yet. I think this thing will be a lifesaver, or at least a frustration saver. I'm always working with old or dull bits or dulling bits faster than I should. Not anymore, at least with standard bits up to 1/2". My only thought is I hope the sharpening wheel lasts for quite a while. It can be replaced, but I think it's something like $20. |
|
|
|
Post by stepthrutuner on Dec 26, 2011 14:43:58 GMT -5
Cool gift. Wouldn't mind having one of those. While working around machinists I kinda learned how to sharpen drill bits by hand against a grinding wheel. At times I've had luck using a hand grinder clamped in a vice and locked on (don't have a bench grinder). The small bits are tricky though.
|
|
|
|
Post by 90GTVert on Dec 26, 2011 20:06:58 GMT -5
I've never tried to sharpen a bit in any way before, so this is still amazing to me. lol After doing it, seems like it wouldn't be a huge deal to touch them up on a grinder though.
|
|
larrball
Scoot Enthusiast
   2016 Genuine Scooter Rough House Sport Ti
Posts: 295
|
Post by larrball on Dec 26, 2011 21:55:44 GMT -5
Brent we had one (when they first came out with them) On a job site and it didnt fare all that well.
I hope you have good luck with your DD.
I'll bet they have improved them since then.
The one we had did not have a diamond wheel like i thank your DD has.
Looking at the pic's you posted your DD does a much better job then the one i used because as far as i was concerned the one we had might as well had ron popel stamped right on the side of it along with a free pocket fisherman so that when you get sooo... fed up, you can go do something more productive.
:lol:
|
|
|
|
Post by Goosey on Dec 27, 2011 7:57:55 GMT -5
Nice edge. I would like something to fix the smaller bits i tend to snap in half. Just got a new set of bits to replace the one with odd missing ones and fumbled the drill when I picked it up, dropped it 6 inches, snapped the bit. That was a drill bit rant I think. If I complain to my female friends they look at me funny.
|
|
|
|
Post by moore716 on Dec 27, 2011 9:16:21 GMT -5
if you sharpen your own a tool like this is invaluable www.mcmaster.com/#drill-point-gauges/=fjmffyit shows you the proper angle to sharpen and its numbered so that each size is the same length. It takes some practice to get it right though. When you are drilling if you get chips and from only one side then th drill is not sharpened evenly on each side. |
|
|
|
Post by aeroxbud on Jan 1, 2012 18:53:37 GMT -5
I dont have a bench grinder so this would be good
|
|
vvtr
Scoot Enthusiast
  
Posts: 243
|
Post by vvtr on Jan 1, 2012 19:10:33 GMT -5
I kinda learned how to sharpen drill bits by hand against a grinding wheel.. yeh i use the side of the fine wheel. sort of curve the bit upwards, held at an angle to the wheel. it's a dying art! when im driling soft stuff like brass or ally i angle them a bit different so they chip better. gets a bit tricky trying to sharpen left handed cnc bits tho lol  |
|
|
|
Post by stepthrutuner on Jan 1, 2012 23:10:26 GMT -5
Yeah, working in that back clearance takes a bit of practice.
|
|
|
|
Post by ravenrock67 on Feb 1, 2013 10:30:07 GMT -5
Hello, being an automotive mechanic for over 25 yrs, you run into all kinds of drilling projects. I have the exact same Drill Doctor, its over 5 yrs old, and I love it. Being able to sharpen a bit as needed is a time saver and a frustration saver. One tip, don't be in a hurry to twist the bit as you sharpen, slow and steady gets the job done right. As for the diamond wheel, yeah, it lasts forever.
|
|
|
|
Post by 90GTVert on Feb 1, 2013 11:24:06 GMT -5
I've had this for a little over a year now and I'm still happy with it. One thing I've learned is that once you get a bit too hot, to the point of discoloration with mine, you should replace that bit. It loses it's temper (no, it doesn't get angry) and then it dulls really quickly. I used to just throw 'em out anyway at that point, but I never put any thought into it beyond that the bit was dull. So on top of being able to keep bits sharp with the DD, it's taught me to use oil when drilling and keep bits in better shape.
|
|
|
|
Post by shakerdriver on Feb 1, 2013 20:36:14 GMT -5
I've been looking at getting one of those but hadn't heard much about it one way or the other.
Sent from my Nexus S 4G using proboards
|
|
|
|
Post by andsetinn on May 5, 2013 8:53:08 GMT -5
I learned how to sharpen drill bits on a bench grinder long time ago. About 6 millimeter or 1/4 of an inch is the smallest I sharpen. The rest I replace. Discolored (from heat, usually at the tip) drill bits needs to be replaced. Proper care of your drill bits and proper drilling will keep your drill bits sharper for much longer.
Nr. 1. Use lubricant, repeat every couple of seconds. Drill holes will not self lubricate, no matter how long you prepare for the drilling.
Nr. 2. Keep the drills cool while drilling. If you see smoke, stop drilling and cool the piece and the drill bit down.
Nr. 3. Push on the drill while drilling, don't let the drill just rattle around in the hole. It will heat up in few seconds and be destroyed.
Nr. 4. Drill straight, it is always (95% of the time) sideways/twisting force that breaks the drills.
Nr. 5. Only use quality HSS general purpose drills for metal, wood or plastic. Don't ever let them touch concrete or stone.
Nr. 6. Only buy quality HSS general purpose drill bits from a reputable hardware store. Titanium coating is usually not worth the extra money. There are lots of low quality/price drill bits out there, often with fake titanium coating. The best indicators to distinguish between high quality HSS drill bits and fakes is that the real thing is usually shiny with very smooth surface and has the size of the drill bit engraved with laser (not stamped) and they are coated with oil. If you are ready to sacrifice a drill bit try to bend it. If it bends it's low quality.
Nr. 7. If there is something behind the hole you're drilling, the drill bit will go through the hole and into that piece. You are not strong/fast enough to stop the drill in time to prevent that.
Nr. 8. If you possibly can drill the piece by removing it and using drill press, do it.
Nr. 9. Drill bits, drills, drill presses. Don't buy the cheap stuff.
|
|
|
|
Post by 70ccsuperyates on Aug 22, 2013 23:51:57 GMT -5
I got a Drill Doctor 350X for Christmas, and just used it the first time on a few drill bits. Thought I'd share the results.... It's the Drill Doctor 350X. This is the lowest model in their series, but I think it will come in handy. The link below shows the various models and their features. www.drilldoctor.com/index.php?option=com_content&view=article&id=159&Itemid=15&tmpl=component Here are two bits pre-sharpening. Pretty rough.   Here are the same two bits post-sharpening.   The first bit took me about 5 minutes. I unpacked the Drill Doctor, read enough instructions to be sure I was on the right track, and sharpened the bit. The next 2 took about 1 minute each. It's really simple and the bits come out quite sharp. It comes with DVD instructions too, I just haven't checked that out yet. I think this thing will be a lifesaver, or at least a frustration saver. I'm always working with old or dull bits or dulling bits faster than I should. Not anymore, at least with standard bits up to 1/2". My only thought is I hope the sharpening wheel lasts for quite a while. It can be replaced, but I think it's something like $20. man I wanna get me one of those drill doctors for Christmas |
|
|
|
Post by waltinhawaii on Aug 30, 2013 19:23:59 GMT -5
Drill progressive holes. Start small then go bigger each time. If you have a large hole, you can't just drill it to that size, a large drill can stick in the workpiece and whip it around if you don't have it clamped down tight. Going to larger and larger bits means taking a small bite of the hole each time, so less stress on your bits. This also means the wear on your bits is on the 2 outer edges of the flutes, just the tips. That's all you really have to sharpen, the insides of the cutting tips don't get dull because you don't use that part. Use lubricant, in aluminum you can use WD40; in steel, any cutting fluid or light oil will do in a pinch. The purpose of the oil is not to lubricate, it is to keep the temp of your bit down so it will stay sharp. Feed rate (how hard you press your bit into the material) and drill speed (rotation velocity) makes a difference. In steel most people go fast with moderate feed. Ditto for aluminum. In stainless, you want high feed (heavy pressure) but low speed due to the metal work hardening very quickly. You bit must cut through the work hardened layer quickly or you will dull out fast and only be creating heat.
A good machinist will learn to sharpen bits out of necessity, this is a necessary skill to develop in a shop. If you don't learn, find a mean shop steward, he will bang it into your skull. I was always pretty slow, but I can do a decent job with a grinder. Keep in mind your grinding table will not be flat, like for most projects. I always had to use a table, eyeballing was way too hard and didn't yield consistent results. Find a large bit(not to sharpen; but to use as a template on your stopped grinding wheel---not moving! only to set the angles... put the bit against the wheel and shine a light in back until the flute is flat against the wheel), you can't set the grinding table using a small bit because the angles are too hard to see that small. It requires a table at a downward angle and the bit at a specific angle to the grinder left to right so the tip of the cutting flute is parallel to your wheel and the motion is *touch the wheel* move the tip up but keep the back of the bit anchored to the table, more or less. Some people twist the bit slightly, like a little swirl. I don't bother because I know I'm only using the edge of the flute, the back end is not in contact with the work.
aloha,
walt
|
|