Post by scoobnz on Apr 24, 2014 22:38:39 GMT -5
HI everyone, well I figured I would post the project I am in the middle of doing right now, It is actually being built for a fund raising event held here in NZ call the Tranz Alpine Scooter Safari www.scootersafari.co.nz
I haven't been given a huge amount of time (about a month) to build something special for this event.
It is detailed on our website here mymotus.co.nz/products/scooter-safari-project-bike (large PDF so give it time) but I will update on here too
The Donor Bike
2009 Baotian Tiger (Rocky) 49cc 2- Stroke

Well we needed something to get this party started!!Our project bike is our old faithful Baotian Tiger, this bike has a good history with Motus (Formerly Escuta) and we felt it was a good starting point for the build. Modern looks, 2- stroke engine and plenty of room for potential tuning.!First things first was to pull it down to see what we are working with. As you can see there isn’t much left once you get down to it!!

The Engine
Pulling apart the old engine was an interesting prospect, having been in storage for the past 2 years due to an oil line failure has left the poor thing in less than favourable condition. Good thing we’re building a special! Getting the engine apart was not as easy as some, lots of over tightened bolts, generous use of industrial RTV made for slow work. Considering the engine suffered an oil failure the damage was surprisingly little. Piston and ring damage, light cylinder scuffing and a sloppy small end bearing were the worst of it. we could have just replaced the top end and been done with it... but where is the fun in that?!
Building A Better Engine
Sure we could throw money and bolt on goodies at the engine and hope for the best, but that is seldom how good engines are built. Anyone could assemble an engine in their garage and I am sure it would work O.K but that it not what we are aiming for here. I have been building high end 2-stroke motors for nearly 20 years, including 125 and 250 GP engines, small engines are a specialty of mine so extra care and attention is made when something special is being built!!For this build a we will be using some performance parts to really spice it up!!
For starters a 47.6mm Aluminium and Nikasil cylinder. This a has quite a few advantages other than a near 8mm increase in size! Aluminium is far better at dissipating heat than the stock cast iron cylinder the bike comes with, secondly the Nikasil (Nickel Silicone Carbide) coating on the cylinder is very durable and provides far less friction for the piston, all this means more horsepower and less heat.!
This cylinder we’re using is a “Bridge” exhaust design, this is used for high performance applications that require larger than normal exhaust ports, without this bridge in the middle to support the piston as it moves up and down, the hole is large enough for the piston rings to fall in and snag! This is more of a sport cylinder that we will be using not race cylinder, we want torque not a high revving monster that has no manners... Torque is what we need for rapid progress, which brings me to our next item in the search for speed.
The heart of the build is often the most overlooked, crankshafts pay a huge role in engine builds and yet is usually the last thing people even consider. I would suggest to everyone who is building a performance scooter engine that you replace this when you upgrade! why you ask... Imagine an engine that has been spinning near the redline for most of it’s life, but all you want is a bigger cylinder, so you hop online and get the biggest one you can squeeze in there, a few weeks down the road and BANG! It all grinds to a sudden halt. People forget that throwing a piston nearly 20% larger places massive stress on an already hard working item. Tie a tennis ball to a piece of string and swing it around for a while... slowly the string stretches but hangs in there. Now we tie a softball to that same string and swing again.. round and round it goes but eventually snaps, you get the idea.For our project we will be using a higher quality and NEW item known as a “stroker” crankshaft, this also has the benefit of having inserts filling in the blank areas (known as stuffing). This is 2mm longer than a standard crankshaft which will bring our total displacement increase to 50% or 74.9cc.
These two main components form the heart and soul of the engine and should be carefully selected for what you need, banging on a big piston isn’t always the answer and neglecting the backbone can cripple a potentially brilliant build.
Link to Album s236.photobucket.com/user/Scoobnz/library/Scooter%20Build
The Extras
Just as the main engine components are important so are it’s supporting arms.
Fuel goes in gas comes out.. Getting that large cylinder to breathe is very important in the quest for power, a high performance inlet is really important here as thestock item a little small for what we need. A high flow aluminium intake is what we will be using here, it supports a large diameter carburettor and has fibreglass reed valves in place of the flimsy steel ones used in stock engines. Stiffer reeds means more torque but be careful as going too stiff (carbon fibre) can lead to power losses if the engine can’t rev high enough. Carburettors can be a scary item to pick and even scarier trying to tune! What size? What brand? We will be using a 24mm PWK D-Slide carb for our build. Normally I would use a 21mm size but our bike will have extensive crankcase modifications (Details to follow) to increase primary compression and intake velocity so we can afford a larger carb, the plus side is that 24mm will provide plenty of top end power!! The Keihin PWK also has a power-jet to aid midrange fuelling and help curb high rev detonation due to a lack of fuel. It allows a smaller main jet than non power-jet types which gives crisper response while keeping up at the top end.!Exhausts are an interesting topic, they can drastically alter howthe engine will run and where the power happens, high endpower, low end grunt, they can make more difference thanalmost all the other parts combined! We will be using an expansion chamber with custom tapers to suit this build, again we want torque and everyday driving use rather than a screamer! Contact a professional before choosing an exhaust and talk about the kind of power you want, a lot of customers call me complaining that their $350.00 name brand exhaust doesn’t work “I was told it would make tons of power!!” . True it might make power on the specific engine it was designed for but not for what you have in your garage... ring first.. then buy.!
More Prep Work
Less is more
Preparation work is progressing on our engine and now that the Easter break is here I have a little time to write down some more on what is happening! The final parts for our build have been ordered and should be shipped out within a few days which means all hands on deck when they arrive to have the bike finished in such a tight time frame, but nothing like a challenge ay!
Well I spent time inside the engine cases before the break and started the long process to gather more horsepower! The crankcases are a little goldmine for engine tuners and can yield surprising results when paired with a good cylinder kit and exhaust system. Here you can see that the cases have a had a little cleaning to get the worst of the casting marks off and I was pleasantly surprised to see how closely matched they were but still needed a little help.
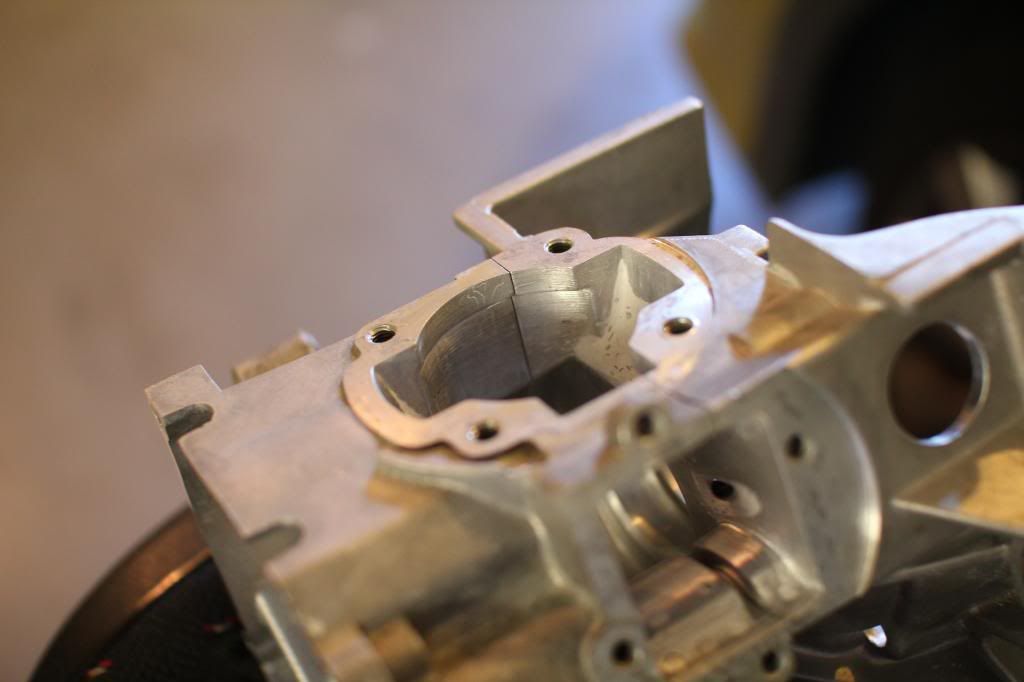
The transfers on the side will need matching to the cylinder kit and work to the bottom of them to direct flow into the transfers will also be done. This is called trenching and must be done with EXTREME care as gas direction and velocity can be adversely affected if it’s too deep, the risk of going right through the cases can also be an issue if you get a little happy with the grinder! I have decided not to do this as the flow charts on my program show it to be fine, however that nasty lip at the bottom of the transfer had to go!
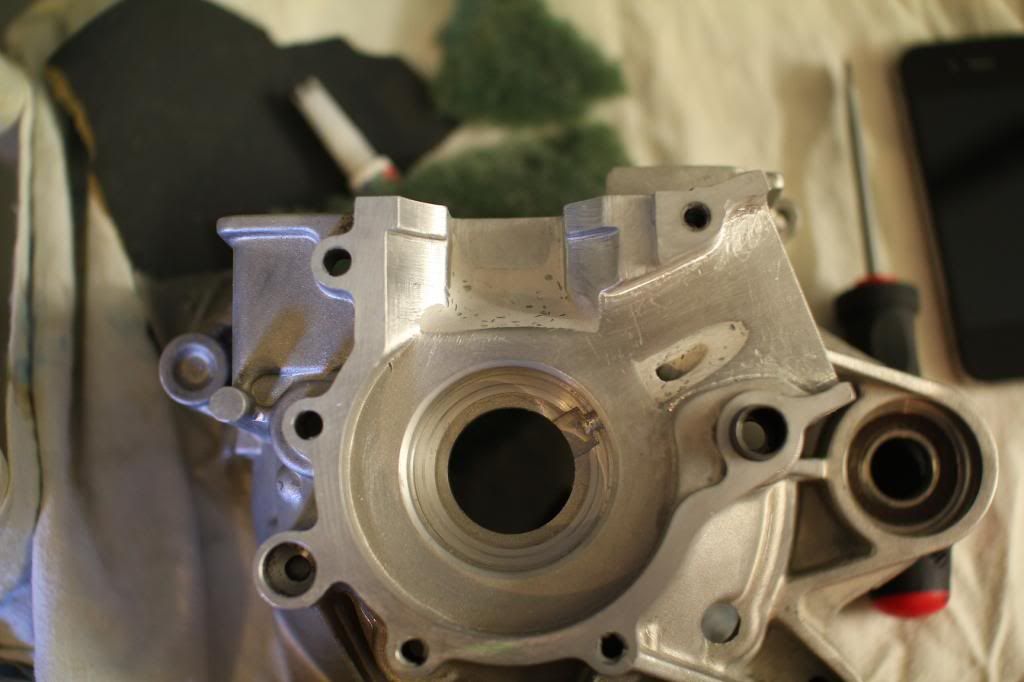
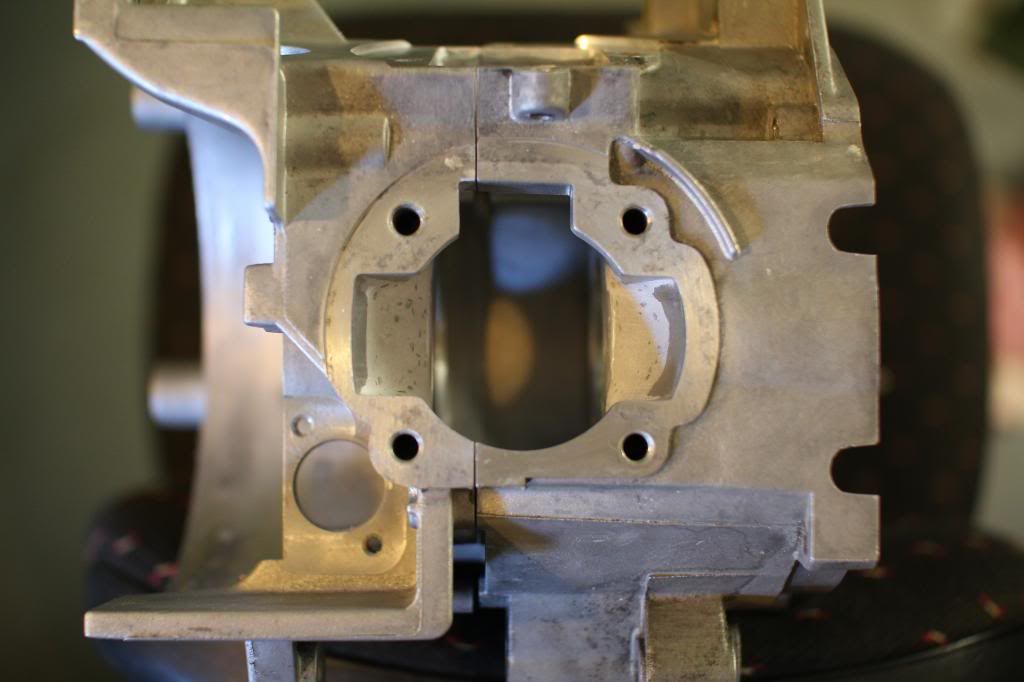
This is where the magic happens
Many people think that “porting” means ripping out metal and opening things up to let more air in... well that is only true with a few aspects of the engine,
larger exhausts, transfers, even carbs can make good improvements, but with a crankcase this is a no no.
When the fuel/air enters the cases the piston comes down and compresses the fuel, this forces it up the side transfers up to the top of the piston. The larger the volume the slower this happens so the less charge we get into the compression stroke of the engine. So we start the long task of filling in the dead areas in the case. Flow into the inlet is the start of all this so you can see on the right that the oil passage ways have been filled, smoothed and re-drilled.
EDIT** I also foot to mention that I had to make a little plastic jig to seal off each transfer ramp for CC volume. If the photos look like there is a different amount it's because there is. The factory casting is pretty yuck and both transfer sides need to be the same volume for an equal flow on top of the piston. Each side was 8cc variance.
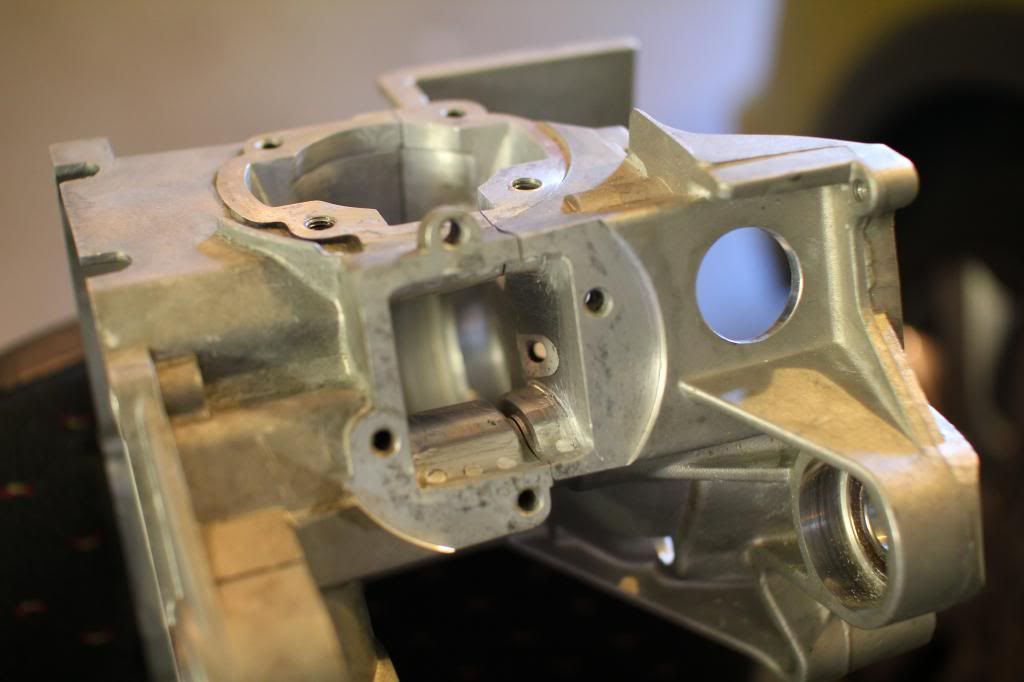
ps: Ignore the dots.. they were from another reed cage stuffing project
More work to go but the changes have decreased crankcase volume by nearly 8% which is huge! this would allow me to cut away at the transfers (trenching) if needed and still have less volume than before. I will be happy with a 5-8% reduction here.
More to come later
UPDATE*
Suspension: The Final Frontier
I like to move it move it...
Well actually I don’t! Wriggling scooters seem funny but can be a nightmare. One thing that bothers me when building performance vehicles is that the chassis is often forgotten. In this case we are aiming for a top speed somewhere in the region of 100+ km/h(60mph) for you US folk), which is more than a little faster than the stock bike was ever intended to travel at, so serious chassis upgrades are needed to keep ourselves pointed in the right direction.
Bouncy Bouncy
Suspension is an area that should be sorted first and foremost, if your suspension bounces up and down with little or no damping then it’s time you got it sorted. When you hit a small bump or a large pothole, the suspension is kicked into action but if it jumps around the vehicle starts to move away from where it should be heading, potentially sending you offline into the path of another vehicle or even grandmas letter box! We will be using some higher quality suspension in this build.
The Pointy End
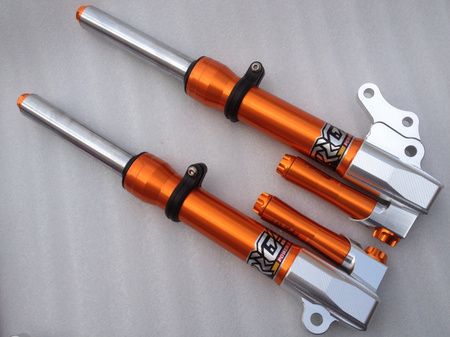
The front forks are being replaced with CNC aluminium items that are both lighter, stronger and more compliant than the stock items. I will also add preload adjusters in a later article. These forks are nearly 30% Lighter than the stock cast items and have machined billet mounts for brake upgrades!
Hold On
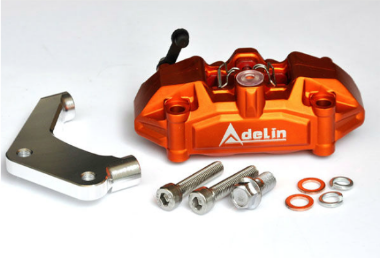
The front brakes are a considerable upgrade from stock, if the scooter reaches it’s potential top speed it’s going to need serious stopping power to keep us safe and happy. 4-Piston billet alloy callipers with 22mm pistons will do the trick here. Compared to the factory item on the new one is HUGE
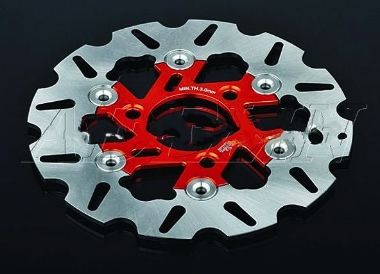
Complimenting this lovely looking item is a 220mm wave disc, this is 80mm larger than the factory item and has an aluminium carrier where the factory is solid steel. So losing mass and unsprung weight will help the suspension work much better.
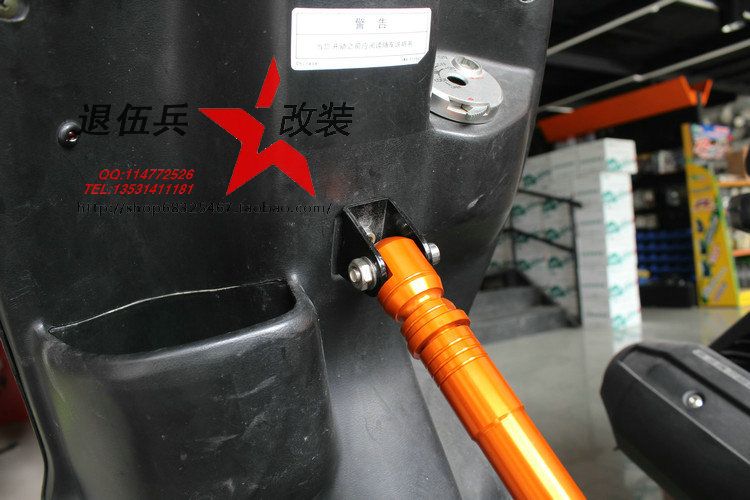
With all this stopping power and grip from the performance tires (I’ll get to those soon) the suspension will still need a hand, we need to brace the chassis to stop it bending when we are pushing on! Below is a CNC frame brace that will strengthen the body and will radically change the handling for the better. it will attach like the following pictures.
The Way Back
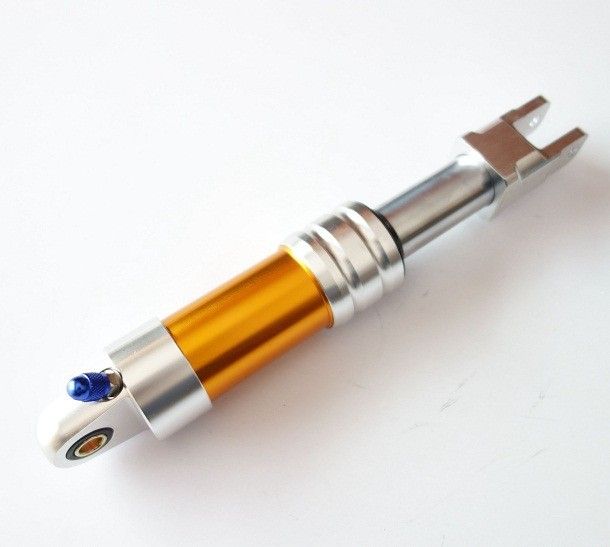
Technically as well as optically, this rear shock is based on Fournales shock absorbers. However, it cannot compete with fournales lightweight construction. In contrast to Fournales, This uses an oleo-pneumatic spring. This allows for a straight-forward setting-up thanks to a high pressure manual pump: you can easily adjust the stiffness of the pneumatic spring according to the rider's weight, driving style and to road conditions. This is also a progressive rate spring, which means that e.g. the last 10cm of spring motion require much more force than the first, which ensures both a smooth ride and response handling over rough surfaces.
The Goodies!
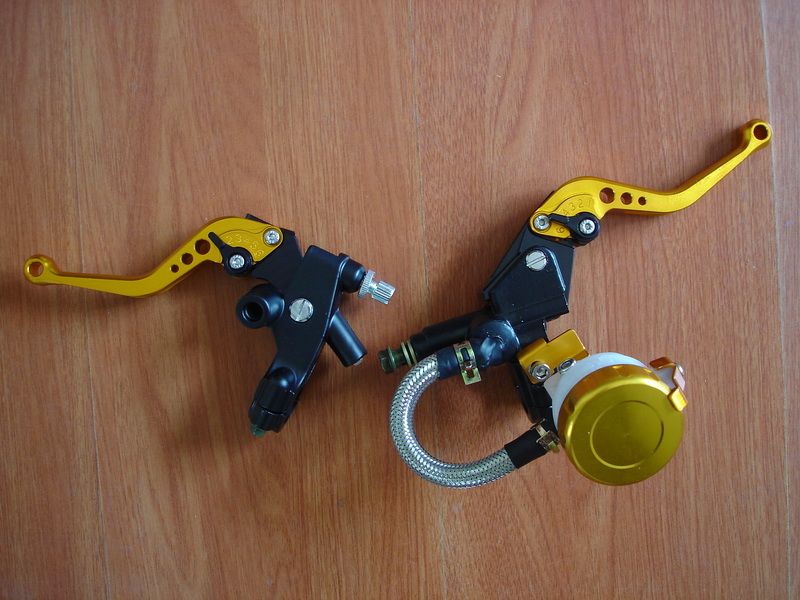
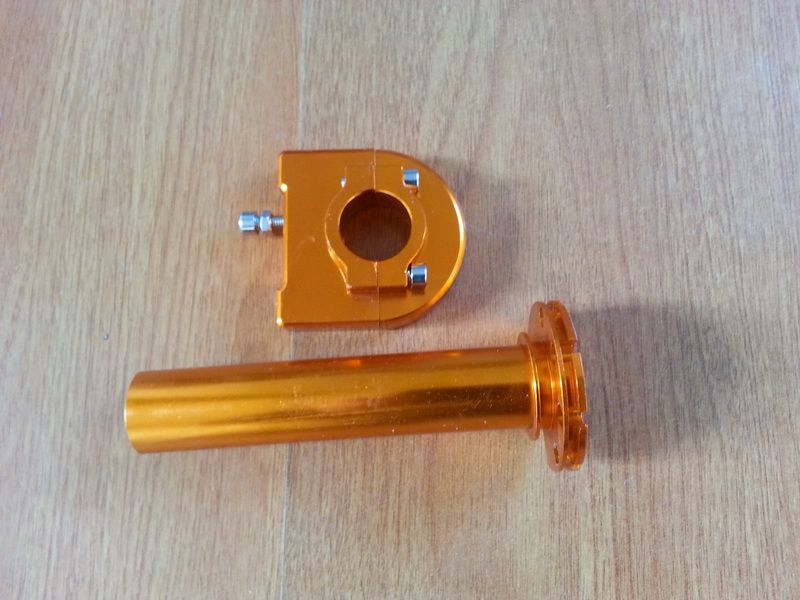
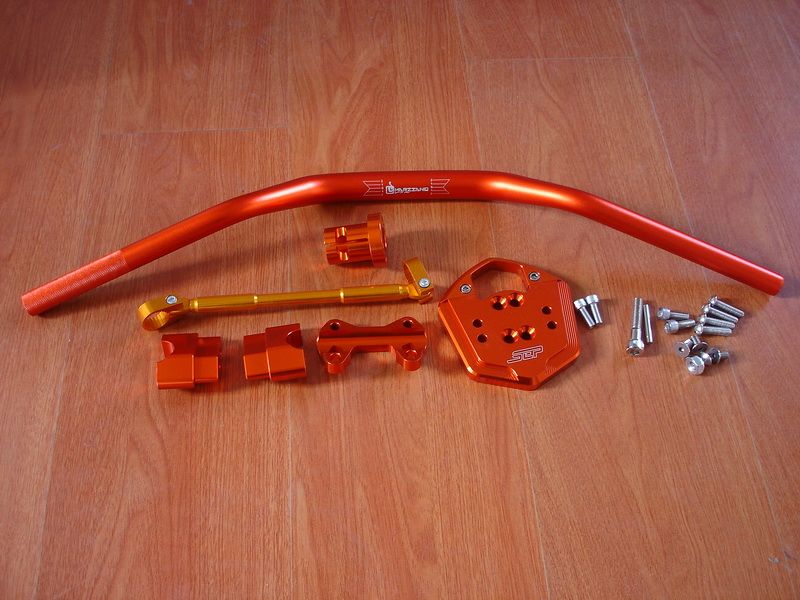
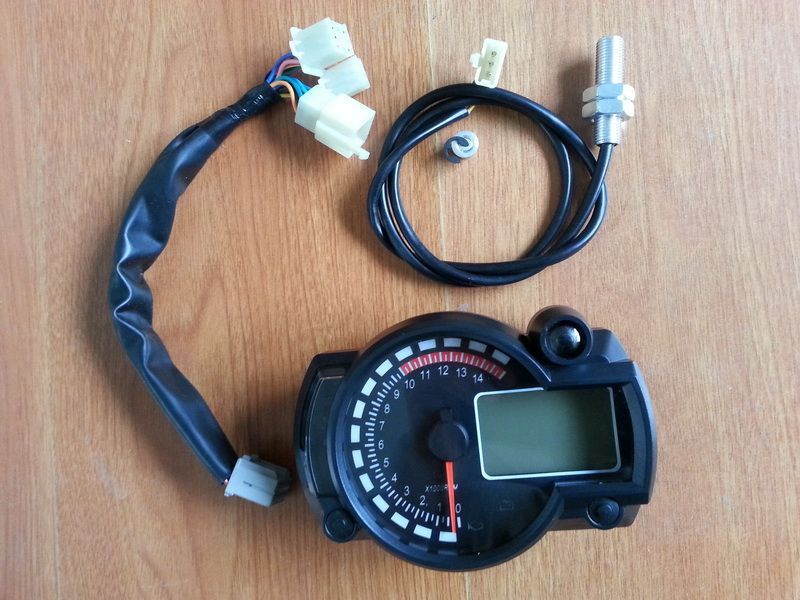
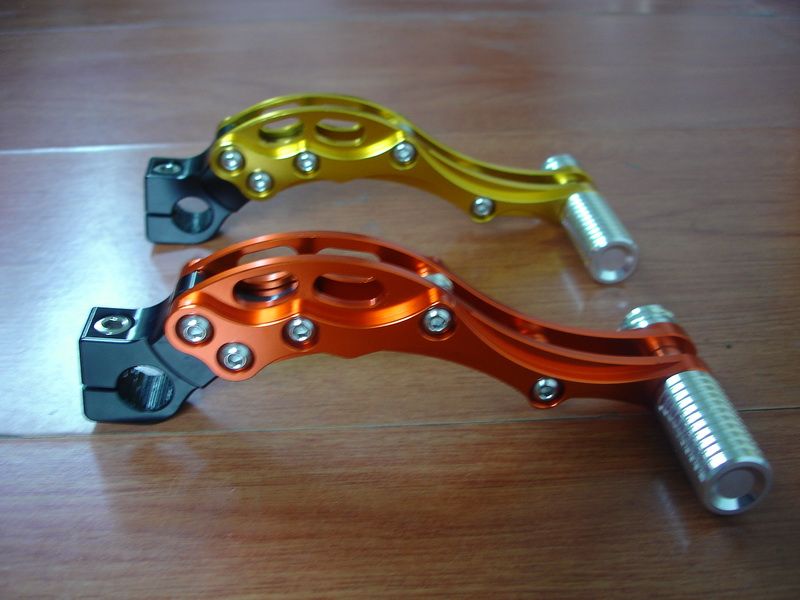
Here is some photos of the rest of the chassis parts that will be used in the build as well as the digital dash.
I will be assembling the engine this week so will update with some tips and tricks
Thanks for reading!
I haven't been given a huge amount of time (about a month) to build something special for this event.
It is detailed on our website here mymotus.co.nz/products/scooter-safari-project-bike (large PDF so give it time) but I will update on here too

The Donor Bike
2009 Baotian Tiger (Rocky) 49cc 2- Stroke

Well we needed something to get this party started!!Our project bike is our old faithful Baotian Tiger, this bike has a good history with Motus (Formerly Escuta) and we felt it was a good starting point for the build. Modern looks, 2- stroke engine and plenty of room for potential tuning.!First things first was to pull it down to see what we are working with. As you can see there isn’t much left once you get down to it!!

The Engine
Pulling apart the old engine was an interesting prospect, having been in storage for the past 2 years due to an oil line failure has left the poor thing in less than favourable condition. Good thing we’re building a special! Getting the engine apart was not as easy as some, lots of over tightened bolts, generous use of industrial RTV made for slow work. Considering the engine suffered an oil failure the damage was surprisingly little. Piston and ring damage, light cylinder scuffing and a sloppy small end bearing were the worst of it. we could have just replaced the top end and been done with it... but where is the fun in that?!
Building A Better Engine
Sure we could throw money and bolt on goodies at the engine and hope for the best, but that is seldom how good engines are built. Anyone could assemble an engine in their garage and I am sure it would work O.K but that it not what we are aiming for here. I have been building high end 2-stroke motors for nearly 20 years, including 125 and 250 GP engines, small engines are a specialty of mine so extra care and attention is made when something special is being built!!For this build a we will be using some performance parts to really spice it up!!
For starters a 47.6mm Aluminium and Nikasil cylinder. This a has quite a few advantages other than a near 8mm increase in size! Aluminium is far better at dissipating heat than the stock cast iron cylinder the bike comes with, secondly the Nikasil (Nickel Silicone Carbide) coating on the cylinder is very durable and provides far less friction for the piston, all this means more horsepower and less heat.!
This cylinder we’re using is a “Bridge” exhaust design, this is used for high performance applications that require larger than normal exhaust ports, without this bridge in the middle to support the piston as it moves up and down, the hole is large enough for the piston rings to fall in and snag! This is more of a sport cylinder that we will be using not race cylinder, we want torque not a high revving monster that has no manners... Torque is what we need for rapid progress, which brings me to our next item in the search for speed.
The heart of the build is often the most overlooked, crankshafts pay a huge role in engine builds and yet is usually the last thing people even consider. I would suggest to everyone who is building a performance scooter engine that you replace this when you upgrade! why you ask... Imagine an engine that has been spinning near the redline for most of it’s life, but all you want is a bigger cylinder, so you hop online and get the biggest one you can squeeze in there, a few weeks down the road and BANG! It all grinds to a sudden halt. People forget that throwing a piston nearly 20% larger places massive stress on an already hard working item. Tie a tennis ball to a piece of string and swing it around for a while... slowly the string stretches but hangs in there. Now we tie a softball to that same string and swing again.. round and round it goes but eventually snaps, you get the idea.For our project we will be using a higher quality and NEW item known as a “stroker” crankshaft, this also has the benefit of having inserts filling in the blank areas (known as stuffing). This is 2mm longer than a standard crankshaft which will bring our total displacement increase to 50% or 74.9cc.
These two main components form the heart and soul of the engine and should be carefully selected for what you need, banging on a big piston isn’t always the answer and neglecting the backbone can cripple a potentially brilliant build.
Link to Album s236.photobucket.com/user/Scoobnz/library/Scooter%20Build
The Extras
Just as the main engine components are important so are it’s supporting arms.
Fuel goes in gas comes out.. Getting that large cylinder to breathe is very important in the quest for power, a high performance inlet is really important here as thestock item a little small for what we need. A high flow aluminium intake is what we will be using here, it supports a large diameter carburettor and has fibreglass reed valves in place of the flimsy steel ones used in stock engines. Stiffer reeds means more torque but be careful as going too stiff (carbon fibre) can lead to power losses if the engine can’t rev high enough. Carburettors can be a scary item to pick and even scarier trying to tune! What size? What brand? We will be using a 24mm PWK D-Slide carb for our build. Normally I would use a 21mm size but our bike will have extensive crankcase modifications (Details to follow) to increase primary compression and intake velocity so we can afford a larger carb, the plus side is that 24mm will provide plenty of top end power!! The Keihin PWK also has a power-jet to aid midrange fuelling and help curb high rev detonation due to a lack of fuel. It allows a smaller main jet than non power-jet types which gives crisper response while keeping up at the top end.!Exhausts are an interesting topic, they can drastically alter howthe engine will run and where the power happens, high endpower, low end grunt, they can make more difference thanalmost all the other parts combined! We will be using an expansion chamber with custom tapers to suit this build, again we want torque and everyday driving use rather than a screamer! Contact a professional before choosing an exhaust and talk about the kind of power you want, a lot of customers call me complaining that their $350.00 name brand exhaust doesn’t work “I was told it would make tons of power!!” . True it might make power on the specific engine it was designed for but not for what you have in your garage... ring first.. then buy.!
More Prep Work
Less is more
Preparation work is progressing on our engine and now that the Easter break is here I have a little time to write down some more on what is happening! The final parts for our build have been ordered and should be shipped out within a few days which means all hands on deck when they arrive to have the bike finished in such a tight time frame, but nothing like a challenge ay!
Well I spent time inside the engine cases before the break and started the long process to gather more horsepower! The crankcases are a little goldmine for engine tuners and can yield surprising results when paired with a good cylinder kit and exhaust system. Here you can see that the cases have a had a little cleaning to get the worst of the casting marks off and I was pleasantly surprised to see how closely matched they were but still needed a little help.

The transfers on the side will need matching to the cylinder kit and work to the bottom of them to direct flow into the transfers will also be done. This is called trenching and must be done with EXTREME care as gas direction and velocity can be adversely affected if it’s too deep, the risk of going right through the cases can also be an issue if you get a little happy with the grinder! I have decided not to do this as the flow charts on my program show it to be fine, however that nasty lip at the bottom of the transfer had to go!


This is where the magic happens
Many people think that “porting” means ripping out metal and opening things up to let more air in... well that is only true with a few aspects of the engine,
larger exhausts, transfers, even carbs can make good improvements, but with a crankcase this is a no no.
When the fuel/air enters the cases the piston comes down and compresses the fuel, this forces it up the side transfers up to the top of the piston. The larger the volume the slower this happens so the less charge we get into the compression stroke of the engine. So we start the long task of filling in the dead areas in the case. Flow into the inlet is the start of all this so you can see on the right that the oil passage ways have been filled, smoothed and re-drilled.
EDIT** I also foot to mention that I had to make a little plastic jig to seal off each transfer ramp for CC volume. If the photos look like there is a different amount it's because there is. The factory casting is pretty yuck and both transfer sides need to be the same volume for an equal flow on top of the piston. Each side was 8cc variance.

ps: Ignore the dots.. they were from another reed cage stuffing project

More work to go but the changes have decreased crankcase volume by nearly 8% which is huge! this would allow me to cut away at the transfers (trenching) if needed and still have less volume than before. I will be happy with a 5-8% reduction here.
More to come later
UPDATE*
Suspension: The Final Frontier
I like to move it move it...
Well actually I don’t! Wriggling scooters seem funny but can be a nightmare. One thing that bothers me when building performance vehicles is that the chassis is often forgotten. In this case we are aiming for a top speed somewhere in the region of 100+ km/h(60mph) for you US folk), which is more than a little faster than the stock bike was ever intended to travel at, so serious chassis upgrades are needed to keep ourselves pointed in the right direction.
Bouncy Bouncy
Suspension is an area that should be sorted first and foremost, if your suspension bounces up and down with little or no damping then it’s time you got it sorted. When you hit a small bump or a large pothole, the suspension is kicked into action but if it jumps around the vehicle starts to move away from where it should be heading, potentially sending you offline into the path of another vehicle or even grandmas letter box! We will be using some higher quality suspension in this build.
The Pointy End
The front forks are being replaced with CNC aluminium items that are both lighter, stronger and more compliant than the stock items. I will also add preload adjusters in a later article. These forks are nearly 30% Lighter than the stock cast items and have machined billet mounts for brake upgrades!

Hold On
The front brakes are a considerable upgrade from stock, if the scooter reaches it’s potential top speed it’s going to need serious stopping power to keep us safe and happy. 4-Piston billet alloy callipers with 22mm pistons will do the trick here. Compared to the factory item on the new one is HUGE

Complimenting this lovely looking item is a 220mm wave disc, this is 80mm larger than the factory item and has an aluminium carrier where the factory is solid steel. So losing mass and unsprung weight will help the suspension work much better.

With all this stopping power and grip from the performance tires (I’ll get to those soon) the suspension will still need a hand, we need to brace the chassis to stop it bending when we are pushing on! Below is a CNC frame brace that will strengthen the body and will radically change the handling for the better. it will attach like the following pictures.

The Way Back

Technically as well as optically, this rear shock is based on Fournales shock absorbers. However, it cannot compete with fournales lightweight construction. In contrast to Fournales, This uses an oleo-pneumatic spring. This allows for a straight-forward setting-up thanks to a high pressure manual pump: you can easily adjust the stiffness of the pneumatic spring according to the rider's weight, driving style and to road conditions. This is also a progressive rate spring, which means that e.g. the last 10cm of spring motion require much more force than the first, which ensures both a smooth ride and response handling over rough surfaces.
The Goodies!
Here is some photos of the rest of the chassis parts that will be used in the build as well as the digital dash.


I will be assembling the engine this week so will update with some tips and tricks
Thanks for reading!


 Excellent article..very inspiring and loaded with good info for any aspiring builder/tuner! I myself have been sitting on a brand new high dollar Aluminum/Nikisil cylinder with a 47.6mm bore and massive 'bridged' exhaust port. I build some real powerhouse 2T's using lower cost big bore kits that I get from my wholesaler. In fact I have sold MANY of them to folks here that made some very fast scoots with them. The reason I have yet to use my high dollar big bore kit is that due to its radical porting and massive 'bridged' exhaust port...I was informed by many that it would need a stroker crank for more swept volume and a stuffer crank to ensure a higher primary compression to properly fill the cylinder..as well as a larger pipe than my Techigas Next R to help scavenge and utilize the larger exhaust volume from the engine. A stroker I can find..a stuffer I can find..BUT a combo of both is hard to find unless I sell a few of my body organs while still alive and send every penny I have to RacingPlanet.com...
  But I did find this incredible deal and hoping it is of good quality...

 But first I would have to sell one Kidney..a Testicle..a Lung and several feet of Coronary Arteries for By Pass Surgery patients just to buy a good crank.. Unless the Stroker/Stuffer that Autotech355 sells is a good quality one. Wonder if anybody here has used one??.


