|
|
Post by repherence2 on Mar 13, 2024 23:02:17 GMT -5
from 17,050 views to 22,617 views on page 3 of "Builds"
for the people that have been coming to 49ccscoot.com to check out this thread, sign up an contribute to this forum.
i honestly find it ridiculous at the amount of views that this SYM dd50 engine build has garnished. big thanks to Brent and the 49ccscoot.com family for keeping this site alive. i haven't been on here in a while. it just tripped me out to see this tread hit 22K views... for a DD50 engine build.
i think im going to get back into it. the bike has been sitting for months in the back of the house in "mock up" status. but, my new Supervisor has a welder and can weld, so i will finish fitting up the engine mounting bracket and have him weld it up. then im going to have my Bonnie get me a wiring and ignition harness from Am@zon for a 4 stroke, and get a 4 stroke type gas tank (no oil reservoir) and run premix.
i been slackin' on this project for a while. let's see how this goes.
---to the lurkers, it's time to sign up and contribute. this is the Best moped forum that i have come across. Thank you Brent for providing us with this place.---
|
|
|
|
Post by repherence2 on Oct 21, 2023 1:56:53 GMT -5
Earlier, I tried to kick start it before I left the shop and it would not start. I sorta felt like it was not getting spark but I did not have time to check. I never had this scoot running since I owned it so I thought it may be an electrical problem or even the random CDI I used. I just realized I forgot to turn the key on while trying to kick it. LoL 
i have kicked and kicked for over 20 minutes before.
...only to realize the key was not in position.
|
|
|
|
Post by repherence2 on Oct 21, 2023 1:52:00 GMT -5
I made a divider from some aluminum and wedged it in there, not perfect but not much I do is. Without changing anything I set off for the house to eat dinner. It has definitely changed things, the carb will need a complete retune. I am not sure if it stayed in place but after I got back to the warehouse I pulled the filter off and the divider was in the bottom of the filter. I think I am going to try and tack weld it in place at the mouth with the TIG. 
my first plate was just like yours.
same like how yours protrudes past the carb mouth. i rounded over the ends, and then i intalled the tea strainer mesh over the mouth. i used a snug hose clamp to draw tension on the screen as i pushed the clamp on the the carb rim. then i tightened up the hose clamp.
when i first did it, i was running a Polini bell mouth. the bell mouth fitment with the mesh was tight and it tensioned the mesh, like how a percussion drum is tensioned. when the plate protrudes, and you tension the mesh over the face, the mesh applies pressure/force to keep the plate pressed up and seated in the carb mouth. cutting grooves and seating the plate in the groove makes it more secure and firm.
what you made/fabricated was on point!
did you damage the carb mouth by trying to weld the plate to it?
|
|
|
|
Post by repherence2 on Oct 21, 2023 1:29:51 GMT -5
I was looking up the carb splitter/venturi dividers; thinking that the "bolt-on" was probably like $25 since there's not much to them. I was a little off. On the page below, ₤125 + ₤5 shipping to total ₤130. At the current exchange rate, that's $159.84. You can get a whole big PWK for less. It's so bad that I honestly wasn't sure if it was a joke.
yep, that's why i made my own while i was killing time at work. i basically made it our of a "scrap" metal from a used pipe flange cleanliness blank.
pure thought, labor, and tinkering to finally get mine to fit. but when working with aluminum, using files and coarse sandpapers make Fitting easier.
just like you, i was not about to spend that kind of money on a Venturi.
|
|
|
|
Post by repherence2 on Oct 21, 2023 1:19:00 GMT -5
Never heard of a contour gauge before. Looked it up. Now I've found another tool that I suddenly need. lol repherence2 : One thing that I never saw you answer is, how is it attached? I've seen some that appear to be epoxied in. Some that look like they notched the carb mouth and made the divider wide enough to fit the notches there. Others were a whole bell mouth design. Your pics kinda look like they're just sitting in there, but I'd think they could at least rotate that way.
my bad Boss, i haven't logged in for a while.
the first divider i made, i used GOOP/ShoeGoo to stick it on. the lead edge of the plate protruded past the carb mouth face about 1.5mm, it was not flush with the carb mouth face plane. at that time, i also ran the Tea Strainer Mesh as a filter, it functioned as a retaining element as well.
i also tried some Permatex. i had some Permatex from work that we used on a reduction gear casing. i figured that if it could hold up to Lube Oil, it would have a chance of working. it worked for a while but over time the adheasive/sealant failed. could have been due to vibration and not cleaning the metal good enough (degreasing) prior to using the permatex.
my final version, i looked at the Rich's Taylor'd Porting site, and to me it looked like they had a groove for the plate to "seat" into. so i marked the half-way point of the carb mouth contour and scribed it. then i ran a coping saw blade through the carb mouth, and used the coping saw to cut the groove.
people need to understand that i had a cheap OKO PWK to do research and development. they are cheap carbs, so i did not have any apprehensions of messing it up. i had a back up OKO anyway. so i went for it.
so as far as glue or adhesive, i would not know really what to use. but i have found that running the mesh as a sort of retaining element, combined with the grooves on the contour for the plate to "seat" into, it combines to keep the plate in place.
i ran the mesh as F.O.D. protector. we have Basalt Blue Rock here in hawaii. this rock is much harder than rocks on the Continents. our roads is paved with blue rock. ingesting small particles of blue rock through a wide open PWK carb can be detrimental to the guts of the engine.
bottom line, like you mentioned, the key to Ensure it does not have a chance to rotate. once it rotates, it does not function as well.
|
|
|
|
Post by repherence2 on Oct 8, 2023 21:35:06 GMT -5
I do remember you telling about the divider before and I have been kicking around how to build one since I have been wasting so much time on tuning this carb. I have no doubt it will help get the carb dialed in easier. How is it attached? Looks like a bit if a PITA to make one.
i totally get it.
yes it does take some effort to make the pattern out of card stock. i use a Compass/Divider to transpose the contour of the carb mouth.
if it is a 28mm carb, i cut out a strip of card stock to the "carb size". so if it's a 28mm carb, i cut a strip of card stock that is 28mm wide. i draw a center line at 14mm. then i take a grade/elementary school compass and use it as dividers. i set it to 1/2 diameter of the carb, i use that to transpose the contour of the carb mouth. if the carb is 28mm, i cut card stock to 28mm width. then i inset it into the carb throat. using a compass, you put the hard point on the carb mouth side and the pencil/graphite point on the center line side. while running the hard point of the compass along the carb mouth, you transcribe that contour onto the card stock.
if not, the other option i thought of would be to use clay of plastocine get a mold of the carb mouth, and then you cut to the clay in half to get the carb mouth contour profile and trace that onto card stock to get a pattern.
what size PWK carb is your POLINI?
|
|
|
|
Post by repherence2 on Oct 8, 2023 20:12:04 GMT -5
finally came back to the Forum. Oldgeek, try looking into a Venturi Divider. i was reading your thread and seen that you have been having problems sorting out the Polini PWK. i encountered problems with the Chinese Oko knock off carbs and the genuine Taiwan OKO PWK carbs. my solution was a Venturi Divider that i first seen on Rich's Taylor'd Porting website. i made my dividers out of aluminum plate. i have also experimented with clear polyethelyne plastic from the hobby shop. for large PWK carbs, the Venturi Divider makes a big difference in my experience when tuning the PWK type carbs. the way i see it, the flat slide face fucks up the air flow and vacuum characteristics versus a round slide. i am just saying this because my experience tuning a Polini CP24 was much easier than tuning a 26 and 28 PWK carb. i think the Slide makes a big difference when it comes to low throttle performance. ever since i started using a Venturi Divider on my large PWK carbs, 26mm-28mm Knock-off and genuine OKO, i have had no problems with the PWK carb. I liken it to something like VTEC on Honda's or "reverse VTEC". from 0 to 1/2 throttle, you get better velocity and vacuum with the Divider. similar to VTEC, the intake profile as far as velocity is concerned, changes. when you run the divider, low to mid throttle is a lot smoother because of the way the air flows and the amount of vacuum the divider induces from 0 to 1/2 throttle. it is So much Easier to tune a large PWK when it has a venturi divider. from 0 to 1/2 throttle, the way the air flows with a divider increases the vacuum and the air is less turbulent because the incoming air is not hitting the flat face of the D slide on the PWK carbs. all i am saying is this, i think your tuning troubles with the PWK carb would be solved with a Venturi Divider. i know it works for me.  vertical and horizontal diffuser i made out of hobby polyethylene plastic. 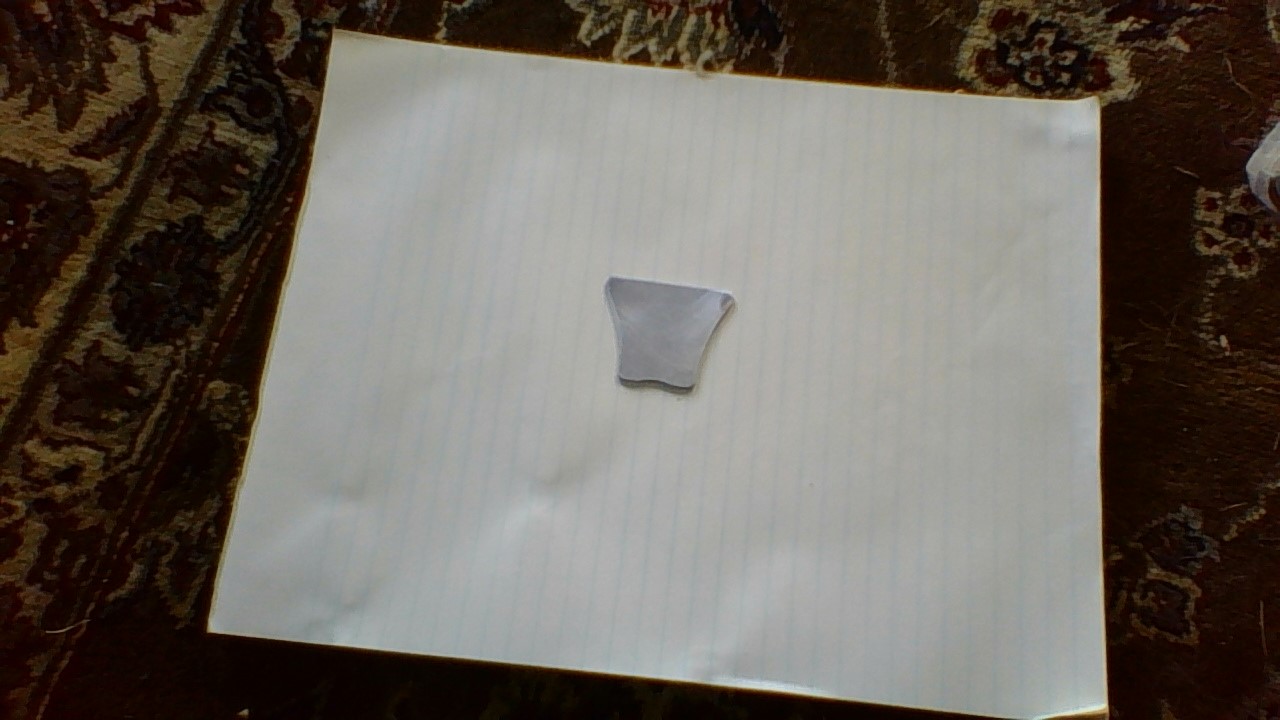 aluminum diffuser plate.
diffuser in the PWK carb
|
|
|
|
Post by repherence2 on Oct 8, 2023 19:49:47 GMT -5
I have a home brew pipe I'll send you if you like..
C16 spec Peace Pipe....?
|
|
|
|
Post by repherence2 on Jun 14, 2023 22:56:22 GMT -5
|
|
|
|
Post by repherence2 on Jun 14, 2023 22:26:14 GMT -5
**i just checked Grainger and they have a listing for M5 key locking threaded insert. it says $32 for a package of 5. we have a Grainger here on Oahu in Mapunapuna. maybe they have it in stock or they can bring it in for you.** |
|
|
|
Post by repherence2 on Jun 14, 2023 20:31:16 GMT -5
do you guys think I couldbget away with adding jb weld to the enlarged holes and then tap for the original m5 bolts? that way I couldbuse a brand new s6 sator plate that happens to fit this ignition and the matching bolts. this would elimnate my original issue which I believe was the enlarging of one or two of the wholes on the mallosi plate. let me know thanks. Brahdder, did you already tap one of the holes to M7 size? In my craft, for your situation, the hole would be plug welded. The hole would be opened up a little bit with a burr grinder and then the hole is filled in with filler metal. After that, machine/file/grind the surface flat. Take the new stator plate and use it to target the new hole to be drilled. However, if your hole is already drilled and tapped for M7 threads, the only way I can see you making it work would be to use a thick wall insert. The solution that came to my mind was to see if an M5 Keensert could be used. Regular Keenserts are much bigger in diameter than a Helicoil. I'm on the bus using my phone now. When I get home and get on the computer I will posts some links/pics. Take your time. Go Easy Easy. No rush. If you need help, hit me up Brahdder. |
|
|
|
Post by repherence2 on Jun 10, 2023 14:51:47 GMT -5
I just switched to the ZX transmission CVT on my Honda Elite and I have a better takeoff and better hill climbing ability. But my top speed is less. Last time I put on a new belt using the old regular S = elite transmission, I had about the same top speed as I do now, until I put in heavier roller weights. I am seeing this and trying to figure out the magic to CVT tuning. I had previuosly on the old S- trans, 5grams until I put the new belt on, and then switched to 5.5grams and then got a higher top speed. I'm sure the bigger rear driven pulley on the ZX will give me always a better takeoff and better hill climbing ability than the stock S Elite trans. So having lighter rollers now for better takeoff isn't as much of an issue now. When you say "ZX transmission" is that; Rear Pulley, Belt, and Drive Boss? Or just ZX rear pulley only. The way I see the CVT, with the weights, you are simply choosing the RPM at which you want the variator to start working/shifting. The heavier the weight, the lower the RPM at which shifting occurs. With lighter weights, you need more RPM for the weights to start moving outward, thus shifting happens at a higher RPM. Center spring, I use that to determine downshift rate and hill climbing ability. If your riding entails climbing hills, you may want to tune so that the CVT downshifts enough so that the scoot does not lug up the hill. Heavy/firm center spring is super fun when in tune but it wears down belts and rollers and builds up lots of heat. |
|
|
|
Post by repherence2 on Jun 9, 2023 9:24:15 GMT -5
Thanks again brother REPH2, Think the boat that you gave me a link to is gonna work just fine all I'll have to do is taper the head flange so it's an inlaid instead of a flat head, If you happen to know a good way of doing this let me know I haven't touched it yet but it did just come in the mail an hour ago. Looks like really good skill too and it was $8 with no shipping fee and got here in 2 days! I'm definitely gonna have to redo the threads in the aluminum or at least deepen them because they don't go all the way to the back at the moment But there's still a piece of a stud in one of the holes I'm gonna drill out right no so let me get to that thank you for putting a spark back in this dream of mine.
no problem Braddah Joey. you helped me out when it was dry, now i got your back. that's how we live Aloha.
be careful on your approach to deepening the hole. you do not want to puncture the case by drilling too deep. if the screw/bolt it too long, you can always shorten the length by filing the end with a file or grinding it back with a grinding wheel/bit or a dremel with a drum sander.
irie-lab idea for taper of head.
put several wraps of masking tape on the threads. chuck up the threaded part of the screw in the drill. the masking tape is to protect the threads from damage from the drill chuck. run the drill and use a file to cut the angle. in essence the drill is you "lathe chuck" and the file is the "tool bit". just remember, files only cut in one direction, pretty much only in the forward direction with the file handle being the back of the file. so you have to have the drill in the proper direction in accordance with the direction in which the file "cuts".
|
|
|
|
Post by repherence2 on Jun 7, 2023 22:53:29 GMT -5
what would I lower? pilot? raise needle clip?
by the way, what size are the Pilot and Main jets?
|
|
|
|
Post by repherence2 on Jun 7, 2023 22:45:12 GMT -5
thoughts from the irie-lab...
your fuel flooding. i think, like what 190mech mentioned, you probably should adjust the float setting because of the angle at which the intake manifold is, it is not parallel with the ground/gravity. so, the way i see it, your float valve is not fully seating shut. so when you are not running your bike, fuel is slowly getting past the float valve and flooding your engine. i have a manual shut off valve that i pretty much never use. it pretty much always stays open unless i need to work on the carb. i use it more as an isolation valve. however, i run the forward facing CT manifold from taiwan and my carb bowl sits parallel to the ground, not at an angle.
i think your float valve may be contributing to the symptoms while the bike is running, sputtering and coughing.
the other idea that came from the irie-lab was that your Main Jet is probably too fat/big. you are running a power jet carb. those carbs have to be set up a little bit differently in approach. if you want to simplify it, you can block off the fuel line that goes to the power jet with a BB (ball bearing) to nullify the power jet circuit.
i ran a 26mm OKO knockoff with a power jet. it was a challenge at first, but once you understand that there is 1 more fuel circuit, that comes online on the top throttle range, then it becomes easier to tune. if not, the PWK type carbs with a power jet can be a nightmare to tune. it is marvelous when it is tune though.
if you insist on running that carb, get yourself a Cylinder Head Temperature gauge. i will make tuning the carb much easier. by watching the temps, you can tell when the power jet starts to come online, you see the temperature change as you go from 3/4 to full throttle.
at least you run a pod foam filter. i ran my 26mm power jet fOKO filterless. i run my 28mm OKO carb with a stainless steel tea-strainer mesh. your carb should be easier to tune than the 28mm that i run because your 21mm carb will have higher intake velocity. but i can also see that being a pain because the transitions of the 5 circuits would be faster than it is on my 28mm carb. the only drawback with that foam filter... if you are ever riding in the rain and your pod filter gets wet, it will be a nightmare because the bike will run like crap. here on Oahu, you ride past 5 districts/valleys and have full sun, and the next moment come upon the next valley/district and encounter full on pouring rain, only in that district. my UNI pod filter would get wet and i would always have the shittiest time limping the bike back home because it ran like crap, because of a wet foam pod filter. after too many days like that, i decided to switch to the forward facing manifold, 26 OKO and later a 28 OKO, no air filter, because carb mouth is too close to the frame. no more shitty days in the rain after that.
1) get a temp gauge. 2) either try to understand and visualize how the Power Jet adds a 5th circuit on the top throttle range or disable the Power Jet by blocking the fuel line. being that yours is a 21mm carb, your Power Jet circuit might be coming online just past 1/2 throttle because of the intake velocity. Power Jet circuit is dependent on vacuum. in my experience, once i understood the power jet, the carb was a beautiful thing. 3) Beware of Wet foam pod filter. 4) adjust your float angle.
|
|


