|
|
Post by AtariGuy on May 13, 2018 15:10:40 GMT -5
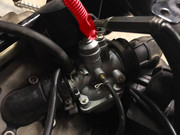
The hose on the far left going straight down into the carb, thats where your petcock should plug in. Otherwise all else looks correct
|
|
|
|
Post by frankj on May 13, 2018 15:27:49 GMT -5
So swap the hose with the coil spring around it with the one in the left of the pic, as we look at it? As they are now I finally got fuel to the bowl but I achieved that by eliminating the vacuum line and using a on/off petcock.
|
|
|
|
Post by frankj on May 13, 2018 15:45:46 GMT -5
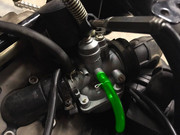
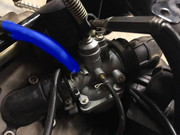
   So the line colored red is my fuel line, the blue line is my vacuum line and I’m not sure what the green one is. Any help? Also, are the other two lines correct? I truly appreciate everyone’s help and patience. |
|
|
|
Post by geoffh on May 13, 2018 16:20:03 GMT -5
frank,red and blue are correct,the green is the oil supply line just a tiny spurt of oil per cycle, you should be good to go ,but your mixture screw looks out of whack(right of the green line) turn it in all the way then back out 2 turns as a rough guide.
geoff
|
|
|
|
Post by frankj on May 13, 2018 17:14:42 GMT -5
I am at a loss. I don’t know what to do next.
|
|
|
|
Post by frankj on May 13, 2018 19:44:48 GMT -5
Geoff, could the mixture screw being out of whack stop it from starting?
|
|
|
|
Post by frankj on May 13, 2018 22:01:05 GMT -5
How can I check the fuel system to see if it’s working properly. I know we have discussed this all week but I’ve messed with it so much I feel like I may be missing a step.
|
|
|
|
Post by AtariGuy on May 14, 2018 0:54:22 GMT -5
If you installed the on/off switch, that vacuum line in blue should be blocked off. The local auto parts stores sell little rubber caps (called vacuum plugs) that fit over those nipples. Now that you're getting fuel to the carb, you're a step in the right direction! Just need to make sure it all gets to the engine correctly. Once you get a cap on that nipple, you should be good to go! I'll try to get a picture of my carb setup for you to see. Just keep in mind, you use an oil injector (green hose in your picture) and i dont. I premix. |
|
|
|
Post by AtariGuy on May 14, 2018 2:16:44 GMT -5

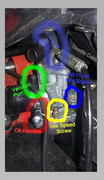
(Click for a bigger image) Here's my carb and I tried to ID some of the most relevant parts you should understand. Mind you, this is not exactly your specific carb, but the circled parts are pretty universal for 2 stroke injection carbs. The circled part in green is the vacuum port. I do not run a vacuum petcock, so i use a vacuum plug. If you use a vacuum petcock, the hose would run from here to it. If you leave that hose open to outside air, it will throw the air fuel mix your engine needs to run way out of bounds and your engine won't run. Find some way to plug it up tight if you use a shutoff valve. The port circled in red is the Oil injector port, that hose typically runs along the plastic fan shroud over the cylinder and down under the stator/fan area. As i mentioned before, I removed my oil pump and went with pre-mixing. This plug is just one of the steps in switching to premix. ( 49ccscoot.proboards.com/thread/564/remove-oil-injection-system ). Circled in the solid blue is the air / fuel mix screw. You will want to be sure your fuel mix screw is set to roughly the factory settings, a starting point for adjustment. Start by getting a lightweight screwdriver and turn the screw in -just barely- snug, feel for the screw to just touch the bottom. Then, loosen it, but count 1 1/2 to 2 turns out. Once you get to that point, get a sharpy marker and draw a line from the screw to the carb - mark it somehow before you adjust that screw any more after that. In solid yellow is the Idle Speed adjustment screw. It's literally a stop that the slide inside rests on and keeps it open juuuuust enough to keep a steady idle. To reset this back to a factory starting point, start with unhooking air filter from the carb so you can watch inside the carb at the slide - loosen your idle speed screw until that slide reaches bottom - as closed as it will go with the screw just barely touching the slide, then turn the idle speed screw back in 1 1/2 turns. Again, mark it with a sharpy like you did the AF screw. At that point, the carb should be set up to run the engine, let us know if any of this gets the scooter running - or at least sounding like it almost wants to start. |
|
|
|
Post by frankj on May 14, 2018 11:25:03 GMT -5
Atari Guy,
First off let me say thank you very much for taking your time to help. I truly appreciate it, I appreciate everyone's help. What a great forum and online community. I will give this a try when I get home, I'm at work now. Thank you once again. I will update you, everyone, ASAP.
|
|
|
|
Post by geoffh on May 14, 2018 15:21:03 GMT -5
frank,hope your having fun and don,t despair I,ve just been back to page one for a look see and I used my bifocals properly this time.Your scoot has been modified by someone in the past and they have butchered the air filter box there are a series of air holes drilled in it. either replace the box or seal them up with duct tape to get you running Atari,s settings are spot on but thats assuming a standard air box is in place.Don,t replace it with a pod filter best to seal the old one up after a dammed good clean.
geoff
|
|
|
|
Post by AtariGuy on May 14, 2018 18:13:24 GMT -5
Geoff nailed it, scooters are fun. Well, they're supposed to be. For a lot of us, building/rebuilding is just as much a hobby as riding. It gets frustrating at times when you want it to run - when you EXPECT it should run - but don't give up hope, there are lots of us here who've been in your shoes and turned to the forums for advice. Patience and diligence pays off though, so stick with it. Geoff mentioned the airbox, thats - strangely - a very important aspect of carb tuning. I recommend checking on partsforscooters.com for a stock replacement air filter - www.partsforscooters.com/161-225-Minarelli-Air-Filter-Assembly - that should get you back to basics. Or duct tape up most of the holes for a temp fix, just leave the stock air inlet hole on it |
|
|
|
Post by frankj on May 14, 2018 21:24:11 GMT -5
I have tried everything suggested and still nothing. I tried to kick start it and tried starting with the battery and nothing. It turned over with the battery but not even close to starting. I am draining battery though. With that being said what it the right way to kick start it? Also, the plug is still dry.
|
|
|
|
Post by geoffh on May 15, 2018 14:39:31 GMT -5
Frank,if you now have fuel in carb bowl next check the jets are clear, they unscrew and you should see light through them. if not use a pin to clear them.Use the kick start untill its running again,no right or wrong way to do the kick maybe try a differnt throttle postion is all you can do.Check for engine compression by placing your thumb over the spark plug hole you should feel it pushing against it.Hang in there.
geoff worth saying but you have to put every thing back together each time you try it
|
|
|
|
Post by frank50e on May 15, 2018 23:07:10 GMT -5
I am the last person on here to suggest just “throwing” parts at a problem but carbs are cheap and being an 04 it’s possible a P.O. let it set forever without running and the pilot jet system on these little carbs are so tiny it’s sometimes almost impossible to clear them.Try a new carb.If you have spark and at least 100#s compression gotta be fuel.All the advice you have gotten is valid but I have gotten to lazy to spend the time cleaning a seriously gunked up carb.JMO
|
|