|
|
Post by scooternub on May 14, 2021 16:29:00 GMT -5
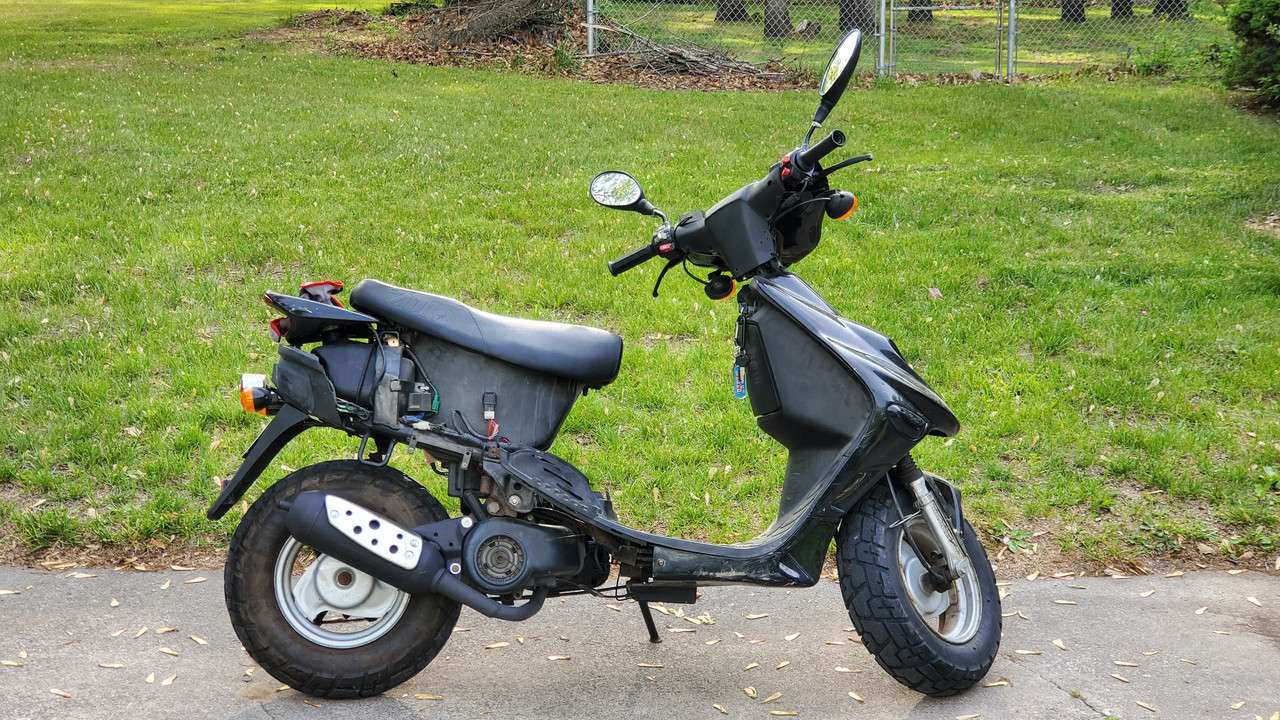
df41590Prob with this is I don't have a center stand, previous owner broke or took it off, 2strokd stated if I remember correctly, said that he tried getting that pin out and pounded on it. Thats who i got it off if but he was selling it for a family member. 
|
|
|
|
Post by scooternub on May 14, 2021 17:10:28 GMT -5
I think trying to remove that pin is a lost cause. I was reading horror stories about the center stand pin corroding weld to the inside.
I wanted to put a new center stand on it in the beginning with when I first got it.
|
|
df41590
Scoot Enthusiast

Posts: 285
|
Post by df41590 on May 14, 2021 17:32:15 GMT -5
Do you have foot pegs for a passenger on the scoot, if not do you have blank bolt holes where they would be? You can put a jack stand (where i'm pointing in my pic) or if you have blank holes ut a long bolt into the hole on both sides with it being high enough for the rear wheel to be off the ground. Then when you pull the engine mount bolt use your other hand to hold on to the cylinder so it doesn't fall and hit the ground.  As for the center stand pin it is likely bent (had this issue on one of the scoots I bought) could try heating the aluminum around the pin then smacking on it otherwise drilling it out is the only other way. |
|
|
|
Post by scooternub on May 14, 2021 17:38:53 GMT -5
I got these holes but I don't know what use they be.   |
|
|
|
Post by scooternub on May 14, 2021 17:40:58 GMT -5
I believe the scooter is a lost cause. I know I would not be able to get this pin out that's gone from the frame through the engine through the frame.  |
|
|
|
Post by scooternub on May 14, 2021 17:42:39 GMT -5
I'll just leave it as is. Hopefully we get a fourth stimulus and I'll get a genuine rough house and do a BBK on it. Least everything be brand new and be able to take apart easily to work on.
This just made me so frustrated I just want to throw out the pos out.
|
|
df41590
Scoot Enthusiast
Posts: 285
|
Post by df41590 on May 14, 2021 17:43:20 GMT -5
Have room for a nut on the inside? Could use a long bolt with 2 nuts.  |
|
df41590
Scoot Enthusiast
Posts: 285
|
Post by df41590 on May 14, 2021 17:47:44 GMT -5
I believe the scooter is a lost cause. I know I would not be able to get this pin out that's gone from the frame through the engine through the frame. You'll be able to remove the engine still. that piece goes with it. |
|
|
|
Post by scooternub on May 14, 2021 17:51:27 GMT -5
Have room for a nut on the inside? Could use a long bolt with 2 nuts. I don't understand this part. Demonstration of the center stand pin? |
|
df41590
Scoot Enthusiast
Posts: 285
|
Post by df41590 on May 14, 2021 18:02:42 GMT -5
the light gray is the bolt, dark gray nuts, black is the hole in the frame. though looking at it again you'd have to hang it from there instead of using jack stands they'll likely get in the way when trying to remove the bolt. Mainly what i'm getting at is lifting it by the frame enough to get the back tire off the ground otherwise if you do it with the rear wheel still on the ground when you remove the shock bolt the scoot is going to want to fold in on itself.
|
|
|
|
Post by scooternub on May 14, 2021 18:19:47 GMT -5
the light gray is the bolt, dark gray nuts, black is the hole in the frame. though looking at it again you'd have to hang it from there instead of using jack stands they'll likely get in the way when trying to remove the bolt. Mainly what i'm getting at is lifting it by the frame enough to get the back tire off the ground otherwise if you do it with the rear wheel still on the ground when you remove the shock bolt the scoot is going to want to fold in on itself. I don't know. I was thinking of strapping the frame like this  Then the two 2x4's in and back of tire, then have something like a milk crate under the engine. This i can forsee is gonna be pain in the ass because there is no way to get a new center stand installed. I think I gave up already or just tired and frustrated, sorry. |
|
|
|
Post by Zino on May 14, 2021 21:01:09 GMT -5
I have done enough without removing the engine .
Just requires to roll on the mat and get good lighting and alot of patience.
You will swear a few times compressing the rings and wiggling on the cylinder.
and the wrist pin clips do the first one at your bench and then as you flopping around the floor putting the other one on.
You can expand the 4 letter vocabulary of the neighborhood kids
Once you get it all put back together .
you will understand what we are talking about and will have that bbk smile.
That is the naraku cylinder I was talking about .
Your stock mikuni carb is a good match with that cylinder.
Paired with your tecnigas pipe that will have alot of extra wahoo on takeoff.
|
|
|
|
Post by repherence2 on May 14, 2021 22:53:18 GMT -5
I viewed a bbk 2stroke install video, looks easy but can be difficult for rings and ring positioning and the wrist pin locks, I been considering it. What I would be worried about is the age of the minarelli motor parts like crank etc at over 12k miles if everything would be able to handle 70cc. Thoughts?70
you can do it. we all took that leap at some point. you live and learn and you gain confidence. at least you have this forum. when i first got into modifications i never knew of this forum. there are a lot of experienced and knowledgeable contributors here.
look at it as a learning experience. get that Yasuni R and a 70cc sport bore. yes, i understand you have 12K on the odometer, most times if its a chinarelli it is indicating Kilometers, but that's still almost 7500 miles. i would still sample the 70cc bore kit. enter the Realm and time to Learn. learn carb and CVT tuning in the process.
at some point, you gonna get bit by the 70cc speed bug. then one day, you're gonna end up with a Polini Corsa, full circle crank, and a Yasuni C16. it's like turbochargers and boost, boost is like crack, you just want more and more. LOL.
this forum has great value because of the "technical assistance" provided by other members of this community. it's duck soup (simple). just take your time. no shame ask for help, someone going chime in with advice. if you unsure about something, ask. get a torque wrench to torque nuts to 11 newton meters (8 ft/lbs or 97 in/lbs). in my craft, our torque wrench requirement is 20-90% of the torque wrench range. i.e. specified final torque has to fall within the 20-90%, but then again we pretty much only use snap-on dial torque wrenches (or Hytorc hydraulic torque wrenches for large fasteners), clickers are rarely used. we are required to do 4 increments and then "around the world". for example, 8 ft/lbs final torque. first i would star pattern first pass at 2 ft/lbs (24 in/lb), second pass 4 ft/lb, third pass 6 ft/lb, fourth pass final torque 8 ft/lbs, all four passes done in star pattern. let it sit for a few minutes, and then we go "around the world". torque to 8 ft/lbs in a circle pattern. most likely, you will use a clicker torque wrench. you can look at your first 3 increment passes as "warming up" or "exercising" the click torque wrench, like you are supposed to do.
torque wrench is highly advisable if you have a Chinarelli. Chinesium is some shitty metal. i tried doing it without a torque wrench and i have ripped threads out of the block, then again that was after 4 bore change outs. but i got trained on helicoil inserts at work, so it was a simple fix for me. in my craft all aluminum components secured with steel bolts/studs use helicoils. the navy will never thread/torque steel fasteners into straight aluminum. most likely Chinarelli blocks are pot metal and not full aluminum too. i rebuilt a Chinarelli engine that had 2 compromised block stud holes. i ended up drilling out all 4 stud holes. inserted 1/4-20 Keensert thin wall threaded inserts, converted from M7 to 1/4-20, metric to standard. i just did it because i had access to those Keenserts and high grade 1/4-20 bolts.
it all depends...what do you want for yourself. if it's more speed and power, 70cc sport is fun, 70cc mid race is funner, never did 70cc hyper race, but i have done 94cc and i like the balance of it. enough power to get speed but it's not a screamer, but to each their own.
|
|
|
|
Post by repherence2 on May 14, 2021 23:37:39 GMT -5
I think trying to remove that pin is a lost cause. I was reading horror stories about the center stand pin corroding weld to the inside. I wanted to put a new center stand on it in the beginning with when I first got it.
you can always try a jacking fixture to "press" it out. like i would put a socket on one side, big enough for the pin to fit inside, but big enough to sit against the the engine case to use as a spacer. then i would get a heavy duty C-clamp, one end of the clamping the socket to block and the opposite end pressing on the pin. hammering a steel pin with a steel hammer leads to mushrooming the pin. you will be able to move it, but once the mushroomed end gets to the bore, the pin wont pass through. if you are going to wail on the pin with a hammer, get a brass bar or a large brass punch so you dont mushroom the pin. the brass bar acts as the sacrificial metal.
you could probably use a 2 jaw gear puller to "press" that pin through the hole too. 
the machinist i learned from frowned upon hammering. he was a firm believer in "the power of the threads", hence jacking fixtures that use threads and torque because it's more controlled force using a wrench (i.e. gear puller). hammering can lead to galling because of the shock loads. galling will make it even more difficult to move that pin and cause mushrooming. maybe presoak with Kroil too to make it easier.
|
|
|
|
Post by scooternub on May 19, 2021 10:16:37 GMT -5
Yeah, the belt is longer so it's harder/more expensive just to get a good replacement (Bando). No belt for the OR kit that I know of, but most never use an OR kit. Cases and CVT covers are different, but the good news there is that some ATVs used those and I've actually seen the long Adly CVT covers come up when I couldn't find any good standard Minarelli CVT covers on eBay. If you need the stretched long case Adly specific parts, this may be of use for searches : Adly Moto/Her Chee Scooters : Bullseye 50, Cat 50, Fox 50, GTA 50, GTC/Nifty 50, Jet 50, Noble 50, Panther 50, Thunder Bike 50, Thunder Bike 100, Viva 50 Adly Moto/Her Chee Youth ATVs : ATV 50, ATV 90 Arctic Cat Youth ATVs : DVX 50, DVX 90 Can-AM/Bombardier Youth ATVs : DS 50, DS 90 Lambretta Scooters : Uno 50 You may need to change jets, you may not. I would have a jet kit on hand if it were me, so I know I have it covered if needed and I could try a few to be sure I get the best results. Here are some pipes. Mounts may need slight work when dealing with clone engines, but you should be able to get most Minarelli horizontal exhausts to fit. www.scootertuning.ca/en/19-exhaust-systemswww.scootertuning.ca/en/13-exhaust-systemsThe street stuff that looks pretty standard usually gives you a boost in all around power, but it tends to be mild. The sport pipes should provide more power at higher RPM. The downside being they tend to drop low rev power. Low RPM can be bypassed so it doesn't really matter with stiffer clutch springs and lighter rollers. Some CVT tuning will be required if you want the most from anything beyond the basic street pipes. Hey Brent, all the names of adly scooters you mentioned, if the machine shop can remove the stuck pin for the center stand of my hammerhead, would you know which scooter you mentioned would match the center stand to my scooter? Or are they all same match? www.ajpartsstore.com/schematics/scooter-partsyoutube.com/shorts/msGJ0kETteU?feature=share |
|