furiousbob
Scoot Enthusiast
  
Posts: 128
Location: Pasadena, CA
|
Post by furiousbob on Oct 9, 2022 22:28:24 GMT -5
Update! I haven't had much time to work on this. It's been hectic with family. BUT I got some stuff done tonight. I'm still waiting on the rear shock and the new throttle cable/liner/fittings so the rear end is at a stand still. The original carb setup uses a molded plastic o-ring type gasket. I'm not 100% sure that'll work with the adapter I made so I got some paper gasket material and made a couple new gaskets. I ended up turning my own punches for the holes.  The front, I got the tire mounted after scraping the crap out of one side of the outer rim. I drilled out the fork axle holes to 12mm and mounted the forks using the aluminum shims I made.   Then I went and mocked up the brake rotor on the hub and made a bracket out of some 2" x 3/8" aluminum flat bar I had. 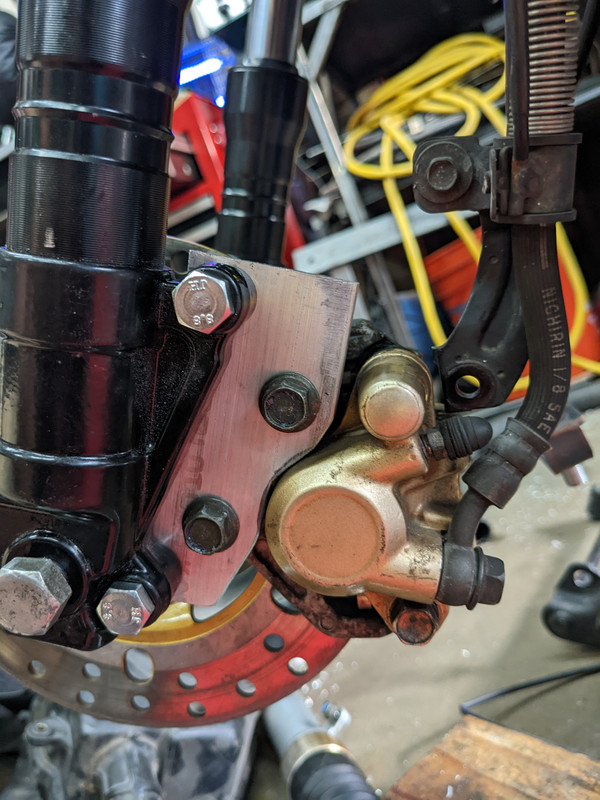 It still needs to get shaped to look more presentable. I didn't mind offsetting the caliper inboard since I was going to make a spacer for the rotor. The rotor ended up being 1/4" too close to the hub in order to keep the tire centered so I turned a hubcentric spacer at 1/4" thick.  This is how she sits now 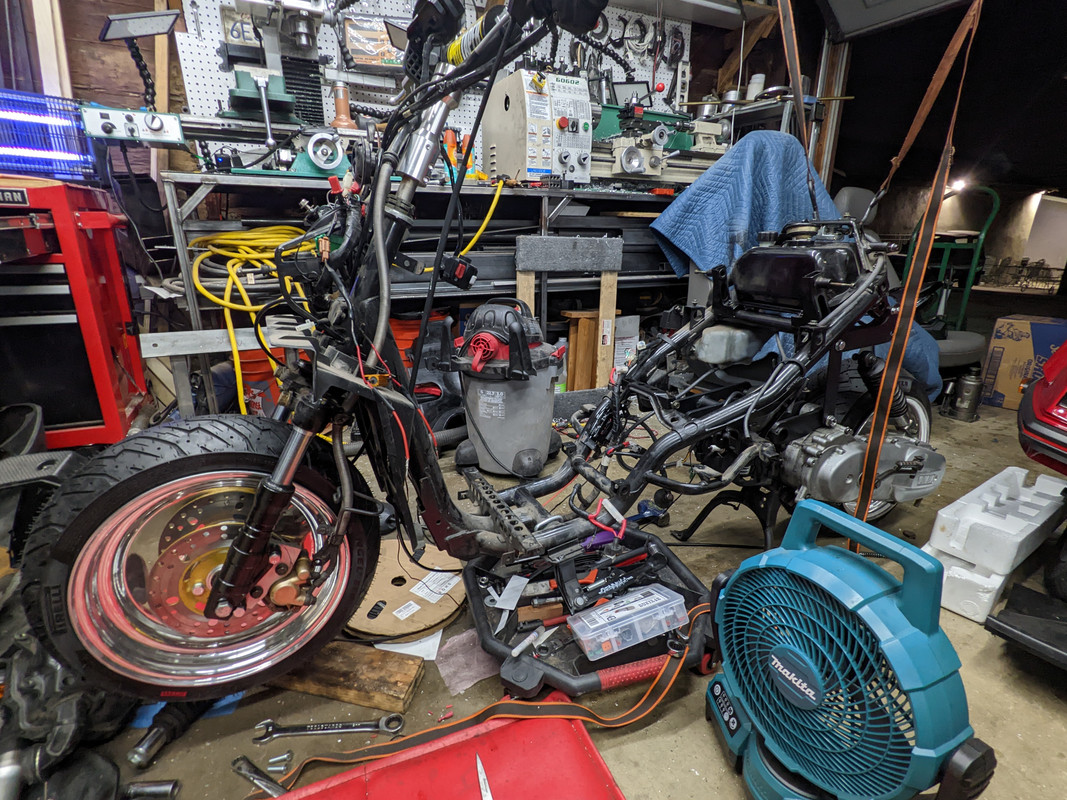 I need to fine-tune the centerline since I'm almost positive I measured wrong and I didn't need that 1/4" spacer to keep the tire on center. It got late and I was tired so I'll figure it out tomorrow. Initially, I thought the spacer was going to have to be thicker since it didn't look like the caliper was going to nestle inside the wheel. It fits just fine, turns out. Tomorrow, I'll re-check my measurements and then make the barrel spacers for the axle. I ditched the original speed sensor since I'll be using the TrailTech's magnet sensor. I'm debating on ditching the Zuma front fender too and making an Aerox fender fit. Not sure if it's worth the $100 for a part that might not work though. |
|
|
|
Post by aeroxbud on Oct 10, 2022 3:09:29 GMT -5
I can get you a picture with measurements of an aerox front fender if you want some. Just tell me what you need.
|
|
furiousbob
Scoot Enthusiast
  
Posts: 128
Location: Pasadena, CA
|
Post by furiousbob on Oct 10, 2022 10:49:21 GMT -5
Thanks for the offer! I'm not entirely sure what I would need. I know the Zuma fender is top mounted to the fork tree but the Aerox is mounted to the forks itself. I think all I would need is a measurement from inside the forks. I can make my own clamping system to support mounts, I think.
|
|
|
|
Post by captincvmn on Oct 10, 2022 11:15:51 GMT -5
I just watched the bar surveillance camera footage. Ouch.
|
|
furiousbob
Scoot Enthusiast
  
Posts: 128
Location: Pasadena, CA
|
Post by furiousbob on Oct 10, 2022 14:30:13 GMT -5
I just watched the bar surveillance camera footage. Ouch. Yeah it makes me cringe every time. |
|
furiousbob
Scoot Enthusiast
  
Posts: 128
Location: Pasadena, CA
|
Post by furiousbob on Oct 17, 2022 22:49:31 GMT -5
Alright so I received the extended brake cable/liner. I have a solder pot and a battery terminal crimp tool that looks like it'll work. I'm not 100% sure how to do this so I'm going to procrastinate by doing other stuff. Center stand! Doesn't clear. Womp womp  So I make it clear  And add reinforcement since the factory one looked like it had a ton of reinforcement  This looks really dumb. I had to fly to Oregon for some work so I shelve the project for the weekend. Went and swung by McMinnville to check out the spruce goose.  Pretty cool in person. Anyway, back to work. Got the new rear shock in the mail. It BARELY clears the wheel with maybe 1/16" clearance. I'm hoping the spring won't rub when it compresses. If it does.... I'll need to figure something else out but that's a future me problem. Ride is now stupid low. Kickstand is about 2" off the floor. Will definitely not clear a turn. I've cut it apart and I'll weld it up tomorrow. BTW, shock is from a Yamaha Jog 50. 12mm up top and 10mm bolt down below. All spacing and original Zuma hardware fits perfect. Zero modification needed. 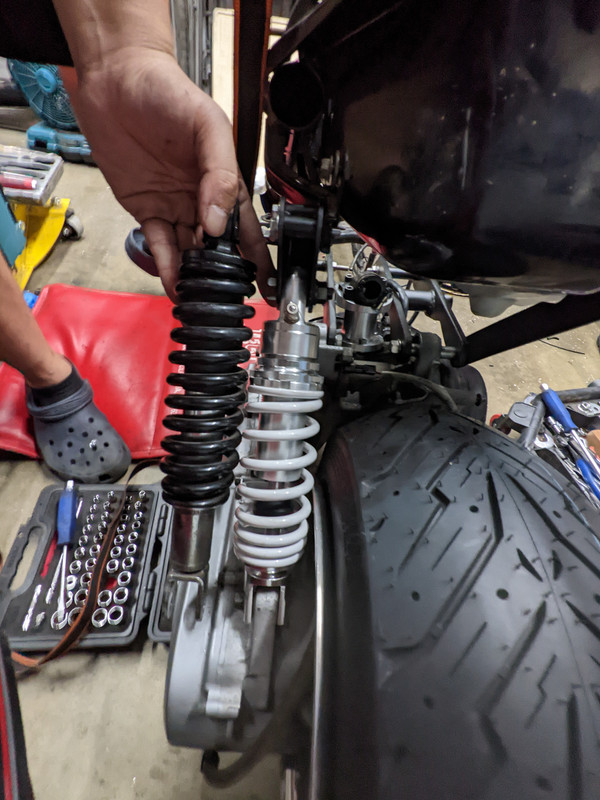   And then I remade the center stand. The tube is 0.75" at 2.5mm or 14ga or .080 wall. I used 0.85" tube at .125 wall that I had lying around. Flat was made with oxy torch and vice, bend is made with my JD2 bender.  |
|
furiousbob
Scoot Enthusiast
  
Posts: 128
Location: Pasadena, CA
|
Post by furiousbob on Oct 17, 2022 23:00:12 GMT -5
Forgot I missed an update on the centerline for the front wheel. Turns out I didn't need the 1/4" spacer. This presented another issue, no hub ring. Without the hub ring, the rotor would rub against the inside of the caliper in certain spots. I decided to dig deep and get accurate. I turned an aluminum hub ring for an interference fit with the hub and a slip fit with the rotor. Got it to within 0.001" on the ID and maybe 0.005" on the OD of the ring. Stuck the ring in the powdercoating oven for a half hour and the hub in the freezer. It slipped on perfectly. No more rotor rubbing.  |
|
|
|
Post by repherence2 on Oct 18, 2022 22:12:53 GMT -5
furiousbob Keep on Truckin' with your Works. you do Interesting things. I Appreciate You for sharing your Work and Passion with Us. Keep up the Great Work my Bruddah! no be shame to Share, you do Great Work. =)
** Game recognizes Game here. Never be shame to Share with Us your Game/Style/Talent. ** 90GTVert provides this forum for us to share Knowledge and Ideas, Everyone is a part of this Greatness. keep doing you, but always remember to Share your Works with Us.  |
|
furiousbob
Scoot Enthusiast
  
Posts: 128
Location: Pasadena, CA
|
Post by furiousbob on Oct 19, 2022 22:23:13 GMT -5
furiousbob Keep on Truckin' with your Works. you do Interesting things. I Appreciate You for sharing your Work and Passion with Us. Keep up the Great Work my Bruddah! no be shame to Share, you do Great Work. =)
** Game recognizes Game here. Never be shame to Share with Us your Game/Style/Talent. ** 90GTVert provides this forum for us to share Knowledge and Ideas, Everyone is a part of this Greatness. keep doing you, but always remember to Share your Works with Us.  Thanks for the kinds words! I'm really happy to have this forum. It started out as a place to whine and complain about my 50cc issues but quickly turned in to the only place I could dump my work. I tried sharing this stuff with friends on social media and I was always met with a lukewarm reception. I'll keep posting as I go along. I was originally rushing to beat my buddy at his build but the more I forced myself in to this project, the more weary I became. I'm taking my sweet ass time now hah. I'll try and upload progress once a week until she's done. There's honestly not that much left, though. I'm currently re-making my carb adapter since lowering the rear end forced the carb bowl to angle up. After that, I'll tackle the throttle cables, the kick stand, respraying any black plastics, fitting my speedo sensor and then finally I get to slap on all the new black plastics I bought. THEN I still need to figure out fenders. I'm thinking the rear will have to be fabricated. Nothing fits this thing. It'll probably be thin steel sheet. Oh and then I'm reupholstering the seat with a brown cover to go along with my brown Oury grips for that "black and tan" look. Anyway, thanks again everyone for your support! |
|
furiousbob
Scoot Enthusiast
  
Posts: 128
Location: Pasadena, CA
|
Post by furiousbob on Oct 21, 2022 22:01:49 GMT -5
Ok I remade the carb adapter for an increased angle. Took two nights' of work  And then I realized I shit the bed and forgot to mirror the mounting bolts when drilling the adapter. So I got on the mill and used an endmill to relocate the holes. Voila  This is how it sits now   Perfect. Now I had no more excuses. I had to tackle the throttle cable(s). I decided to start with the pull cable. I ended up only doing the pull cable and deleting the 2nd cable. A quick search on this forum told me I needed to add a throttle stop. I added an M5x0.8 bolt to the throttle housing  I finished cutting the cable/sleeve and soldered the ends on. Seemed to work okay minus adjustments. I had to pause and jump on getting my generator running so I could have 220V for a welding job tomorrow. Jenny won't start so I cleaned the carb. Still nothing. Waiting on a carb rebuild kit from Amazon. Tomorrow, I need to re-attach the center stand and weld up the kick stand. I've put in an order for an Aerox 50 front fender and I'll pick up some SEM trim black tomorrow from a local spot so I can start spraying the black plastics. She's so close to being done. |
|
furiousbob
Scoot Enthusiast
  
Posts: 128
Location: Pasadena, CA
|
Post by furiousbob on Oct 25, 2022 22:13:50 GMT -5
Small update. Here's how she sits right now. Looks kinda cool. 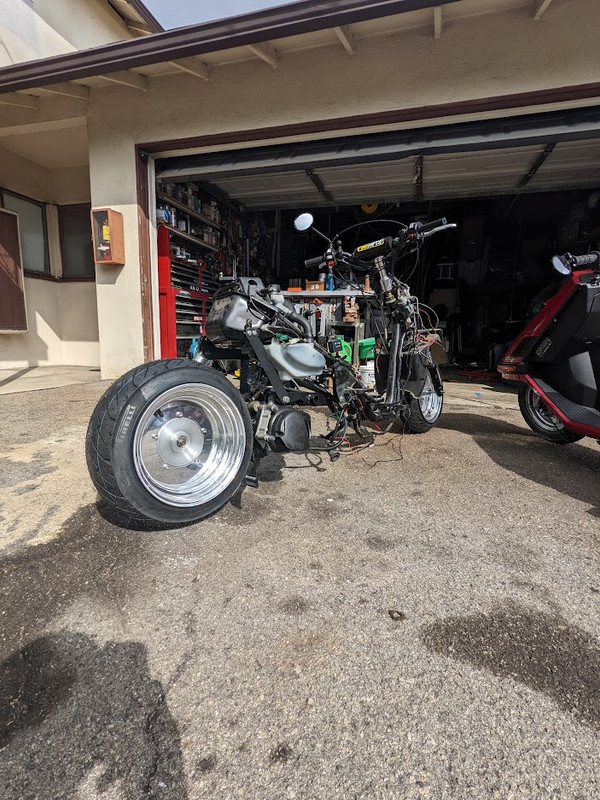 Worked on the exhaust. Turned spacers to space the exhaust mounts out about 2.25"  The exhaust uses 1.25" tube at .060" wall. It was Sunday and I only had .120 wall tubing on hand  Luckily, the existing exhaust is carbon steel and not stainless steel. Easier to weld but I was surprised it wasn't SS? I'll probably leave the tube uncoated. Anyway I had to turn down a buncha tubes to work with. Successful on the third fitment attempt. Tubing was tacked with MIG and burnt in with TIG. My TIG skills suck... but my MIG skills on tubular welds aren't much better. At least with TIG, I get to burn back over the ugly welds and make em less terrible.  Fitment is better than before, to be honest. I remember I had to wrestle that exhaust on. Now it just bolts right up!   Then I tidied up some turn signal wiring with deutsch connectors and started the front end. I noticed I was missing the two reflectors on the front so I eBay'ed some in. Moved to the main storage bucket. I really didn't want to sacrifice any storage space because I love using this thing as a grocery getter. Alas, I had to start chipping away at the tub. I skimmed back my carb adapter in an attempt to make it work. No joy. Called it a night. I'll probably end up chopping off the lower part of the tub and bending some sheet steel over it. So close!  Final shape of the carb adapter: 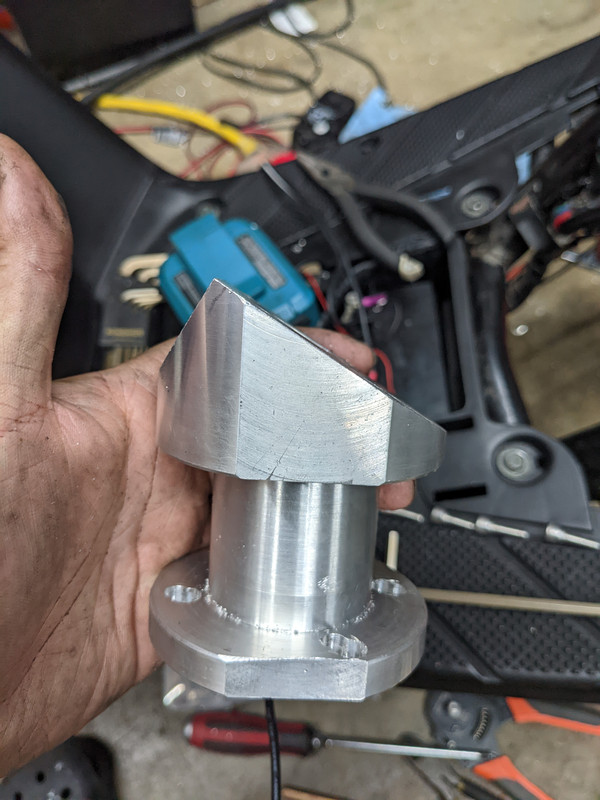 |
|
|
|
Post by aeroxbud on Oct 26, 2022 4:34:04 GMT -5
I think ryan_ott made an infill panel for his Zuma bucket from Kydex. Looked really good. It comes in sheets that you can heat and mould into shape. |
|
|
|
Post by ryan_ott on Oct 26, 2022 8:28:50 GMT -5
|
|
furiousbob
Scoot Enthusiast
  
Posts: 128
Location: Pasadena, CA
|
Post by furiousbob on Oct 26, 2022 10:44:44 GMT -5
Hey that's awesome! I've never heard of nor worked with Kydex but it sounds really simple. Since I work mostly with steel, steel has always been my go-to haha. I've ordered some 8x12 sheets off of Amazon.
I've also decided on using 22ga sheet for the rear fender. But I won't get to that until I get all the rear panels back on, which starts with finishing the tub.
|
|
furiousbob
Scoot Enthusiast
  
Posts: 128
Location: Pasadena, CA
|
Post by furiousbob on Oct 30, 2022 21:37:18 GMT -5
Weekend update! I honestly didn't get much done. I was stuck welding up and installing a Ford 8.8 in my buddy's XJ. It took the entire weekend. It was exhausting. But it's done!  Anyway, I sprayed some more plastics. Here's a before and after of the floor panel   Mocked up a fender  Made the fender out of 20ga steel. It's a terrible photo but I'll have better photos after I make the mounting bracket and powdercoat it ( it's going gloss black )  Kydex came in! My buddy was over and he took the reigns since I was bouncing back between the oven the Kydex was going in to and my other buddy's XJ axle install. I gotta say, this stuff is awesome to work with! I ended up using some leftover Gorilla 5-min epoxy to stick it in place. But yeah, just popped it in my powdercoating oven for maybe 10-15 minutes at 300F. Waited for the surface temp to rise to just shy of 300F and it was malleable for maybe 1 minute. Form it and voila! A photo of the hole it needed to cover:  And the finished product:  I finally took it off the center stand to check clearances.  So with just the rider's weight, the pipe is about 2" off the floor. I had my buddy bounce up and down on the seat and it left me with 1" clearance on the down stroke. This thing is going to scrrrraaaape. I may regret this but I'm moving forward! I put the seat cover on after starting to attach some panels. I got the cover from Cheeky Seats. I honestly thought this was a complete re-cover of the seat. So tear off original cover, spray down some contact adhesive, staple gun around the edges to attach. BUT this is a stretch-over cover. So it covers the original seat. Honestly, I'm not sure how I feel about the color scheme right now. But the good thing is it's easily reversible.  I was missing some panel hardware so it's back to the waiting-for-parts game. |
|