|
|
Post by niz76 on Aug 12, 2014 23:57:38 GMT -5
Carb had a 68 MJ. Removed snorkel. Disabled oil pump and went to premix. Upjetted to an 80. Too big of a jump- bogs at takeoff for a few seconds and then scoots away. 1-2 Mph increase in top speed. Will put a 75 MJ in tomorrow and try again. This carb has a non-adjustable needle and had some weird screws to prevent MJ change. I had to cut a notch in the center of a screwdriver to unscrew them. If I can't get the takeoff tuned better, I might put it back to stock for now until I get some clutch springs and a contra, as I liked the peppy takeoff better than the 1-2 mph increase. I'm also wondering if the CDI is restricted as it never goes above 7800-8k RPM.
|
|
|
|
Post by niz76 on Aug 14, 2014 0:05:49 GMT -5
I put the 75 main in tonight and she doesn't want to run like that. (68 stock) So now I've tried an 80 and 75 after removing snorkel. The 80 was better, but too much hesitation at takeoff and a non-adjustable needle. I ended up putting the snorkel back in with the 75 MJ. This is what she likes. Takeoff is back and gained a bit of top-end vs. the 68. This carb is much smaller than the Mikuni that was on my Baccio... must be why the Baccio was so fuel and air hungry? Here's a quick pic of the "tamper resistant" screws in the carb: 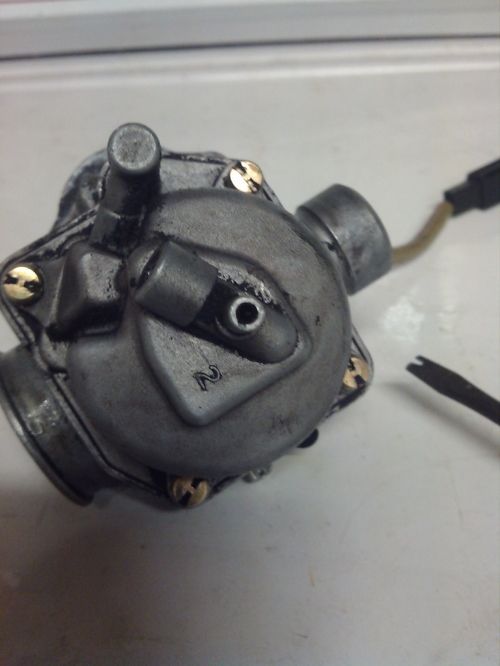 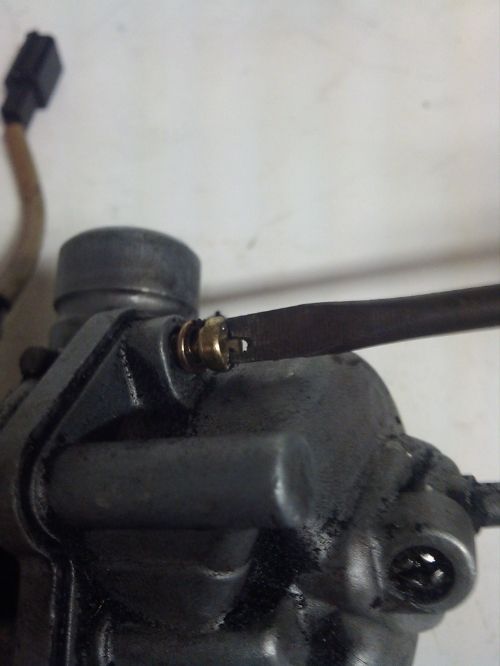 |
|
|
|
Post by Jwhood on Aug 14, 2014 20:05:30 GMT -5
Never seen a screw like that,those bastards,anything too try to stop us from making them faster!!!; )
|
|
|
|
Post by niz76 on Aug 15, 2014 19:19:15 GMT -5
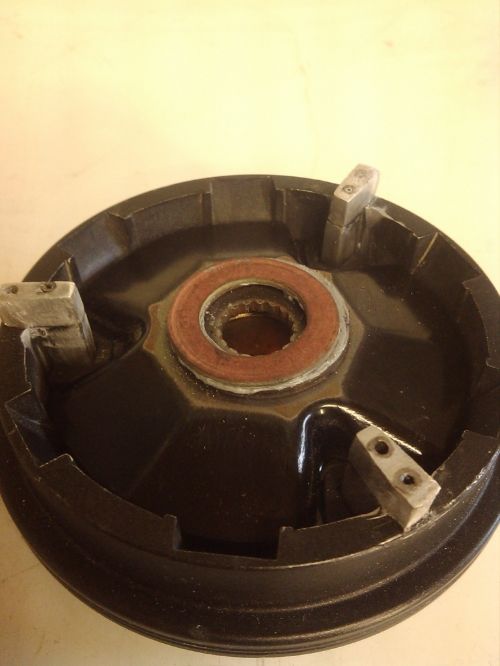 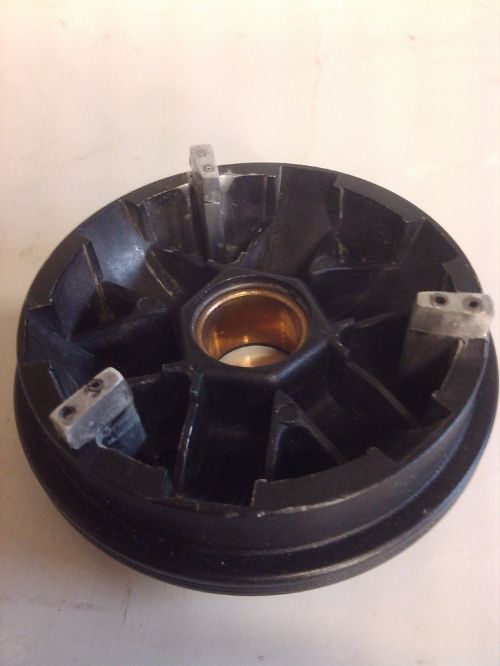 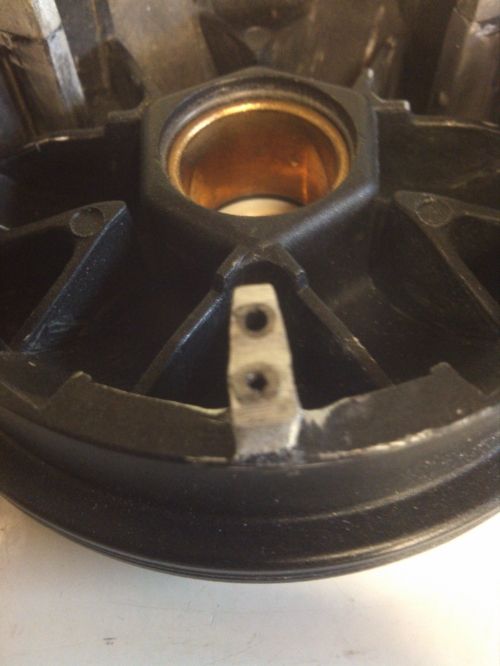 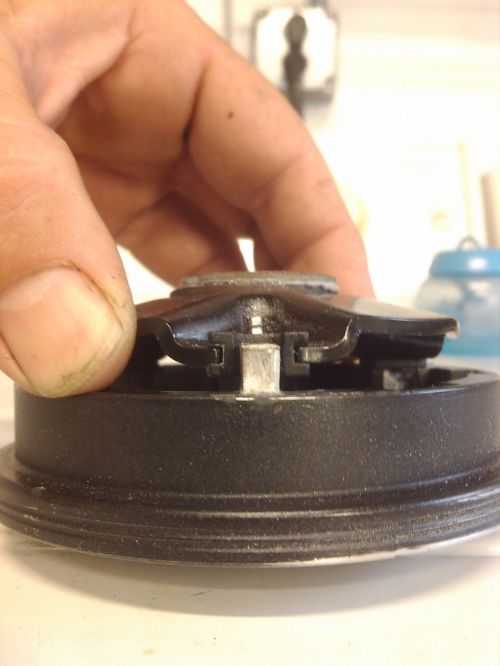 As you can see, I've finished making my 49ccscoot.com-inspired-Home-brewed-"Mini"-Over Range Variator. Phew say that 3 times fast! This is an aftermarket Hoca variator that I purchased specifically with this mod in mind after finding some success modding the stock variator (3 mph gain). After reading Brent's home-brewed OR variator mod writeup in the tech section, I was inspired to try my hand at it! It's basically a carbon-copy of what Brent did, except that after reading what happened to Brent's OR vari after a few hundred miles, I opted to use spring steel roll pins to support the guide extensions. I sanded and filed on these babys for hours (it felt like) to get everything nice and smooth so that the plastic guides could slide over everything correctly and not get snagged. I used superglue to fill in the gaps, which is why it looks as if there's no filler. In the end, I gave the vari an extra 5mm of opening distance! While doing some mock-ups with the belt, the best that I can figure is that the belt will most certainly ride all the way to the edge of the vari, and- if there's enough belt, should actually ride a tad higher than the vari face itself. I'm hoping for an additional 5-6+ mph. out of this mod! I'm hoping this mod itself will put me over 50mph. I was working on this vari mod while simultaneously starting to build a home-made replica of the Stage6 Pro pipe that Moofus supplied the dimensions for, and 190Mech and everyone else supplied the info and inspiration for! Needless to say, it took me a little while to get this finished. So long, in fact, that my 2T Baccio scooter got stolen the day before I finished this vari. Damn! After a frantic weekend of scooter shopping, I secured another 1E40qmb 2T scoot. Yay! The Roketa AIR R50 performed really well bone stock, but 2 days after owning it I was itching to get the CVT cover off and try out my Mini OR Variator. After checking everything out under the CVT cover, I grabbed a decent belt and the modified Hoca vari and went to slide it on- Uh oh- the Roketa AIR is a LARGE splined Minarelli! Double Damn! I do have a plan to rectify this situation and not have to re-do all the tedious work I put into making this vari. I am just going to purchase another Hoca vari from partsforscooters- the 90cc one- and it seems that all the dimensions should work out, and I'll actually end up with the modified large spline 90cc Hoca vari and a 50cc Hoca vari after swapping the ramp plates and drive bosses... If anyone knows why this might not work please let me know! P.S. As you may have noticed in the pic, I glued a couple of spacers to the back of the vari ramp plate. After some very detailed inspection, I realized that the Hoca vari was not opening all the way as it's "deeper" than the stock vari, and was hitting on the e-start clutch before opening (or closing?) all the way and preventing the belt from seating all the way down onto the drive boss... P.S.S. Since my old scoot didn't have a kick starter, I put a lot of attention into getting this little OR vari to work WITH the e-start. I did find a solution. It involves grinding notches into the e-start clutch, and it seems it's plenty strong enough to handle it... So, I'm pretty much at a brick wall right now as my scooter budget was blown out of the water by having to replace my scoot on short notice, and I've run out of acetyline to proceed on the pipe build too... but I've been happily driving my new(ish) blue scoot around and actually enjoying its (almost) stock performance! I've got a few side jobs lined up so it won't be long and I can update on some more mods and performance in my never-ending quest for affordable scooter speed! |
|
|
|
Post by oldgeek on Aug 15, 2014 19:30:03 GMT -5
Interesting approach!
I would like to see pictures of the starter clutch as well when you get a chance.
|
|
|
|
Post by niz76 on Aug 15, 2014 20:13:23 GMT -5
U got it Oldgeek. The starter clutch that I already modified was in the stolen scoot. I haven't touched this one yet.. I need to inspect and measure but I think I need to give up either e-start or kick start to make this work. There just doesn't seem to be enough room on the shaft for everything. I left out the kickstart pawl on my mockups-didn't need it anyway. But now that I have a scoot with both... well we'll see. Will post pics!
|
|
|
|
Post by 90GTVert on Aug 15, 2014 20:46:17 GMT -5
I don't know that you'll actually gain speed from this. My reason for trying it was that if I spaced out the variator so I could get the belt low for a hard launch, it broke guides. I can use the Hoca with no extensions and mod it to the point that the belt reaches the outer edges if I've got the power to push it there, but it destroys the guide bushings almost immediately. This for me was mainly about not having to compromise either hard launches or higher speeds without breaking bushing after bushing. I think it'll be a nice mod that you'll enjoy as long as it all works out, but this in itself is not going to make it faster I don't believe, not vs just a Hoca I mean.
I probably have a Hoca drive boss and ramp plate for the large splines I can spare if you want to pay whatever shipping would be USPS (should be cheap that way unless it's heaver than I think). Not sure how great the condition would be, but I've broken so many bushings and worn down the guides that there's prob a set out there that's OK leftover from a jacked up variator. IIRC the variator itself is the same with the Hoca and they just swap out the other bits. If you haven't bought one already, let me know if you're interested and I will look.
|
|
|
|
Post by niz76 on Aug 15, 2014 22:12:25 GMT -5
I do agree that this mod is probably more about having the best of both worlds- i.e. a good hard launch since I can have the drive boss extension/spacer in AND have it be able to cover the distance of the boss and be able to close real tight to the fixed face (I have the faces filed too) so that it can drive the belt all the way to the edge of the vari.
I guess I'm just calling it "more top speed" because driving without the boss spacer in is not an option for a heavy rider like me (wayyy too slow take-off) and I can never seem to get the full travel out of the vari (marker test) for best top speed. Like you said- This mod will give me both! Thanks!
"I learned it from watching you.." LMAO
|
|
|
|
Post by niz76 on Aug 17, 2014 14:45:52 GMT -5
hI aLL! Remember that seat I was bi!@%ing about? I did something about it! UsmcDoc said it best HERE about these seats: ".......a nice ride..but the only drawback so far for such a tall scoot with 120-70-12 tires is that...well..they are using the YYQT50-6 (Jonway Sunny and TaoTao ATM50) double hump seat. It uncomfortable to ride on. You either have to be 5' 2" tall to fit the front of the seat..or over 6' to use the rear portion. Even sitting on the rear 'hump' I would slide forward to the low part of the seat and have my legs cramped and knees against the front dash portion. Maybe I got spoiled by my Adly TB50 with its slightly sloping seat...where you can sit anywhere on it..and be comfy." This double hump seat on the large frame scooters is really more than a minor inconvenience IMO. To deal with it, I find myself hopping up onto the (rock hard) upper section while riding, and then back down when coming to a stop light since I'm at my tip-toes up there to reach the ground. Then up, down,....up, down..... you get the picture  Here's what I decided to do about it: Here you can see the 'double hump' seat with the cover off it... 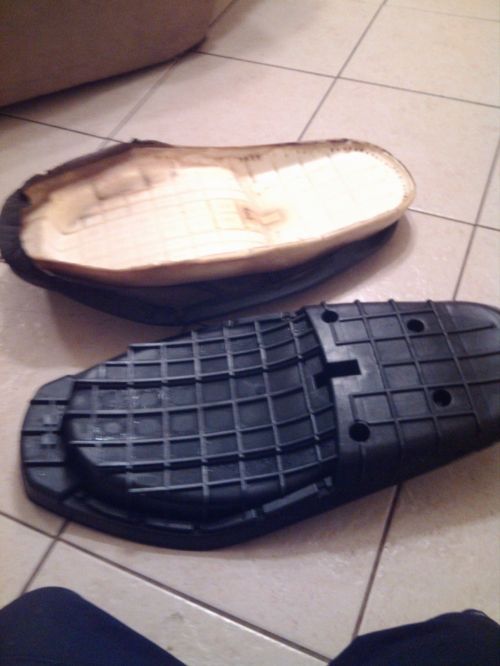 I must admit, I really didn't have my plan worked out 100% in my head, but I threw the cutting wheel on my grinder and just started cutting away!  Here you can see the original side profile with that pesky humped area exactly where my bootay wants to be..  A little more cutting and I'm getting closer to what I want this seat to be... 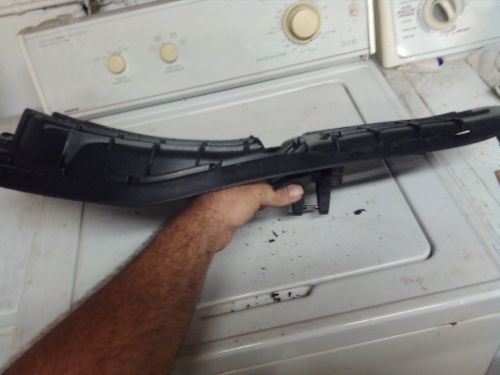 A little more cutting... 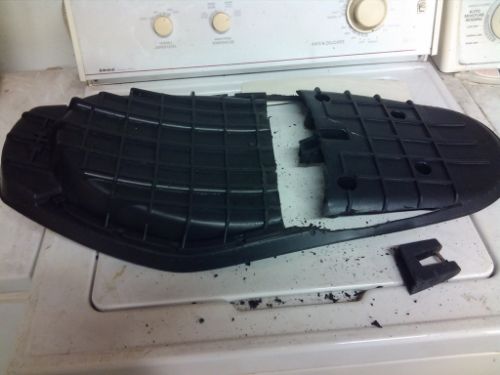 So I've gotten the hump removed and pretty happy with the profile so I start putting it back together with a few peices of scrap sheet metal and rivets... 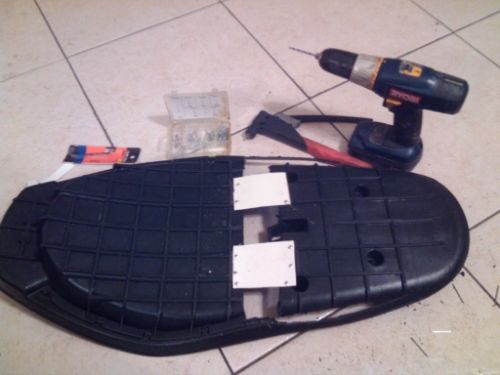 A quick test-fit and I'm liking what I'm seeing! 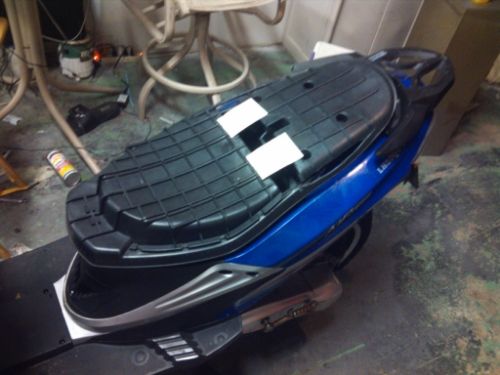 Some more sheet metal and rivets and my seat is back to together again! 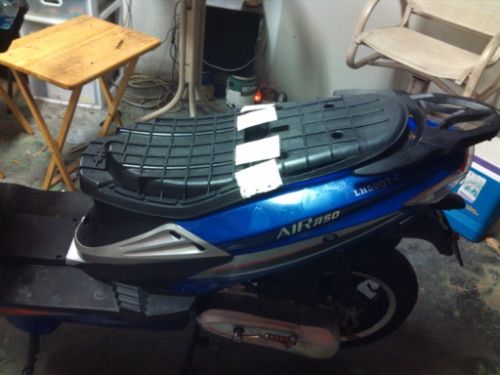 At this point I threw the foam and cover back on and took it for a test ride. It feels fantastic! 98% improvement! But I didn't stop there.... 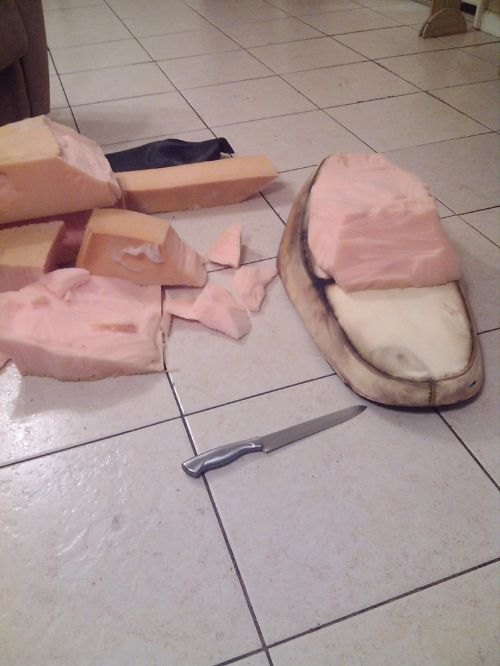 I could've put it back together the way it was and been very happy with my new seat feel, but I wanted that added luxury that 2TDave spoke of when describing his Zuma seat. I grabbed a cushion from a discarded couch in my neighborhood (disenfected with bleach spray and threw it in the dryer for a while) and carved a nice "custom" shape to make my bootay extra happy! When sitting higher up on the slanted seat, I usually just brace myself against the front plastics from my legs to counter-act the feeling of wanting to slide forward. I added this bit of cushioning so that my seat now conforms perfectly to me while riding and it feels 100% better now! Some stretching and stapling... 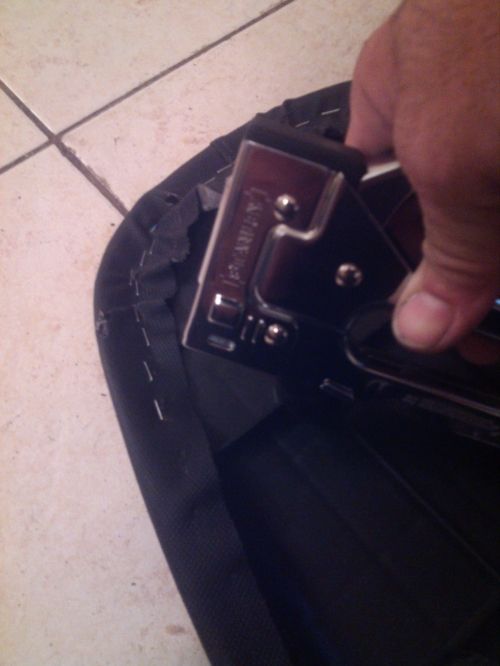 And she's all back together and lookin good!  I still need to re-attach the locking mechanism, but it's just a matter of simply shortening it and attaching with a piece of sheet metal bent into the rectangular shape and pop-riveted back on. I will probably paint it black also... So there's my seat mod! It worked out great and has upped my scooter riding enjoyment by 1000%. Maybe now I can take a day-long trip and do some fishing in the deeper south areas such as Bradenton or Naples... but how will I carry my fishing gear? HMMMMM...... |
|
|
|
Post by 2TDave on Aug 17, 2014 14:57:34 GMT -5
Nice job Niz! Riding the Zuma has really got me motivated to do something about the seat on my RX8. I'm keeping the foam from the original Zuma seat that's being replaced for use on my RX8.
|
|
|
|
Post by 90GTVert on Aug 17, 2014 16:40:38 GMT -5
Good work.  |
|
|
|
Post by niz76 on Aug 17, 2014 18:14:31 GMT -5
Thanks fellas! Here's a quick peek at where I left off on the Stage6 Pro pipe build that Moofus supplied the dimensions for. I can get a good weld for 6"-8" or so using a coat hanger, then I seem to be blowing hole after hole for the next 6"... Frustrating. I found a "90 degree method" on youtube that shows to hold the torch at 90 degrees to the work area so as to not heat it so much, but I really need to dial in my skills on this as I seem to be using more oxy/acetyline filling holes I've blown than actual welding of the pieces! Any Tips? 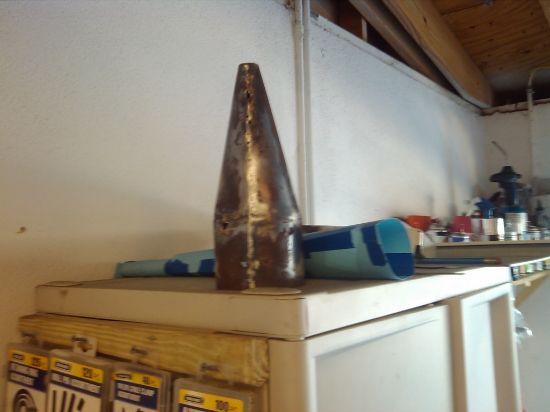 |
|
|
|
Post by niz76 on Aug 18, 2014 14:28:52 GMT -5
Dear Brent, You, sir, are THE MAN! I received the parts you sent me already! 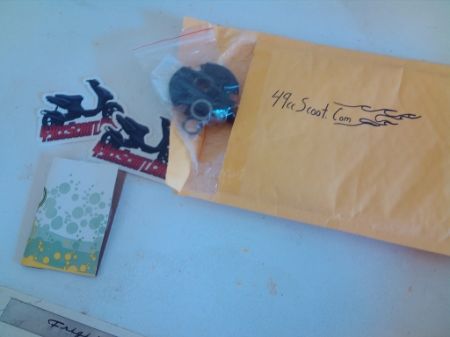 Again, thanks so much Brent. It's easy to see why this is such a thriving and elite community here with such good people for members. I love this place! Expect some CVT tuning adventures from me very soon! |
|
|
|
Post by 2TDave on Aug 18, 2014 14:48:21 GMT -5
I love the new flame logo on the package!
|
|
|
|
Post by 90GTVert on Aug 18, 2014 15:05:35 GMT -5
I thought the flames might make the envelope faster.  |
|