|
|
Post by Zino on May 14, 2020 6:02:37 GMT -5
Thats a great price on a radiator compared to oem . The Oem Dealers Partzilla and Bike Bandit and others it will cost more for the gromets and studs than the radiator. www.bikebandit.com/oem-parts/2010-kawasaki-ninja-250r-ex250jaf/o/m148745#sch638173A motorcycle salvage yard should work as another alternative Plenty of Ninja's out there Uou hav piqued my interest with your custom fairings and how to do it can you post up pics of the process . |
|
|
|
Post by hippo008 on May 20, 2020 22:59:21 GMT -5
I thought it would be a good time to talk about working with fiberglass and its applications. I put together a small composites 101 for you all below.
Introductions
Composites represent a totally unique section of fabrication that no other material occupies. With any standard manufacturing process any material you work with is complete. Woods, Metals, and Plastics all come whole and ready to use immediately. The advantage of standard materials is their cost, availability and ease of use. Composites are just the opposite. Glass fabric, carbon, kevlar, ect. all come in component parts. Glass fabric is good as garbage without its binder. Composite parts do however fill a unique role. If you need a precise, strong and light part that can easily be made in a production setting composites are the answer. Composites also can be changed and added-to without weakening the original part. Much like welding adding more composites to the original part will make one larger part, not two parts added together like a wood or some plastics.
Composite parts are made just the same way its name implies. You take reinforcement material like fiberglass, a mold to lay the reinforcement on/in and a bonding media like epoxy resin. None of these components do anything useful on their own. Dried resin with no media is a flaky brittle mess. Fiberglass/carbon/Kevlar fabric on its own is just an expensive ouch blanket. Im not even sure what a mold would be on its own, a sculpture maybe? However when you mix all of those pieces together you get a very strong part that can replicate complex shapes and curves easily without the need for a workshop full of tools. Composite parts are also highly specialized. You can make a part for just about anything with composites.
Resins

There are really only two types of resin within the composite world. There are epoxy based systems and polyester based systems.
Epoxy should be used when you are looking for the longest working time and for great UV stability. Epoxy is unique in that it is generally very safe to use for both the user and with other materials. While epoxy generally does not have a strong odor you should still wear gloves, a full respirator and goggles at the least. Epoxy product lines are generally very large and include lots of different products from fairing compounds to colorants and texturing. Epoxy itself does not change very much. What can change the nature of an epoxy system are additives. That is to say there are not many specific types of Epoxy out of the bottle like there is Poly resins. Epoxy systems are also commonly found in the marine industry with most boats being manufactured with epoxy systems. Epoxy systems come with set drying times and set mix ratios. You will have a part A resin and part B hardener. The ratio by which you mix the products vary by manufacturer. The viscosity, binding characteristics and more can be changed with additives. Generally speaking additives do not function based on ratio but rather desired outcome. You keep adding until the desired affect is achieved on your mixed resin.
Polyester resin is a bit more complex than epoxy. Poly resins come in many different types that are specific to certain applications like tool making, heat resistance, electrical resistance and so on. Some specialty additives are also made for poly resins. However unlike epoxy, poly resin additives are used in specific ratios by volume. In my previous work I liked a certain poly additive that made the resin mix harden in the presence of UV light. No hardener needed, just mix up the appropriate amount of additive to resin and presto you have an infinite working time. Polyester resins also do not have a manufacturer set mixing ratio with a specific hardener. Poly resins almost all use MEKP (methyl ethyl ketone peroxide) as their respective hardener. MEKP is added to poly resin as a percentage of pre-mix volume based on temperature and desired working times. For example, you can kick a batch of poly "low" meaning you will have a long working time and long dry time, including a gel stage that is useful for more complex layups. It is also just as possible to kick a batch of poly "hot" to the point that the resin has gelled while its still being mixed. Poly also has a nasty habit of being highly exothermic. I have melted at least a few mixing cups with too much MEKP. For this reason Poly resin is harder to work with for the beginner. It is also not nearly as friendly for you, your materials or the planet. Poly resin systems are smelly and highly toxic if inhaled, often being labelled as neurotoxin on the bottle. MEKP is also very dangerous. MEKP itself is highly explosive to the point that its often recommended to not use MEKP directly under florescent lights if possible. Polyester does have some obvious advantages over epoxy systems however. Poly resin is significantly less expensive than Epoxy systems. Because of the nature of its hardening you have granular control over your works hardening time. Polyester also is more flexible in both physical characteristics and application than Epoxy, often being seen in applications like surfboards, road safety signs and marine hatches/hardware and industry around the world.
All resin systems do not keep very well on the shelf. The rule of thumb I have been told by boat guys is about 90 days in the shop then you have to toss it. I am not sold on that number though. I have used poly resin over a year past its "best by" date and had no issue.
Picking the right resin system is the most critical part of working with composites. Using a high quality material is step number 1 in making a quality part that fulfills your needs. Since I am going to be doing basic lamination and mold work a normal laminating resin is being used. However if your purpose is different than mine make sure you get the right product. If you plan on vacuum bagging or vacuum infusing your parts get an infusion grade resin. If you plan on doing casting get a specific casting resin. You catch my drift? 
Fabrics & Media
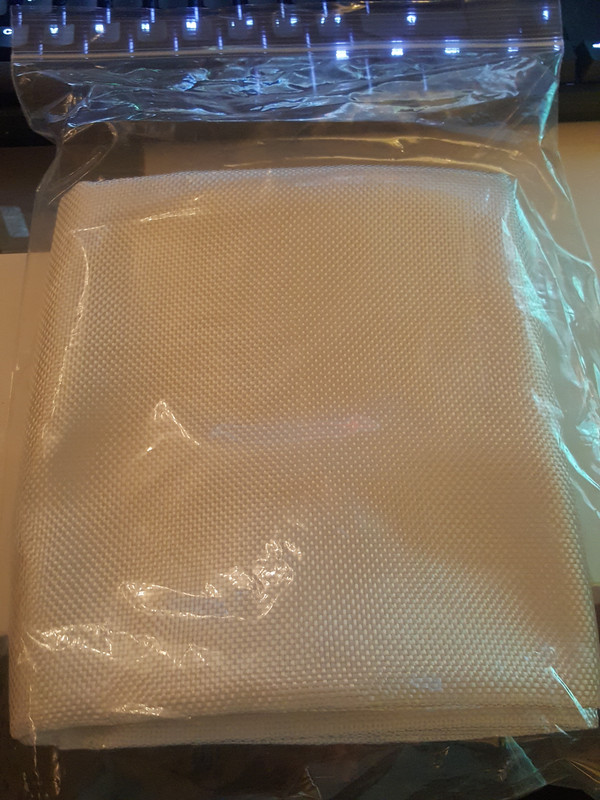
Resin systems are totally useless without some type of media to contain it. There are hundreds of different things that can be resin infused from wood to glass fabrics to other plastics. To keep things simple I will just be talking about fiberglass as its all you should generally need.
Fiberglass is literally woven pieces of glass and plastic fiber. It comes in a variety of types. Fabric, roving mat, matte, twill, tape, ect. and each has its own specific use case. The most important thing to know about fiberglass is its weight. Most fiberglass materials have a weight rating. This rating corresponds to how much resin the glass will hold per square yard. For example a 6oz fiberglass will hold approximately 6oz of resin optimally for every square yard of the fabric. Its important to know this number does not represent reality UNLESS you are vacuum infusing. Even then its more of just a ballpark. Weight ratings should be seen more as a strength vs flexibility rating. A 1oz fabric will be extremely fine and easy to shape however it will be very weak. Similarly a 30oz fabric will be very tough and strong but wont conform to molds easily at all. To keep it simple I will recommend 4oz and 6oz fiberglass cloth for most use.
Also worth mentioning is fiberglass mat. Fiberglass mat does not have any specific direction to it like fabric does. The strands are blown into a sheet making their direction random. Fiberglass mat isnt to be used by itself, it is an additive product to other cloth fiberglass projects. For example you could lay up two layers of fiberglass cloth @6oz a layer and have a clean, smooth and somewhat strong part. However it would not be easy to just keep adding layers without making the layup that much harder. This is what mat excels at. Because fiberglass mat has no direction it can be easily torn, overlapped and glassed into place forming a thick and strong part quickly. Fiberglas mat will also add lots of strength to your part due to its randomly placed fibers. With glass fibers moving in essentially every direction all over the part the result is a very stiff strong part.
Tools

Like any material you need tools to work with it. This is one of the places composites really shine. You essentially just need a form/mold, a small paintbrush, a small roller and PPE. With those simple tools you can produce high quality and professional parts. No need for a shop full of specialized equipment like metalworking or woodworking. That is not to say that some highly specialized tools dont exist. Vacuum infusion is the very best way to create any composite part. This process is outside the scope of this project however I do think its worth mentioning. If you are willing to go through the molding process and are willing to spend extra money there is simply no better way to make parts than vacuum bagging. The result is the highest quality and highest strength-to-weight ratio part you can achieve. EasyComposites out of the UK made a great video that quickly explains the process. Here is the video. Easy Composites Vacuum Bagging
My project
I am going to be using an epoxy system from Total Boat, a product made by and sold from Jamestown Distributors out of Rhode Island. I have used their stuff before and trust it. Their Total Boat line of products is easily found in any quality boat shop around the US. I used to use it all the time laminating rowing hulls. That isnt to say its the only name however. West System is another very popular brand among boat builders and fabricators alike.
The goal is to make a panel on my Genuine Roughhouse that replaces the current headlight panel that will hold a radiator from Taida. I did not want to cut up my kickpanel like so many others do but still wanted watercooling. I am going to be producing a panel that is bolt in with as few modifications to the surrounding scooter as possible. I want everything I do to it to be fully reversible if necessary.
I am going to be achieving this panel by using a process called lost mold construction. I have never done this particular type of layup before and as such this is all new to me. The process is as follows.
Shape a styrofoam plug into the shape of the new panel.
Lay 6oz fiberglass cloth over the top of the plug until a few layers have been built. Let cure.
Use mineral spirits to dissolve the shaped plug from the fresh fiberglass panel.
Apply more 6oz fabric to the rear of the part to add thickness to the skin, let cure
Apply fiberglass mat to rear of part until a satisfactory thickness and strength have been achieved, cure.
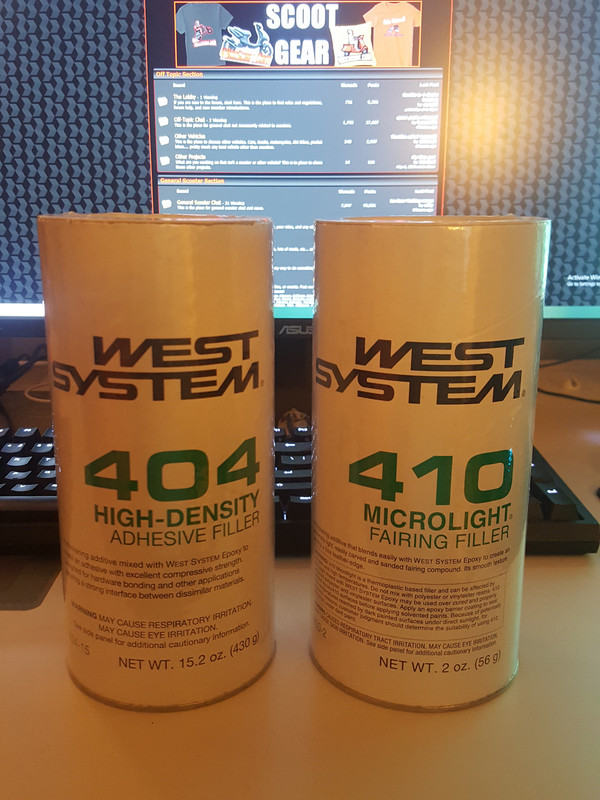
Mix fairing compound with epoxy and 410 filler and fair the outer skin of the part. Cure. Sand. Repeat until the desired finish is achieved.
On rear of part apply radiator mounts with thickened epoxy and 404 additive. Let cure.
Seal part with sandable primer. Cure, Sand. Repeat until the desired finish is achieved.
Paint.
Mount radiator, look like a badass. Fin.
I will be updating this thread with more updates on the part production process. The radiator from Taida was delayed a few days but should be here soon. If anybody has any questions let me know.
|
|
|
|
Post by Zino on May 21, 2020 5:21:45 GMT -5
Very thorough writeup
|
|
|
|
Post by hippo008 on May 23, 2020 18:56:22 GMT -5
Big day today lads. The radiator came in from Taida......and I am not impressed 
The radiator came from GY6Store on ebay, seemingly a good storefront with positive reviews. I think Taida just produces a poor quality product. I am not impressed with it at all. I wont be buying any of their products moving forward. Here are some photos of the build quality.
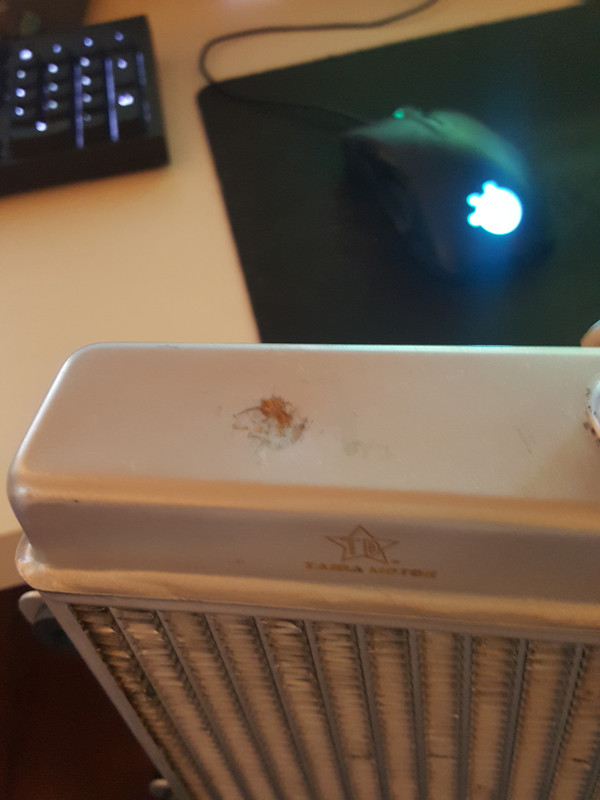
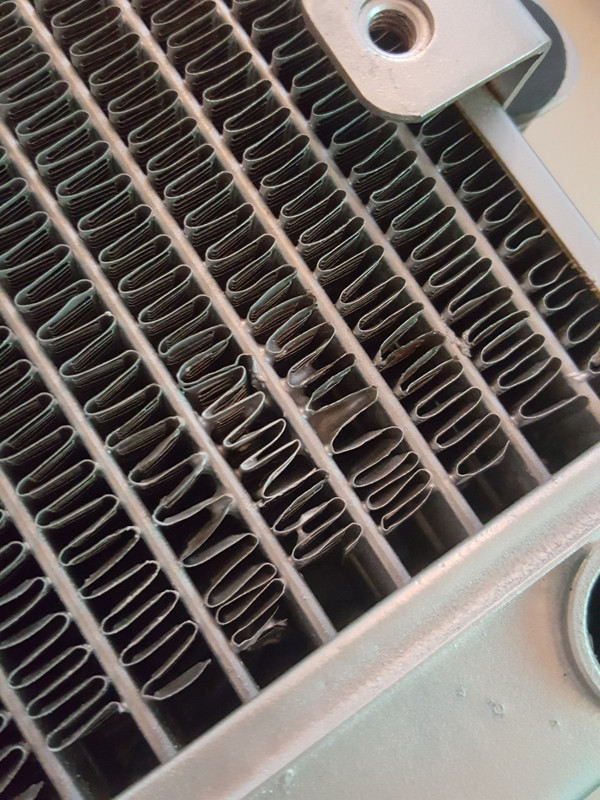
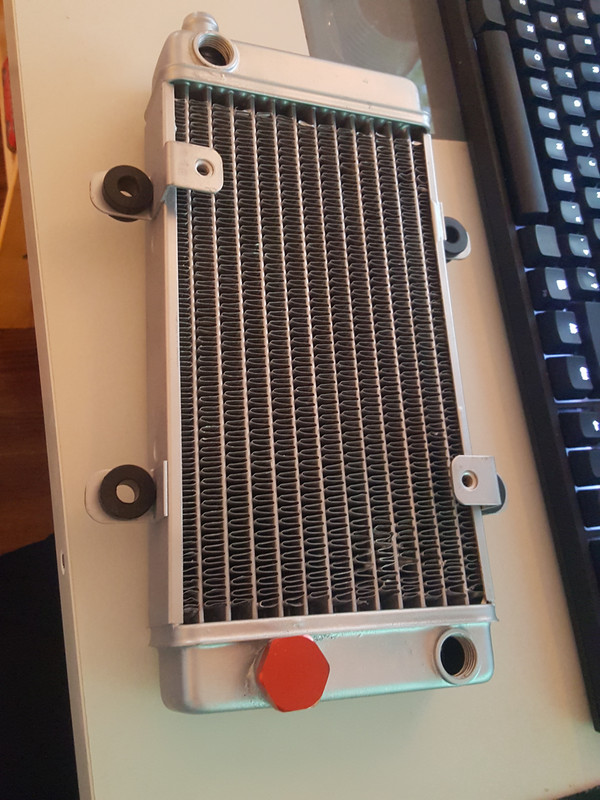
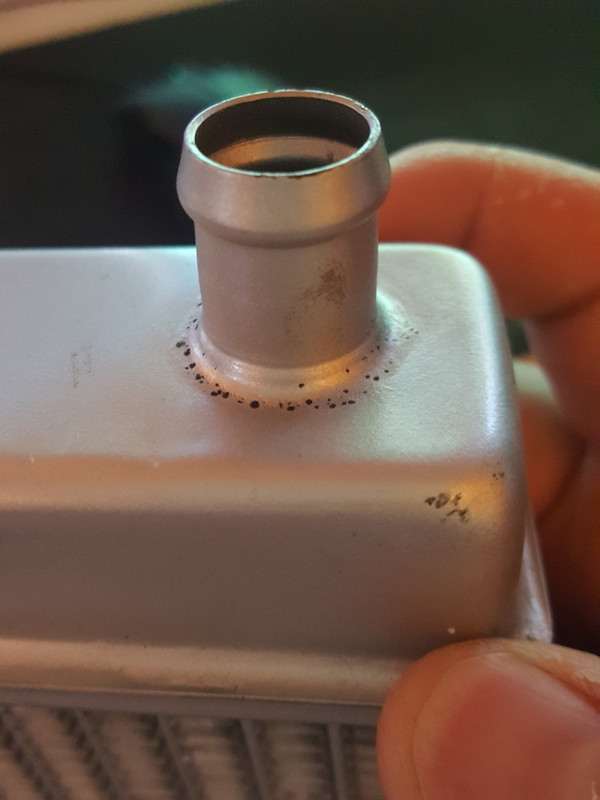
I really wanted to like this thing. Its the perfect size for my scooter and has all the ports I need to properly route all the hoses. I would return it but I cant find a suitable replacement. Ill roll with it for now and see how it goes.
I started the glassing process today. Initially I was going to do a lost-plug layup with standard insulation foam. After a few hours of cutting foam I just was not happy with the result. I decided to scrap that plan and move forward with my original idea, a layup based on a stretched fabric process commonly found in car audio. The plan is to copy the existing panel with 6oz glass. Cut away the center of the panel, leaving just the edges. Build an MDF frame to support the radiator mounts and suspend the frame within the cut panel. Stretch cotton fabric from the suspended frame to the cut panel, producing a perfectly contoured face all around the part. Glass in the cotton with 6oz glass and reinforce the rear with roving mat. I began the layup this evening.
The 6oz glass layed up real smooth on the panel. I was expecting to have to cut some pleats around some of the tight areas but it wasnt needed. I just used a chip brush and my roller to work in the resin and roll out the bubbles. No matter how much work you do there will always be a few voids in a hand layup. No matter though, they will be compensated for later. Here are some photos.

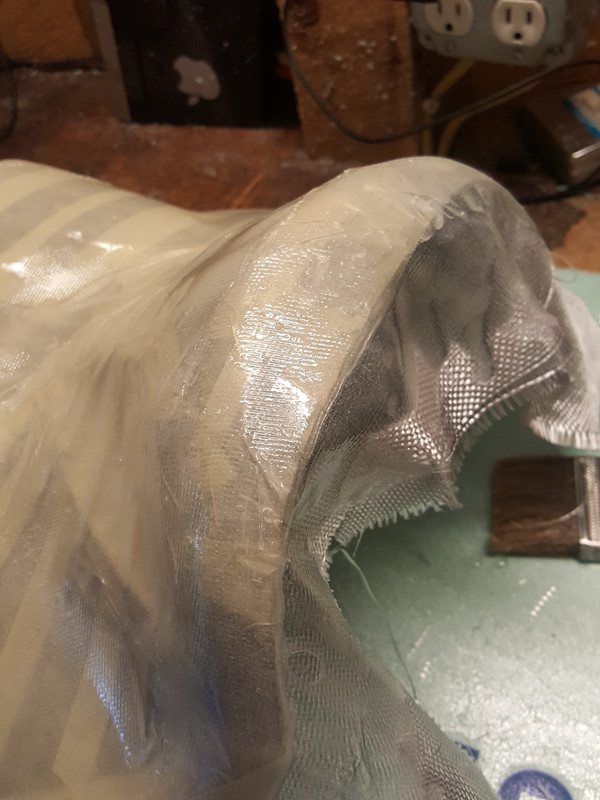
Here you can see the bubbles.
More to come!
|
|
|
|
Post by hippo008 on May 26, 2020 21:41:46 GMT -5
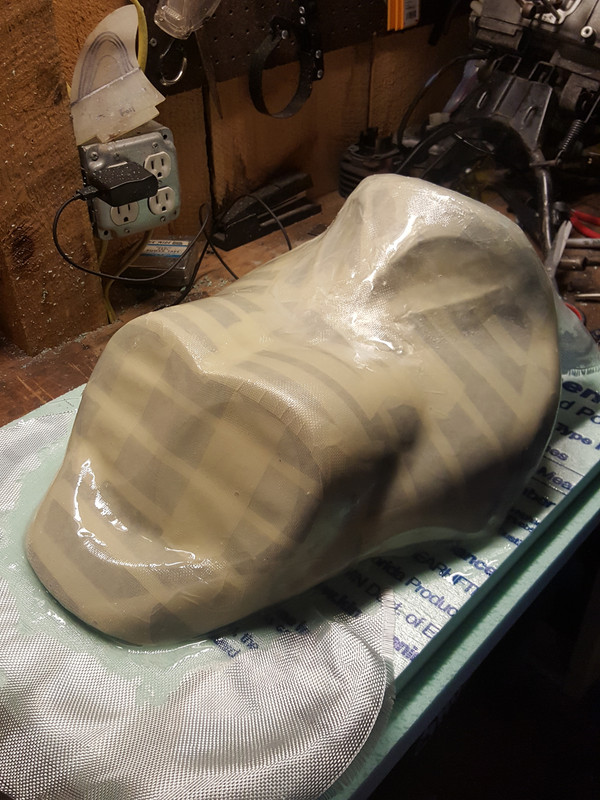
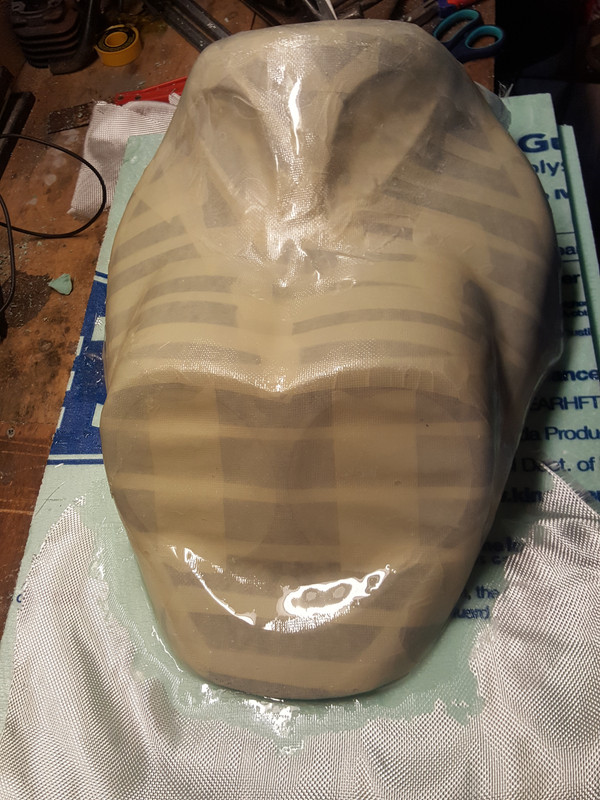
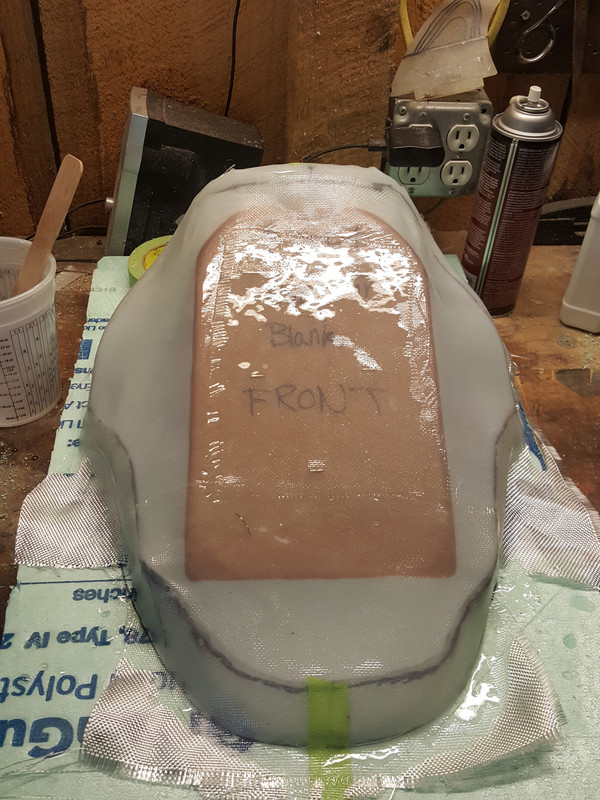
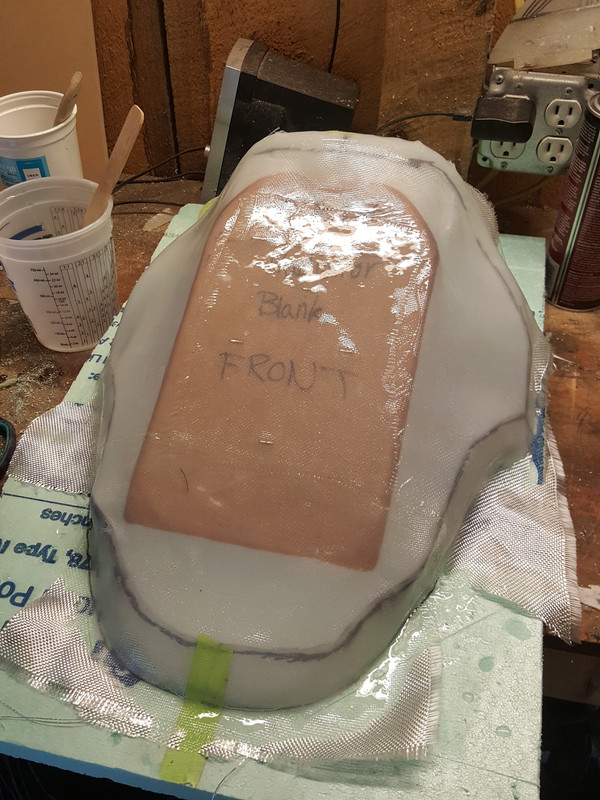
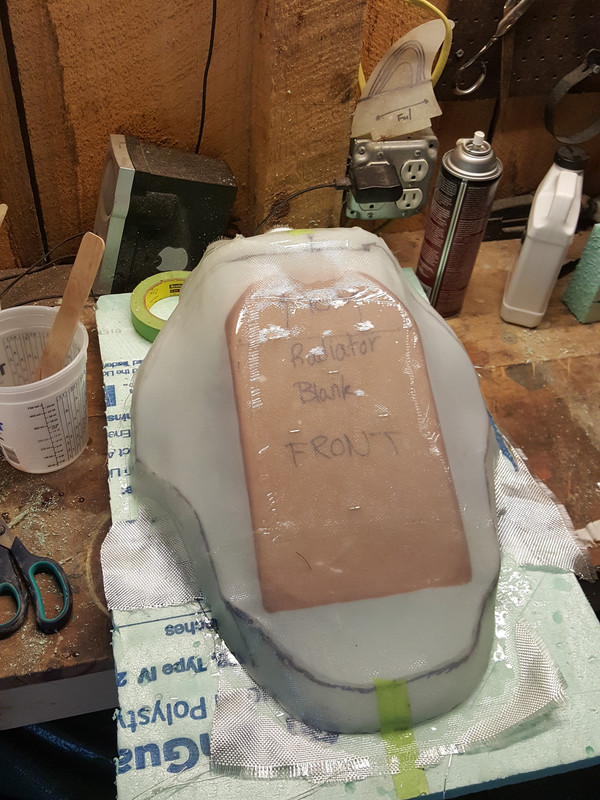
Big update today guys! The first lamination I completed did NOT work well. I thought I could get away with using slow hardener in 60F weather. The lamination turned out OK with only a few small bubbles. The de-molding was easy, but only because the epoxy didnt fully kick  . I decided to change my approach. Masking tape is a cheap trick to make flat panels when real mold release isnt available or too expensive for a small job. A part with complex curves like this one is not well suited to the quick and dirty methods. Mold release comes in a few different forms. Wax, PVA spray and PVA paint. PVA is fairly expensive and only really good when sprayed onto your mold. I didnt want to use my spray setup on anything but paint. Wax is cheap and readily available but less reliable. You have to be really diligent about wax schedules and coverage. Even one small spot without enough wax will have epoxy adhere to it. Mold release max is essentially just carnauba wax with additives to resist heat. I picked up some 100% carnauba at my local autoparts store for $8 or so. This is the stuff. . I decided to change my approach. Masking tape is a cheap trick to make flat panels when real mold release isnt available or too expensive for a small job. A part with complex curves like this one is not well suited to the quick and dirty methods. Mold release comes in a few different forms. Wax, PVA spray and PVA paint. PVA is fairly expensive and only really good when sprayed onto your mold. I didnt want to use my spray setup on anything but paint. Wax is cheap and readily available but less reliable. You have to be really diligent about wax schedules and coverage. Even one small spot without enough wax will have epoxy adhere to it. Mold release max is essentially just carnauba wax with additives to resist heat. I picked up some 100% carnauba at my local autoparts store for $8 or so. This is the stuff.

I applied 10 coats of wax to my mold. I let it cure to harden overnight before applying resin. I was worried it wouldnt be as effective as real mold release wax but it worked great! A small plastic putty knife was all that was needed to remove the part from the mold.
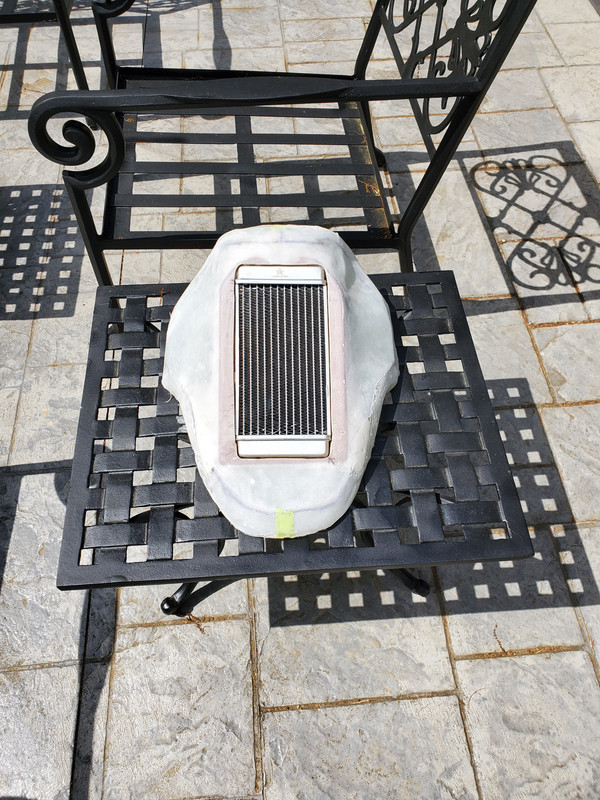
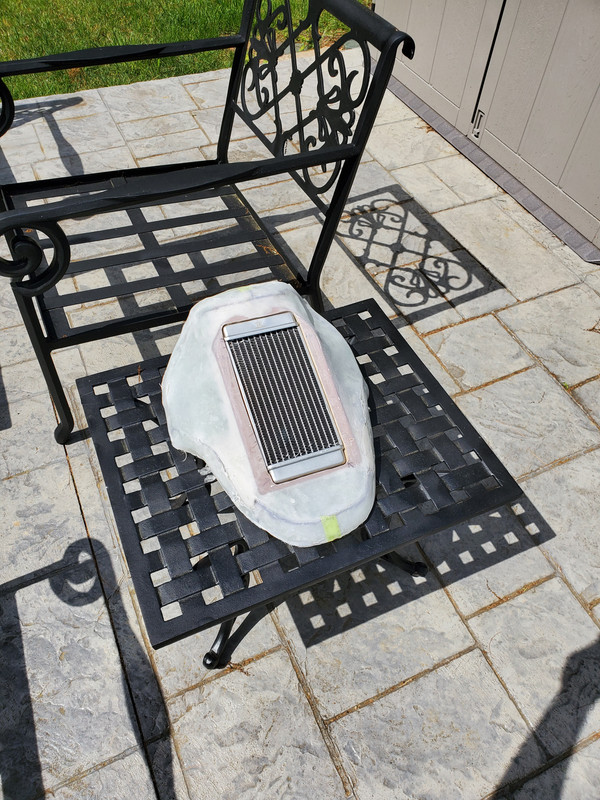
I ended up adding one additional layer to the layup last minute bringing me to 3 layers @ 6oz cloth. My resin was gelling in the pot while the last few areas on the final layer were being worked. The result is messy but totally functional. There are some dry spots in this mold but that is ok. My focus was on the outer shape which will become the outer edge in the final part. The middle of the part could have been left totally dry if I really wanted. However I opted to try and glass the whole thing in one go to ease in handling later in the process.
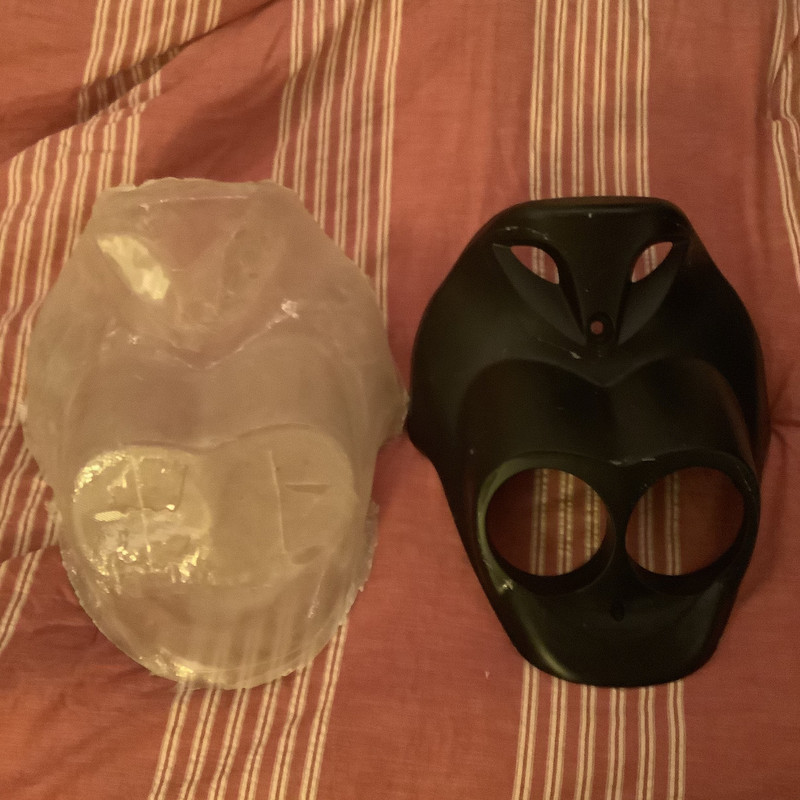
Here are some pictures after the de-molding. No resin dried onto the original cowling, all of the residue is left from 3M tape and the wax.
Sorry about the lighting. I have terrible lighting in my room. The parts look a lot better in the sun I promise!

|
|
|
|
Post by jbjhillbilly on May 28, 2020 1:53:56 GMT -5
Excellent work!
I’ll have to remember the car wax release trick when I fix my 9’2” Stewart (got it back from a buddy who wasn’t too delicate with it).
|
|
|
|
Post by hippo008 on May 28, 2020 7:42:43 GMT -5
Excellent work! I’ll have to remember the car wax release trick when I fix my 9’2” Stewart (got it back from a buddy who wasn’t too delicate with it). In your case I would use Partall mold release wax. Not locally available but its the best shot you'll get for a good mold release. In a pinch the brown or clear packing tape works pretty good too. Just make sure to press down all the edges! |
|
|
|
Post by aeroxbud on May 28, 2020 15:49:31 GMT -5
Looks good so far 👍
|
|
|
|
Post by hippo008 on May 30, 2020 16:01:56 GMT -5
Okay guys I have some updates for everyone. I got more work done on the cowling. I started today by using my Dremel and a cutting disk to trim down the panel to its correct dimensions. I used a little sanding drum to clean up the rough edges. I then used a sharpie to divide the panel into sections that made sense to me visually. In each section I drew a rough line about 1"~ away from the newly trimmed edge. Using the dremel I cut out the panel to its new cut line.
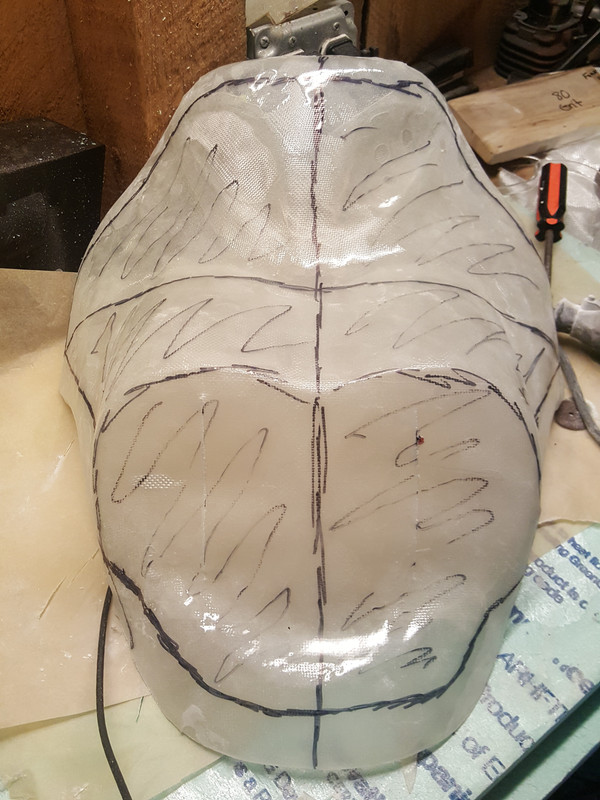
Some areas have high spots, notably by the lower edge of the panel near the nose. These will present a problem later in fabrication and will need to be cut out. I left them in for now to add a little more structural stability to the small edge left over.
Next I took some MDF and cut out a rough blank of the radiator size +1" all the way around. This board will be the mounting point for the radiator later in the process. I opted to leave the middle of the mounting panel intact for now. This way the fiberglass has more to adhere to and the panel will be stiffer during the sanding process to come. Later on I will use a jigsaw to cut out the shape of the radiator grill to allow air to pass in.
I didnt get any photos of these next few steps, sorry guys. Once I get some momentum I like to keep chugging through until a natural stopping point. 
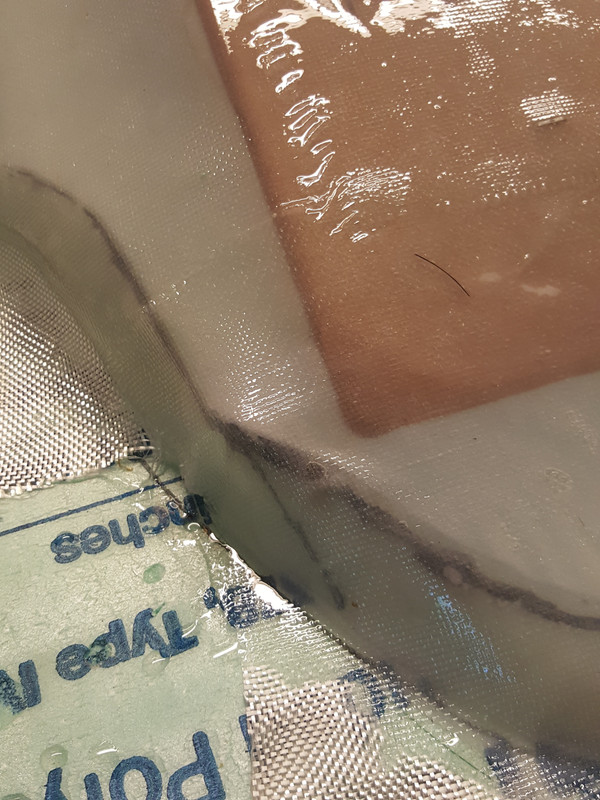
I used some green insulation foam and my favorite spray adhesive to build a little support to hold the radiator panel in the correct orientation. Once everything was lined up properly I cut up an old cotton pillowcase to make a large square of fabric. Using some 3M Super 77 I stretched the fabric from the middle of the radiator panel to the outer edge of the fiberglass panel. I should mention here that I used cotton fabric to quickly create the average surface between two unique shapes. However cotton serves another purpose within my layup. Cotton is an excellent material to use as the base of fiberglass panels. It holds resin well and is very smooth compared to glass fabric. Cotton shouldnt be used by itself though because it alone will dry glass-hard and is likely to crack. I previously have been mixing resin with the traditional volumetric methods. However I find I almost always overestimate the amount of resin I need when using this method. This time I decided to mix using weight and it went great. A warning to anybody following along, resin does NOT mix 5:1 by weight. Each manufacturer puts out its own weight mixing ratios. In my case its 100:18 by weight. Over the cotton I layed up two layers @6oz per layer. The layup isnt perfect. In some spots I did not pull the fabric tight enough and ended up with some droops. Nothing some epoxy filler and sanding wont fix! 
Here are some pics of the finished layup right before the gel stage.
I also got around to ordering all my parts. I ended up going with the Stage6 Streetrace with a Yasuni R, 21mm Dellorto PHGB carb and Top Preformances Water Pump cover. I did some thinking and realized what I wanted most was a reliable scooter with a wide powerband. The Stage6 Streetrace runs at a safe RPM, is cast-iron for reliability and has a wide powerband. The Yasuni R seems like a natural pairing according to my goals. According to PedParts dyno numbers the Yasuni R has the widest powerband of any Yasuni pipe. Down the line I plan on adding a few upgrades like a better variator, Trailtech Vapor, street tires, ect. One step at a time for now 
If anybody is deciding to undergo this process for the first time go for it! This is my first go-around with this type of fiberglass work too. If I can do it anybody can!
More to come!
|
|
|
|
Post by mrchilled85 on May 30, 2020 16:11:09 GMT -5
great job makeing that mold i was planing to do that after i buy new panels as i have to order mine from over seas tho the panels are cheap the shipping is a killer :/
the Yasuni r is such a great pipe mate if i had the money i would get one my self
|
|
|
|
Post by hippo008 on Jun 3, 2020 18:56:00 GMT -5
The parts came in from ScooterTuning.ca today. Happy with everything so far!
I am going to finish the LC conversion before I begin the engine build though. I have a question for yall. I am thinking of getting a CVT kit for my scooter. Are they recommended? I know some people swear by them. NCY and Naraku both make a full kit for the Genuine scooter and I have been eyeing the NCY kit.
As for next upgrades I plan on purchasing a Trailtech kit as well as a bar riser, bars and grips. Let me know what yall think!
|
|
|
|
Post by hippo008 on Jun 5, 2020 20:33:20 GMT -5
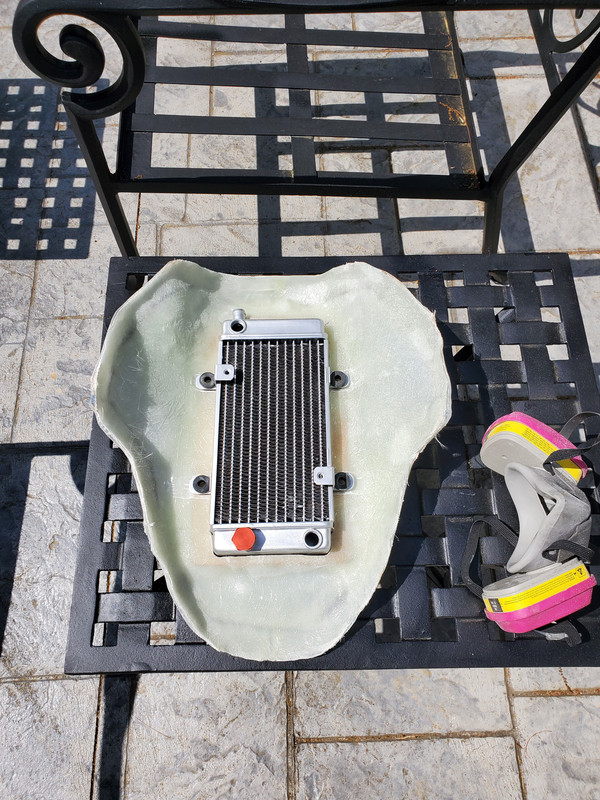
Good news and bad news. Good news is all the parts are in and the radiator project is coming along nicely. Bad news is the cowling I was working on I am just not happy with. The fit around the scooter was meh at best. I think a few things went wrong. After cutting the middle of the copied cowling out the leftover edge did not have enough stability to hold its original shape without warping. I also believe the highly exothermic nature of my layup caused the part to twist ever so slightly during the initial cure. The part itself looked great and held the radiator like a champ though which tells me this project is possible! I am going to start on Mk3 of the cowling soon when work dies down a bit. Here are some pics before I scrapped the part. I used roving to glass in the MDF panel.
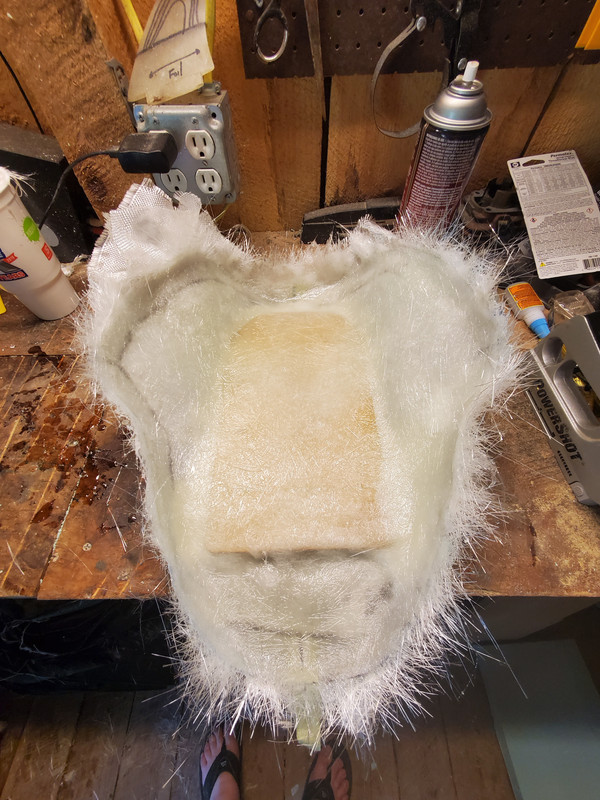    As a pick me up I decided to mount up the bars and new grips to feel a little progress. I am pretty happy with the look. Excuse the messy shed. As a pick me up I decided to mount up the bars and new grips to feel a little progress. I am pretty happy with the look. Excuse the messy shed. 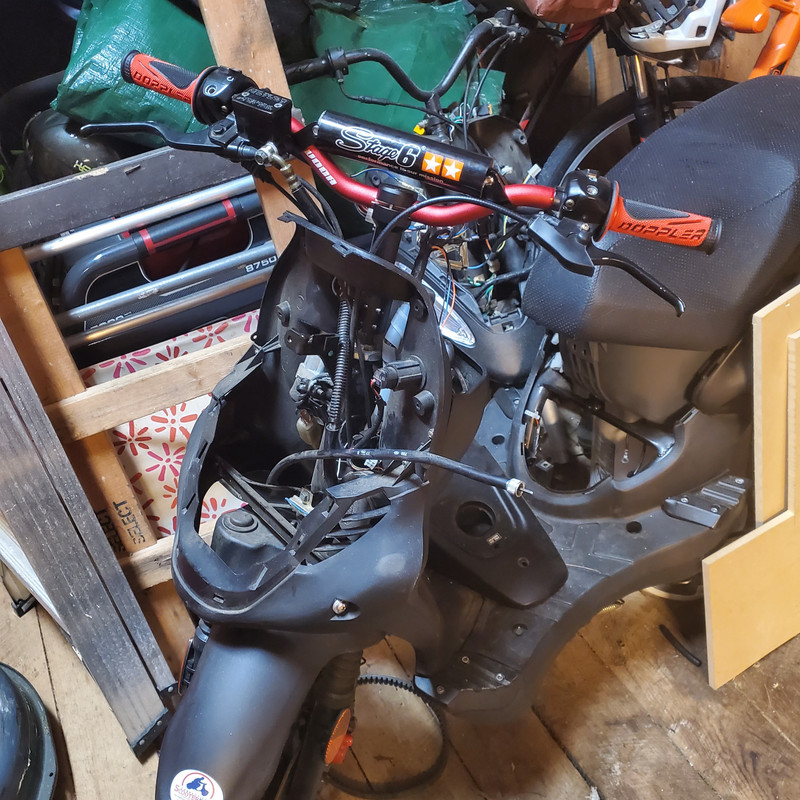 More to come! More to come!
|
|
|
|
Post by hippo008 on Jun 6, 2020 19:39:12 GMT -5
Small update today. I have not had a lot of time after work so I have been doing odds and ends. I assembled the top end today. I purchased new studs and they werent long enough? I purchased them from scootertuning and I assumed they would be of the correct length but boy was I wrong. I ended up installing the original Genuine studs. I tightened each stud to 13ft/lbs and assembled the cylinder. I am very pleased with the quality on the Stage6 Street Race cylinder. Good casting and good machining with clear care taken around the part. Ill be purchasing from them in the future. The studs are still short IMO. They dont extend past the cylinder head nuts and they arent bottomed out within the case. I am not sure if this is par for the course or if my studs are just short and I need extra long ones.
I de-greased the cases with my drill brushes and some purple power. I like the purple power stuff. Safe for you and the environment but still does a great job. I also got to installing the Stage6 long choke cable right above the cellphone charging port. Looks nice and fits very well within the small space.
I was hoping to install the carburetor and Malossi intake adapter but I seemingly do not have the original carburetor bolts to attach the adapter. Any idea on where I could get those as well as some elongated cylinder studs?
I was fooling around with the CVT and noticed something odd on the torque driver. It looks like half of the weld on the driver is cracked. I am not sure how this happened but hey there it is. Ill be looking into a CVT kit for this thing now. I will most likely end up with a NCY kit as I just do not trust Naraku products. I know Brent had a similar issue in his Triton at one point however I believe his totally snapped not just cracked. Any idea on what could cause this? 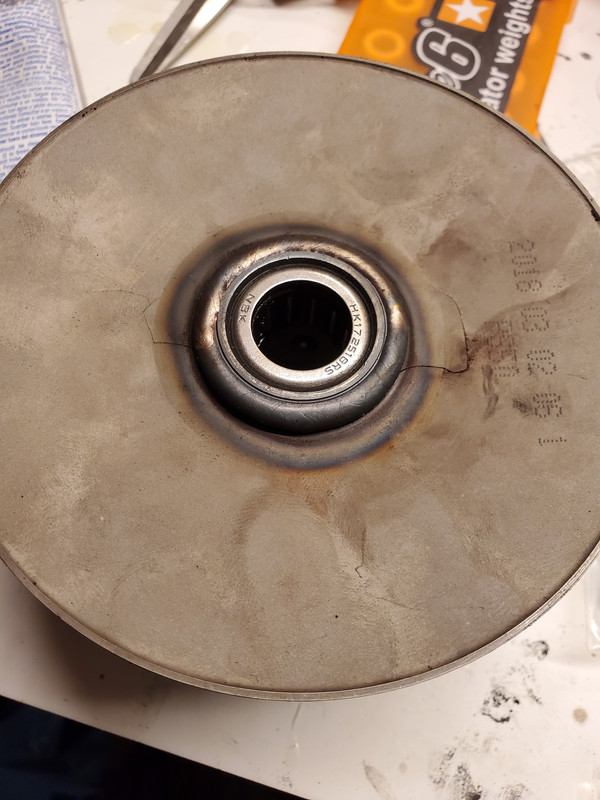 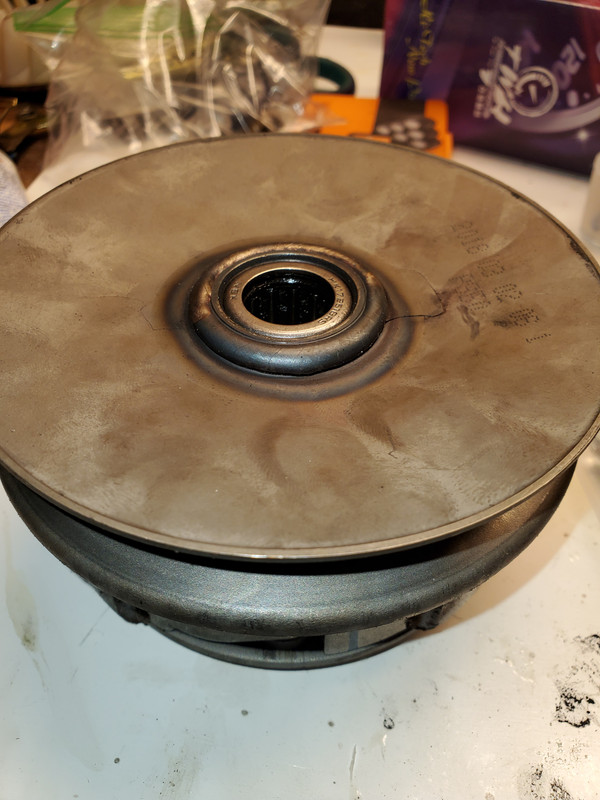
|
|
|
|
Post by hippo008 on Jun 9, 2020 20:59:37 GMT -5
I was lazy this afternoon and made an overview video instead of traditional photos and a write up.
Quick question for the experienced folks here, I am having a hard time guessing jetting. My 21mm PHGB comes with a 92 main and 40 pilot jet. Is this a safe (rich) starting point?
Heres the video.
|
|
|
|
Post by Kenho21 on Jun 9, 2020 21:24:13 GMT -5
I have a Yasuni R with less than 200 miles on it I'll have for sale later this week in case you're interested. Love the build. Looks like you know what you're doing.
|
|


 . I decided to change my approach. Masking tape is a cheap trick to make flat panels when real mold release isnt available or too expensive for a small job. A part with complex curves like this one is not well suited to the quick and dirty methods. Mold release comes in a few different forms. Wax, PVA spray and PVA paint. PVA is fairly expensive and only really good when sprayed onto your mold. I didnt want to use my spray setup on anything but paint. Wax is cheap and readily available but less reliable. You have to be really diligent about wax schedules and coverage. Even one small spot without enough wax will have epoxy adhere to it. Mold release max is essentially just carnauba wax with additives to resist heat. I picked up some 100% carnauba at my local autoparts store for $8 or so. This is the stuff.


