|
|
Post by Zino on Aug 11, 2020 6:28:44 GMT -5
I had you pay attention to where that dimple was in relation to the throttle assembly. It will only fully go back one way . I used the same sewing pin to get out the locator pin that I used to fish on and off the spring . Take alot of pictures to help yourself and the next guy . Move the clip down one notch to richen it up . You will hear it clip into place when it is right My old eyes needed a magnifying glass to verify I was in right clip. Brent has a good write up on carbs I linked so you can see the needle clips and have a resource for your Carb it is a mikuni style. www.49ccscoot.com/faq/carbtune.html |
|
ingram
Scoot Enthusiast
  
Posts: 100
Location: Houston, TX
|
Post by ingram on Aug 11, 2020 8:25:34 GMT -5
Man thank you guys for spending the time helping out on here! Zino, all the detailed info you have been giving is excellent!
|
|
ingram
Scoot Enthusiast
  
Posts: 100
Location: Houston, TX
|
Post by ingram on Aug 11, 2020 9:22:57 GMT -5
|
|
ingram
Scoot Enthusiast
  
Posts: 100
Location: Houston, TX
|
Post by ingram on Aug 11, 2020 9:30:46 GMT -5
Oh and I installed a Malossi RS3 shock I got from Scooterpartsco while I had the cosmetics off. I thought the shock was going to be longer and raise the rear a little but it ended up being the exact same length as stock so oh well. At least now I have the ability to adjust the tension as I see fit. 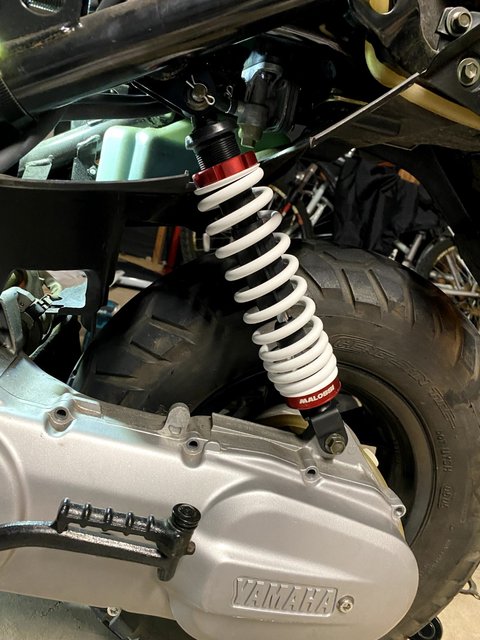 |
|
ingram
Scoot Enthusiast
  
Posts: 100
Location: Houston, TX
|
Post by ingram on Aug 11, 2020 15:04:38 GMT -5
Ok I got the carburetor needle set! 
Removed the spring first and then I pushed out the pin from right to left using a staple actually. 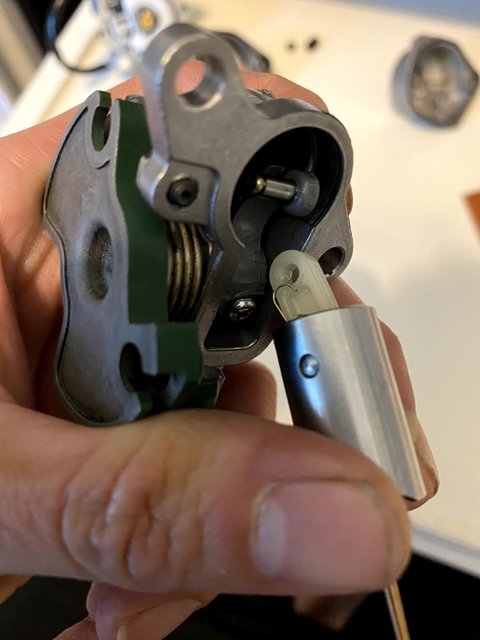
These are the parts in order from top to bottom that I took apart and then reverse order to put it all back together. 
Stock needle position right in the middle. 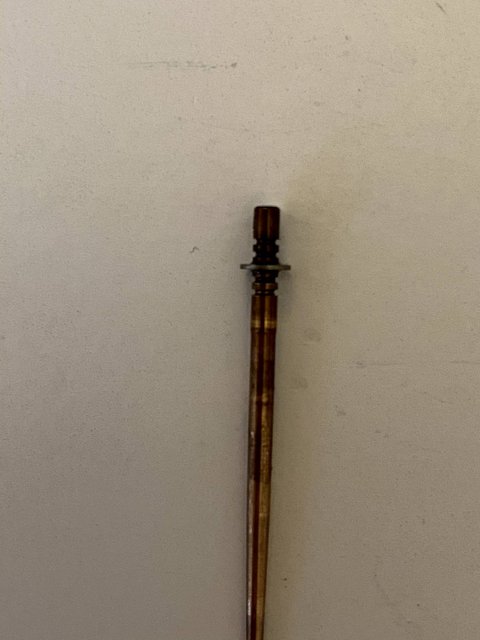
Final needle position one notch down to make it richer. 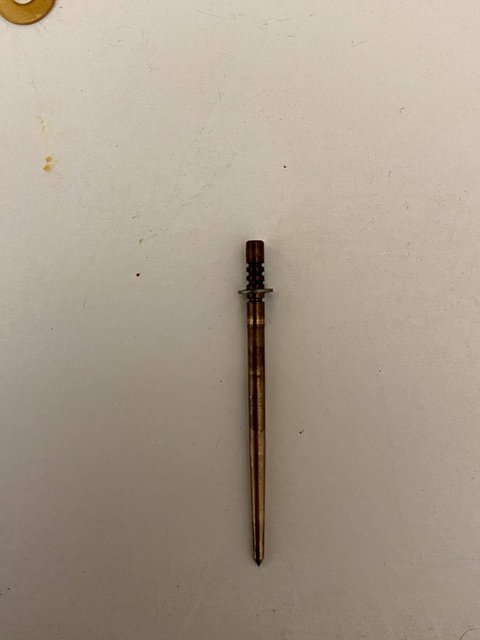 |
|
ingram
Scoot Enthusiast
  
Posts: 100
Location: Houston, TX
|
Post by ingram on Aug 11, 2020 15:41:45 GMT -5
Originally I purchased a "performance" carburetor from scootertronics along with the silent pro pipe and the carb came in first. I inspected it and thought it basically looked the same as the stock carb so I figured I would just keep it as a spare. It actually is this carb from partsforscooters but scootertronics is selling it as a performance carb - www.partsforscooters.com/114-79-Zuma-YW50-CarburetorWell I pulled it out when adjusting the needle on my stock carb and decided to take comparison photos and when measuring the intake it does indeed have about 3mm more intake width than the stock carb so I guess it should provide a little more performance and I might use it after all. "Performance" carb on left and stock carb on right. Anyone know what the inlet right next to the oil injection port is on the "performance" carb that the stock carb doesn't have? 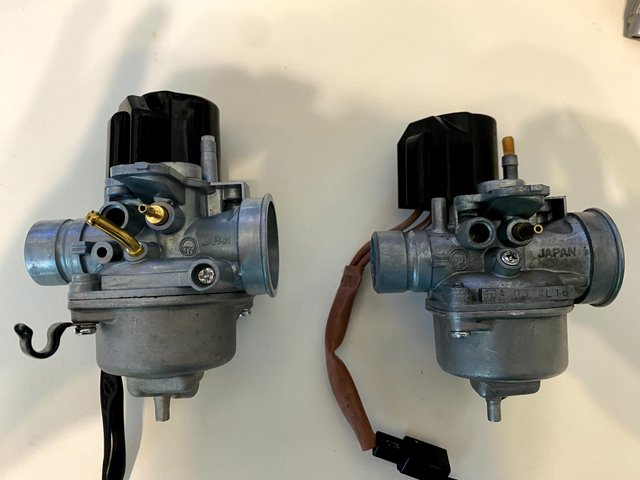 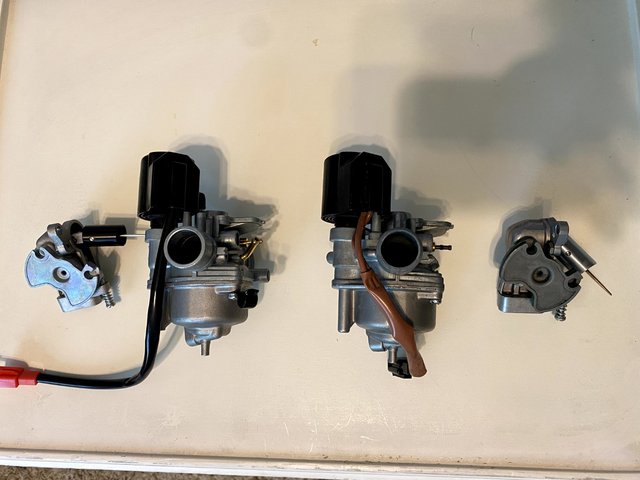 You can see the "performance" carb does have a larger intake (about 3mm wider) than the stock carb. 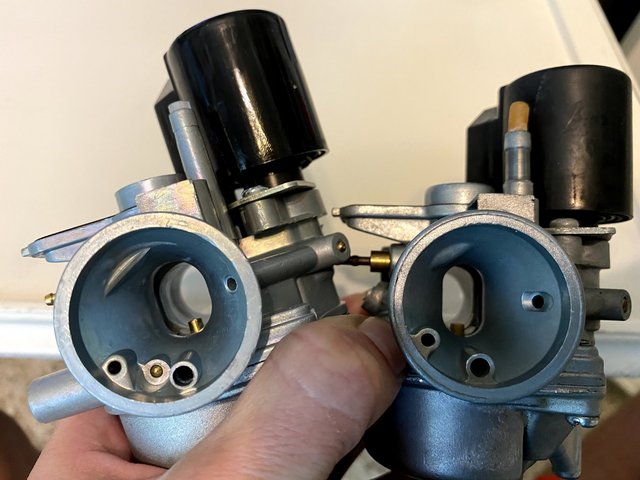 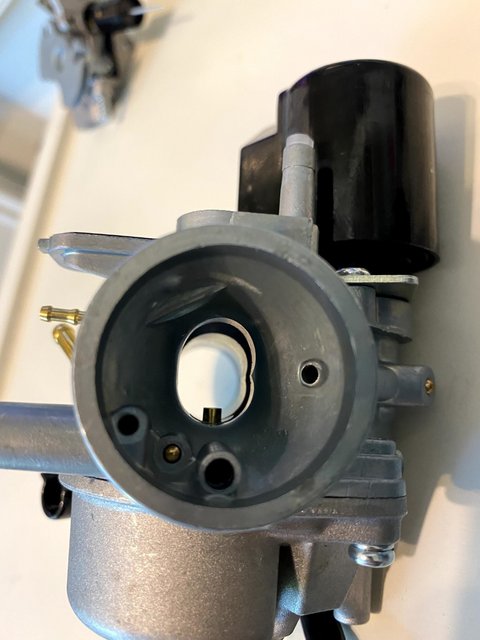 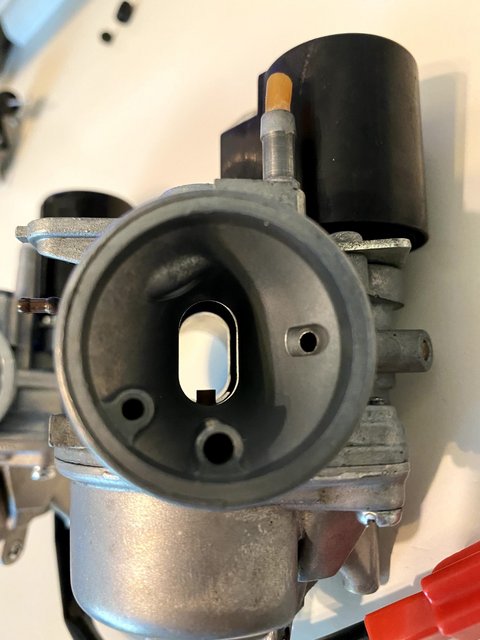 Float bowl area looks the same but the "performance" carb already has a 90 main jet installed. The pilot jet isn't marked so I don't know what size it is but the partsforscooters page lists a size 38 for the idle jet but that is way different than a 44 stock idle jet so I wonder if 38 is actually accurate.  The "performance" carb needle does not have notches for adjustment but comparing the default setting to the one clip rich stock needle it looks to match the one clip rich setting. The "performance" carb needle has a plastic spacer that goes below the clip which stock does not so that is why i included it when comparing the settings. 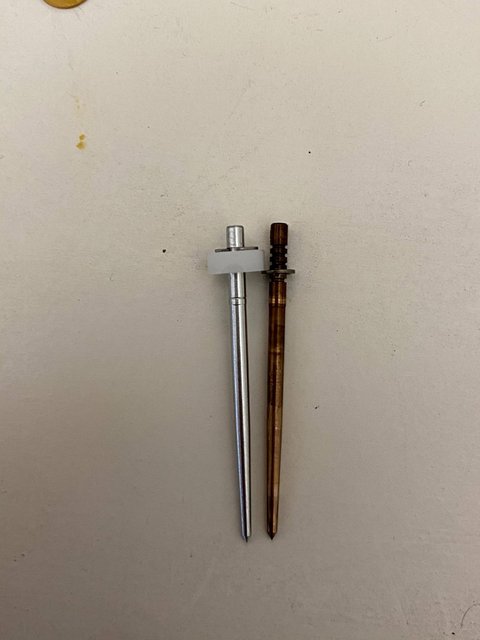 |
|
|
|
Post by aeroxbud on Aug 11, 2020 16:09:04 GMT -5
I have shock envy! Lol😍
|
|
|
|
Post by Zino on Aug 11, 2020 17:00:49 GMT -5
Nice pictures this will help the next guy reset his carb and also your pictures for tear down and reassembly of your engine are top notch. As far as that carb it has mikuni jets the teikie jets for the stock carb are similar size dimension wise but flow different . The pilots I have never tried to fit in the teikie carb I just buy the vino 46 jet when I need richer I run genuine mikuni jets from jetsrus to fill in for when I need to go richer then Teikei jets and to fine tune. I copied this from my build thread . After about a half dozen runs for those that run the stock carb and want to up grade jets . And want to have more option than the yamaha jets . Here is the order Leaner to Richer Teikei =T Mikuni =M T80 ,T82 ,M85,T84 M87.5 ,M90 The T84 to the M90 is what I needed to run when I piped and kitted a build . The M92 had just a small gurgle to it at wide open . If you buy knock off mikuni jets buy a wider range to be on the safe side. here are 2 of the same jet size one is a knockoff mikuni.  |
|
ingram
Scoot Enthusiast
  
Posts: 100
Location: Houston, TX
|
Post by ingram on Aug 11, 2020 17:39:43 GMT -5
Haha thanks I’ll let you know how it rides when I get this thing going again. |
|
ingram
Scoot Enthusiast
  
Posts: 100
Location: Houston, TX
|
Post by ingram on Aug 11, 2020 23:21:11 GMT -5
Oh man I got everything back together tonight and it fired up without much trouble and sounded great so I had to do a quick test run down the street.
It is awesome!
I didn’t ride much but the short distance around the block and back I got it up to 43 and it pulled hard the whole way. The same route a couple days ago I was only hitting about 36 tops.
Idle was great when I first fired it up but during the short ride I had to pull the throttle slightly at the stop signs otherwise the idle was too low so obviously time to adjust and tune.
I just threw the stock carb back on because I didn’t want to mess with the other one I have until I learn more about tuning.
So now I have the Malossi kit installed with stock exhaust and stock carb set at one needle clip rich using a Vino 46 pilot jet and a Mikuni 85 main jet.
|
|
|
|
Post by Zino on Aug 12, 2020 7:09:01 GMT -5
The Malossi kit is a fun upgrade alot of guys stop there and just upjet the stock carb .
Ride a couple of tanks of gas on the stock pipe and really enjoy what you have so far .
This way as you rip around breaking it in
There is a ceiling on rpms and also so you get a idea how snappy it is at all ranges.
You also can verify jetting is close .
When you get out 300-500 miles the kit loosens up and you pick up a mile or 2 of speed .
Now when you get the pipe using the stock pipes snappiness as a baseline .
Get the clutch springs up where they give you that hit the throttle launch .
And then set the variator weights by going progressively lower
Take the one with the best top speed that feels spunkiest .
You might be okay with 6 grams but I would a set at 5.5 and 5 to get you in the right range .
Carb tuning is more critical on the main with the Yasuni R you will be turning more rpms .
Remember to throw a 5-10% bigger jet into the carb and then work your way down .
A jet or 2 lower then where she gurgles is a rough guide .
|
|
ingram
Scoot Enthusiast
  
Posts: 100
Location: Houston, TX
|
Post by ingram on Aug 12, 2020 10:12:16 GMT -5
Definitely will be running this setup for a couple tanks at least. I want to throw on the multivar again now that I have the BBK on and I also purchased the "budget" overrange parts from dynoscooter that I will put on as well. When do I need to re-check torque on the cylinder head bolts? Also, what octane fuel should I be running with the Malossi kit? Currently it just has about 1/4 tank of 87 octane left in the tank and I am ready to put 93 octane if needed. I run 93 on my truck so I was going to fill that up some to get any leftover in the pump hose out and then fill up my scooter. The Yasuni will have to wait until I'm ready for it.  For others the "budget" overrange is discussed here and the links for the parts on dynoscooter are below: |
|
|
|
Post by aeroxbud on Aug 12, 2020 13:45:07 GMT -5
Normally do a couple of heat cycles, then torque the head again.
|
|
|
|
Post by Zino on Aug 12, 2020 17:19:51 GMT -5
I torque it down after my first run.
The malossi squish out of the box does not require premium gas .
I avoid ethanol added gas so I do run mostly premium because I cannot find non ethanol gas .
Swapping just the variator is a minor change and easy enough to tune You can keep the stock belt .
When you add the overrange rear you will need the bigger belt you might have to adjust the variator weights
|
|
ingram
Scoot Enthusiast
  
Posts: 100
Location: Houston, TX
|
Post by ingram on Aug 14, 2020 21:39:17 GMT -5
ok guys I ran into an issue. My stock clutch bell was visibly wobbling slightly so I bought a fancy replacement one but it doesn’t allow enough threads to screw on the bell holding nut. I tried to put the nut on anyway and it stripped before I hit 29ft lbs of torque so now I need a new nut to put everything back together again. New stage 6 clutch bell 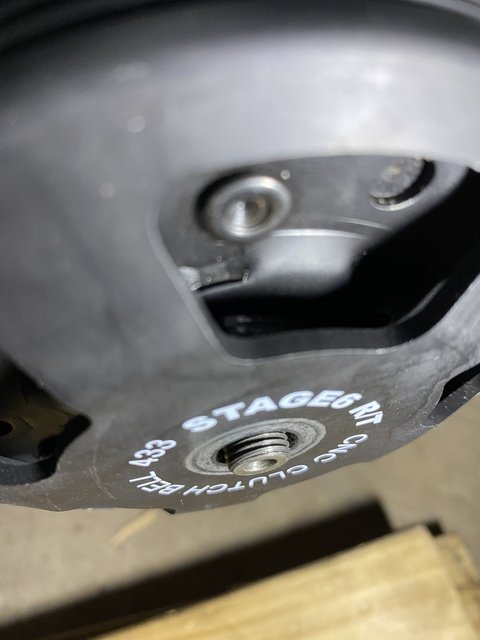 Stock clutch bell 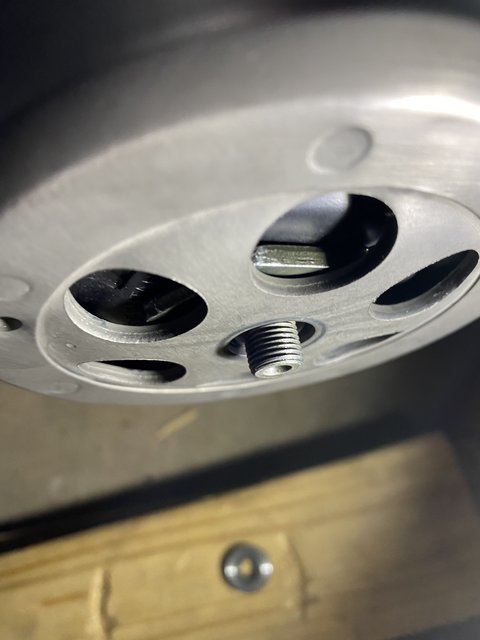 |
|