|
|
Post by oldgeek on Aug 18, 2020 23:14:10 GMT -5
The new belt is wrong, so just use the stock belt, its new anyway. Remove the ring at the front from the variator boss, it is a restrictor so dont use it.
I could be wrong about this, but I think the shim behind the ramp plate should be moved to the front and used only if needed.
Please be certain the variator nut is correctly tightened upon reassembly and that the splines are completely engaged, you may have to move the belt out of the way so it does not hold the variator apart as you are tightening it up.
You got a creampuff scoot there!
|
|
|
|
Post by laydback on Aug 19, 2020 6:11:40 GMT -5
This is a closer shot of the stock belt in the rear drive pulley and the belt is wider than the limiter spacer it's riding on on the crank pulley.   |
|
|
|
Post by aeroxbud on Aug 19, 2020 6:23:36 GMT -5
Can't you squeeze the clutch and rear pulley together, so the belt sits deeper. Otherwise the drive face will not be tight when you tighten the nut up.
Remove that plastic restriction from the drive boss like oldgeek said.
|
|
|
|
Post by laydback on Aug 19, 2020 6:41:21 GMT -5
Can't you squeeze the clutch and rear pulley together, so the belt sits deeper. Otherwise the drive face will not be tight when you tighten the nut up. Remove that plastic restriction from the drive boss like oldgeek said. I can definitely get the belt deeper in the rear pulley. That's why I posted so many pics to make sure that I wasn't making any mistakes in reassembly...how deep do I want to seat in there? Thanks! |
|
|
|
Post by Zino on Aug 19, 2020 8:07:59 GMT -5
Take out that thick shim (wedding band )between the variator fan and movable plate it is a speed limiter to keep the plates from closing all the way.
With a sharpie mark the front variator and the clutch from the inner to outer edge .
I have the same set up on my zuma malossi varator ,top performance torque driver
On the back pulley, I have about 3mm left on the back pulley .
Removing that thick wedding band may fix most of that travel by letting the front pulley let the belt get in a lower gear .
As Far as shimming I do have a shim behind the variator next to the starter clutch and 1 next to the variator fan.
Between the 2 of them together it is less than 1 1/2 mm .
|
|
|
|
Post by laydback on Aug 19, 2020 18:30:51 GMT -5
Take out that thick shim (wedding band )between the variator fan and movable plate it is a speed limiter to keep the plates from closing all the way. With a sharpie mark the front variator and the clutch from the inner to outer edge . I have the same set up on my zuma malossi varator ,top performance torque driver On the back pulley, I have about 3mm left on the back pulley . Removing that thick wedding band may fix most of that travel by letting the front pulley let the belt get in a lower gear . As Far as shimming I do have a shim behind the variator next to the starter clutch and 1 next to the variator fan. Between the 2 of them together it is less than 1 1/2 mm . The Malossi literature says that the small 1 I used is 2mm. I still have the stock 1 thats even smaller that I can use here. Is this where you were saying? That's where it was.  |
|
|
|
Post by laydback on Aug 19, 2020 20:27:15 GMT -5
The Malossi came with reeds😊🙃   |
|
|
|
Post by laydback on Aug 19, 2020 20:46:00 GMT -5
|
|
|
|
Post by laydback on Aug 19, 2020 21:37:43 GMT -5
|
|
|
|
Post by Zino on Aug 19, 2020 22:04:44 GMT -5
Take out that thick shim (wedding band )between the variator fan and movable plate it is a speed limiter to keep the plates from closing all the way. With a sharpie mark the front variator and the clutch from the inner to outer edge . I have the same set up on my zuma malossi varator ,top performance torque driver On the back pulley, I have about 3mm left on the back pulley . Removing that thick wedding band may fix most of that travel by letting the front pulley let the belt get in a lower gear . As Far as shimming I do have a shim behind the variator next to the starter clutch and 1 next to the variator fan. Between the 2 of them together it is less than 1 1/2 mm . The Malossi literature says that the small 1 I used is 2mm. I still have the stock 1 thats even smaller that I can use here. Is this where you were saying? That's where it was. Yes That is where to put the adjustment shim , I have shim kits so I am able to dial it in closer |
|
|
|
Post by laydback on Aug 20, 2020 7:36:00 GMT -5
The Malossi literature says that the small 1 I used is 2mm. I still have the stock 1 thats even smaller that I can use here. Is this where you were saying? That's where it was. Yes That is where to put the adjustment shim , I have shim kits so I am able to dial it in closer What exactly is being adjusted/shimmed? The nut barely flushed up with the end of the crankshaft threads. I ended up removing the thin stock one because there was barely any spline for the kickstarter sprocket. It’s easy enough to put it on if need be, but it really didn’t “look” necessary. There’s no play and the nut is barely flush. |
|
|
|
Post by Zino on Aug 20, 2020 7:50:25 GMT -5
It is important that that nut is close to flush .
With the front side shim above You are shimming for belt width and to reduce belt slap .
You want the belt on the front pulley to hit the drive boss
And start in the Lowest gear possible and still be able to hit the highest gear.
I am running a polini belt that is made for the bws 100 cc.
The drive boss is the metal tube that goes over the crankshaft your using a shim to extend the drive boss.
Back side shim
We use a shim on the back of the variator to space out so the belt does not rub on the case .
When you discontinue the electric start you need more shimming .
|
|
|
|
Post by Zino on Aug 20, 2020 8:05:33 GMT -5
Good pictures of your tear down it will really help the next guy see it is not that intimidating if you go slow .
A couple steps that I am a stickler on .
Put one circlip in on your bench or kitchen table the other one you can flop around the floor and install.
I like using copper spray on the base gasket .
A slight chamfer on all the edges of the cylinder ports to knock off the sharp edge So I dont catch a ring .
I hand polish the exhaust port with sand paper from 80 grit down to 400 grit to a mirror like finish for extra flow out of cylinder .
The rest of ports I left rough so the cooling mixture tumbles .
After first warm up ride I take off the shrouds and retorque the head bolts I often find they need a quarter turn after the gaskets settle in .
|
|
|
|
Post by laydback on Aug 20, 2020 8:32:07 GMT -5
Thanks for the explanation on the shimming. I had studied up on the circlip install and after getting them off, definitely knew I was preinstalling the first one on the build! I bought hondabond but will look into the copper spray. My cylinder port edges felt for sure smooth (to my surprise) but I bought mini files, so I may as well do a bit of chamfering. On your exhaust port is it all hand work or are you using any tools (Dremel)? Any pics? Mirror like finish, hmmmm, sounds bad@$$!!!
My past forum experience is where I learned to share with great detail/lots of pics. I have lots of stuff out on camper, golf cart, pocket bike, and other forums.
Thanks again!
|
|
|
|
Post by Zino on Aug 20, 2020 8:40:15 GMT -5
I prefer doing by hand sanding it takes a hour or so . Just use WD 40 as you sand That way I dont spend to much time in one area with a dremel . here is a one picture finished up 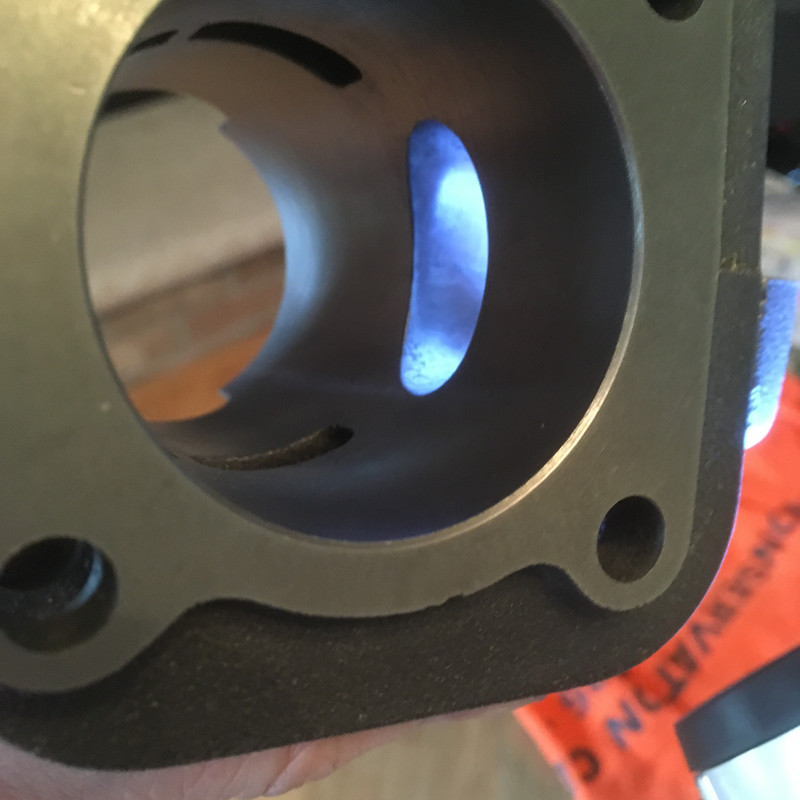
This one is almost finished 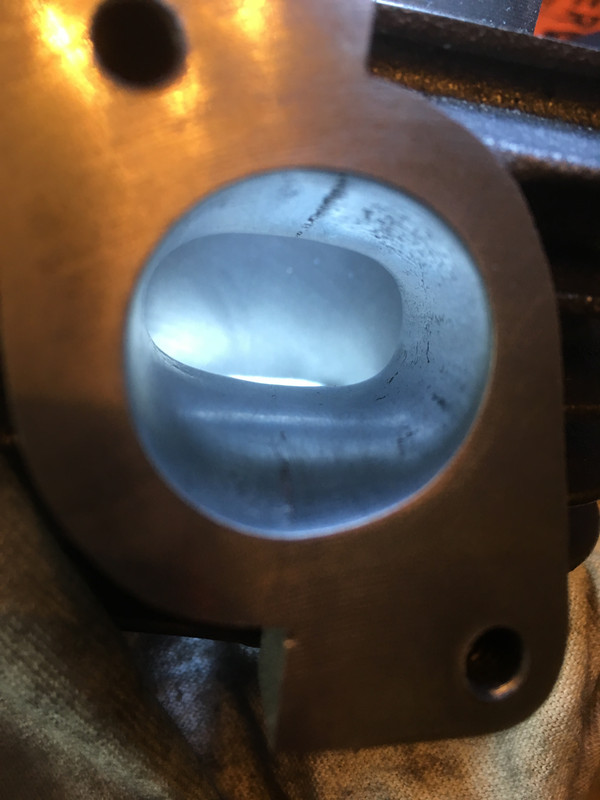 |
|